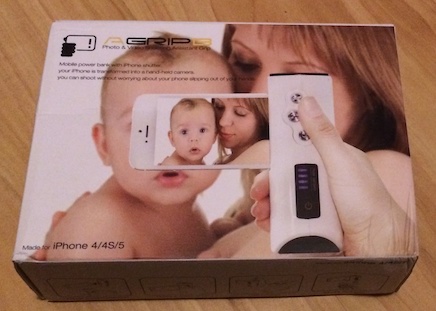
The A Grip B Photo and Video Shooting Assistant Grip is a long name and not very catchy but it conveys pretty well what the product does. It provides a proper hand grip for holding your iPhone single handedly as well as offering physical buttons for all photo tasks except zooming and focusing. In addition it has a standard tripod mount built into the bottom and a booster battery pack built in. It set me back just under $50USD and in the month that I’ve been using it, I’ve grown quite fond of it.
The device grips onto an iPhone 4/4S/5/5S but may not fit the 5C nor the older 2G/3G/3GS. I use my iPhone to take ALL of my photos and videos particularly of the kids around the house, the yard, at sports, parties, the beach and bushwalking to name just a few. That said I’m always concerned about the weight of my devices because I’m always lugging them with me. For example: I use a MacBook Air, and a Retina iPad Mini (Had the iPad Air for 3 months and switched to the Mini as it was lighter)
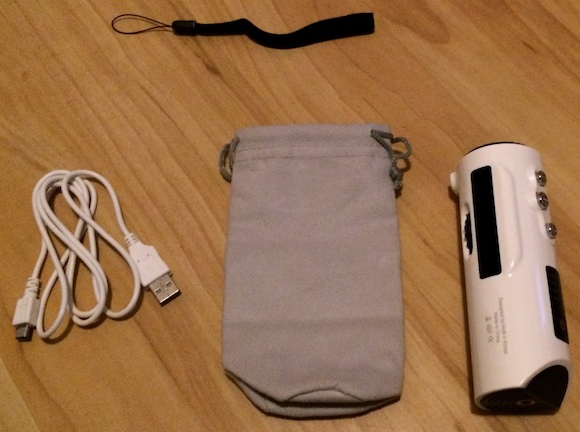
The box doesn’t mention it supports the 5S but then since it’s essentially a hardware clone (in terms of external dimensions) of the 5 it’s a pretty safe assumption it will work okay. In the box is also a black wrist-strap which is a pain to thread through and a protective sock that it a tight fit but works as advertised.
As I’ve discussed previously I believe the iPhone is the best camera I’ve ever owned but it has several problems. Holding the phone steady is difficult with one hand, taking family shots isn’t possible without someone else to operate the phone, video drains the battery quickly and it’s not possible to remotely trigger a photo out of the box.
From my previous compact camera I had a tripod but no way to mount my iPhone to it. Family shots you can get away with a timer but a remote shutter gives much more control and you can take as many shots as you like without bumping the camera (great for low light and reducing motion blur). Taking an hour of video will flatten my battery which is a big problem if I need to make or receive phone calls.
In short the AtoB fits all of my criteria save one: the remote shutter. I’m fixing that with a different device I’ll discuss in another review.
Charging
The AtoB doesn’t come with a charging cable for your device so you’ll need to BYO 30-pin or Lightning USB cable. I’m sure the reason for this was to keep costs down and to avoid Apple licensing costs/issues; not to mention they would need to provide both a 30-pin Dock and Lightning cable since they don’t know what phone the purchaser would have.
If you’re connecting the standard charging cable that came with your iPhone, the cable is way too long and droops down getting caught up on everything if you’re trying to charge while you’re using the grip
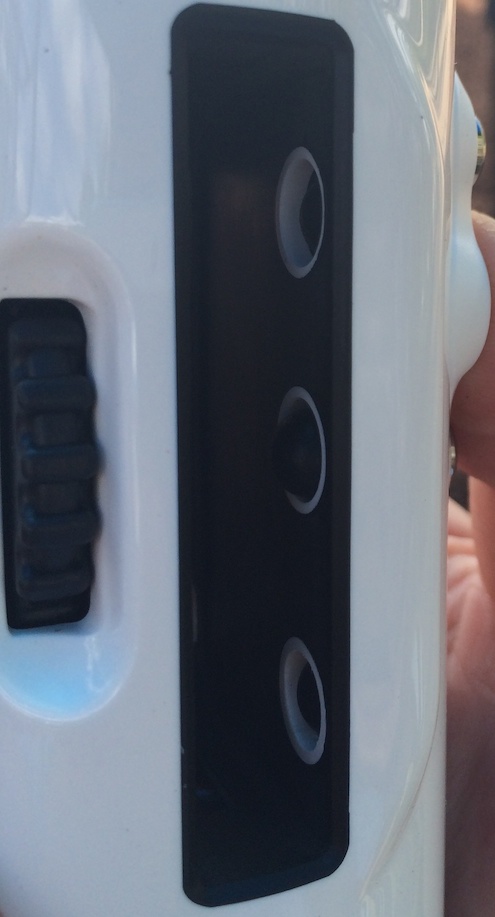
It does come with its own USB to micro-USB charging cable for replenishing the built in battery through a connector on the top of the unit.
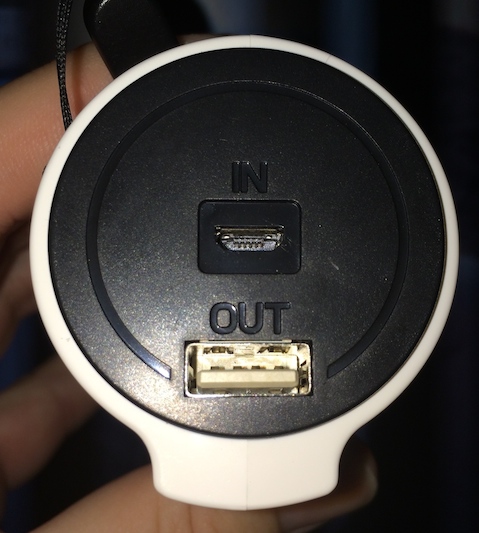
There is no visual indication that you are charging an iPhone however when you first connect the USB connector from your BYO cable the front indicators light briefly. The power button on the front is slightly misleading insofar as the unit doesn’t actually turn on and doesn’t require power to work in any way. The button when pressed lights up one to four blue LEDs that indicate approximate onboard battery charge level.
Gripping
Attaching the iPhone requires spinning a large black dial depressed into the front fact of the hand grip clockwise to loosen and anti-clockwise to tighten. You need to ensure the dial is loose enough when you insert your iPhone and that the small metal tab at the bottom of the device touches the band of your iPhone.
You must be in the photos app before you insert the phone into the grip which can be a pain but since the device isn’t integrated via Bluetooth or direct connection there’s no real option there. It relies on the Apple photo app having it’s three control buttons on the same physical location on the screen. In future iOS updates this may change, making the grip buttons useless unless an app is used that emulates their original physical location on the screen.
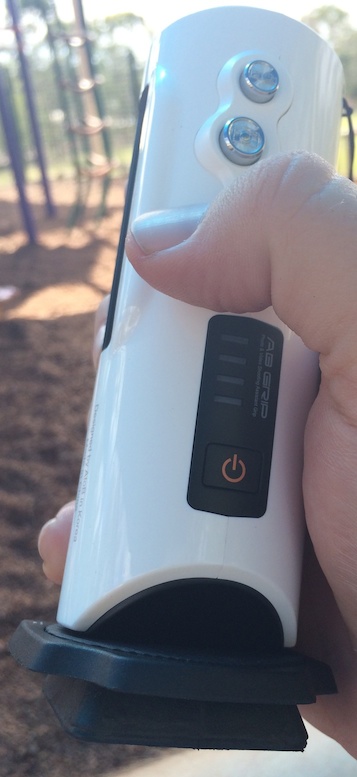
What it does do is make holding the iPhone with one hand effortless. There is practically no shake and in my video tests it was quite clear that the grip made a huge difference. That said with prolonged use, if you have sweaty palms like I do and it’s summer, the grip can get a bit slippery to hold. That said if you’re holding a bare iPhone with hands that sweaty it’s not going to be much of an improvement. After using it for an hour or more I found myself becoming a bit more casual with how tightly I was holding it whereas with the bare iPhone I was always extra careful. Something to consider.
The Buttons

The grip push buttons seem like a great idea and in many respects were necessary since the design of the grip covers the area where the touch buttons appear on the screen. The simple issue with the buttons was that they didn’t always work. Maybe once out of every 20 times the buttons wouldn’t work1. It wasn’t a fault with the button but rather a reality of my hand grip. The conductive strip along the front edge didn’t always make contact with the palm-side of my fingers hence the buttons didn’t conduct through to my body.
Why Not A Case?
Why not a battery case with a tripod thread? I found a few of these (strongly considered the SnapGrip but I’d done the whole case on/case off thing in the past and it destroyed the cases. If I was to go the case route then it had to be a case I would leave on all the time and I wanted to keep the weight down for the majority of the phones usage.
Whilst it sounds like I take lots of photos and videos on my iPhone the truth is that relative to the number of hours for which I am not it’s really not a large proportion hence any solution had to be quick connect and disconnect again for short term but regular usage. This cases were off the list.
Battery Pack Charging and Boosting
The other option is to use the external battery booster continuously connected to the iPhone from the moment you begin shooting. When this is done, the iPhone charge is held at a constant 100% until the AtoB battery pack goes flat.
The lower three indicator lights light up constantly during charging, with the 4th blinking when it was charging. To determine the level of charge it was necessary to unplug the unit and then press the power button to see how many LEDs were lit which was a little annoying but not the end of the world.
So far as charging rates are concerned the AtoB boosts the iPhone at a slightly lesser rate (0.1%/min less) than the wall charger but this is to be expected and in practice is too small a difference to be of any real concern.
Physical Marking

In the long term there will undoubtedly be marks left on the metal band and in the back and front of the phone from the metal tag, clamp and buttons respectively. That said it shouldn’t damage the phone significantly, but the people that want to keep their iPhones in pristine condition might not like this attachment. Then again such people will probably keep their iPhone in a highly protective case that it never comes out of.
Wrist Strap
The first time I used it I dutifully placed my wrist in the strap just as I have a thousand times with my compact camera. The problem is that the strap itself is A) difficult to get my wrist through and B) when my wrist was in the strap it was difficult to put my hand low enough on the grip to comfortably reach all three physical buttons. In short, the strap was too short and too small - at least for my hands. I don’t consider that I have large hands although I can easily span an octave and can make 9 keys in a pinch on a full size keyboard but for anyone with hands larger than that, you needn’t bother with the strap. Since then I’ve considered removing the strap since it doesn’t help, it only hinders me. You mileage will vary I’m sure.
Maximum Recording
The tests below show up a rather obvious point: extending the battery to take more video is all well and good provided the iPhone can store it all. I have the 64Gb model for this (and a few other) reason(s) however the most popular model is 16Gb (48%) with the 16Gb (35%) not far behind2 which severely restricts the amount of video that can be stored in any one sitting.
The following table estimates the maximum recording times by 1080p and 720p for each iPhone 5S model capacity3 based solely on my own testing. Your mileage may vary. For my most common scenario even adding the AtoB and starting with a fully empty iPhone I would not have enough battery to record up to the maximum amount, however this is not a real world scenario.
| Memory Size | 1080p @ 30fps | 720p @ 120fps |
|---|---|---|
| 16Gb | 104 min | 65 min |
| 32Gb | 207 min | 134 min |
| 64Gb | 441 min | 273 min |
Testing Results
All tests used an iPhone 5S and it’s Apple-supplied charger 4 and cable. The first three tests relate to charging the iPhone and AtoB from dead conditions to fully charged conditions including the iPhone charging rates.
A) Recharging iPhone from AtoB from dead to 100%
1hr 56min (116min) ( 0.9%/min) 5
B) Recharging the AtoB from dead to fully charged
3hrs 18min (198min) 6
C) Recharging iPhone from wall charger from dead to 100%
1hr 38min (98min) (1%/min)
The remaining tests check how much video can be recorded with the iPhone on its own and with the AtoB boosting while video is being taken.
D) Fully charged iPhone no grip
Total Video Time Recorded: 2hrs 34min (154min) (0.65%/min) Space used on device: 20GB (0.13 Gb/min)
E) Fully charged iPhone using grip to boost battery when in use
Total Video Time Recorded: 5hrs 54min (354min) (0.3%/min) Space used on device: 45GB (0.13 Gb/min)
F) Comparative 720p 120fps test
Total Video Time Recorded: 45 min used 34% charge ( 0.75%/min) 7 9.5Gb. (0.21 Gb/min)
The issues:
- The physical push buttons don’t always work
- Long term marking of the iPhone is inevitable
- It won’t work with a case on
- Slippery when sweaty
- The wrist strap is poorly positioned
Conclusions
Not everyone has the same needs but for those serious about getting more from their iPhone photography and video capabilities devices like the AtoB represent an attractive accessory. For me it’s been great and for the price it’s not going to break the bank I’d say its worth it.
-
The buttons themselves push down perfectly fine with a nice smooth although plastic-cheap feeling however their touches on the screen did not register. ↩︎
-
Survey undertaken for the iPhone 5 upgrade back in September of 2012 by Wells Fargo Securities. Real breakdown numbers are not available from Apple to the best of my knowledge. It’s fair to say that the vast majority of iPhones are sold in equal numbers in the 16Gb and 32Gb models with the 64Gb being less than a fifth of the overall sales. ↩︎
-
The 16Gb iPhone model has only 13.6Gb of usable space. The 32Gb iPhone model has only 28.2Gb of usable space. The 64Gb iPhone Model has only 57.4Gb of usable space. ↩︎
-
Charger Model A1444, 5V 1A supplied with iPhone 5S. All video recorded at 1080p 30fps unless otherwise noted.The flash LED was forced off for all video recording tests. The video taken was of a background that was static usually of a single colour which will likely lead to large compression values. Tests were performed between 22 Celcius and 28 Celcius. Humidity was not controlled or measured. All tests were continuous without breaks and it is noted that cumulative heat will drive subtly different battery performance/longevity compared to intermittent operation ↩︎
-
At the completion of the charging cycle one Blue LED remained on the AtoB ↩︎
-
The exact time the AtoB was fully charged was difficult to determine exactly as I had to periodically disconnect the charging cable and test it - a process by which the charging was interrupted. It’s possible this value was out by up to -20mins. Additionally no percentage is provided as it’s capacity varies from the 5S and thus no direct comparisons are useful. ↩︎
-
This assumes a linear drain on the battery reporting by the iPhone. Tests have shown that it remains mostly linear during the 50-100% range. ↩︎