Previously I’ve written about my Bitcoin/Lightning Node and more recently about setting up my RaspiBlitz.
It’s been five months since then. I’ve learned a lot and frankly the number of websites that actually provide information on how to manage your Lightning Node have a lot of assumed knowledge. So I’d like to share how I manage my node lately with a few things I learned along the way that will hopefully make things easier for others to avoid the mistakes I made.
The latest version of RaspiBlitz incorporates the lovely Lightning Terminal which incorporates Loop, Pool and Faraday into a simple web interface. So we’ll need that installed before we go further. Log into your Raspiblitz via Terminal and when you’re in the web interface, enable both of the below if you haven’t already:
- (SERVICES) LIT (loop, pool, faraday)
- (SERVICES) RTL Web interface
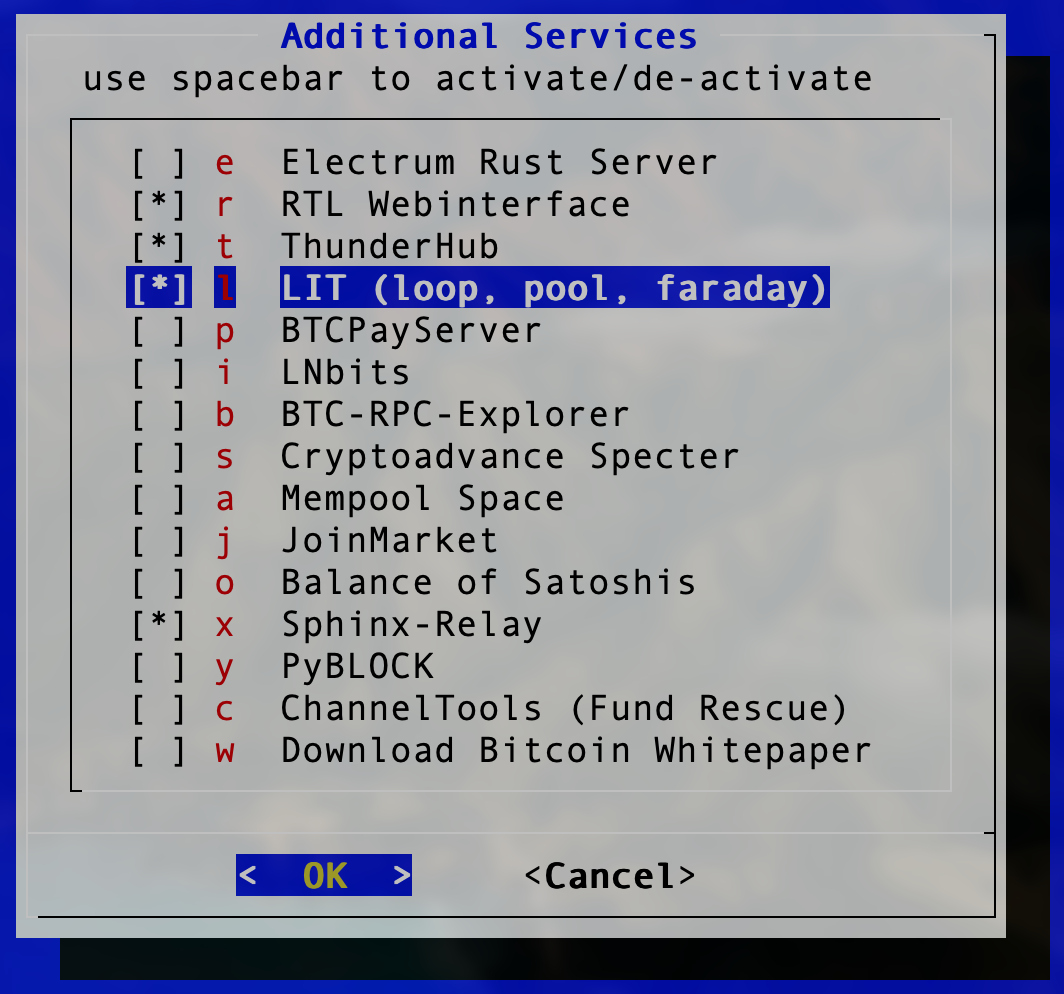 Install LIT from the Additional Services Menu
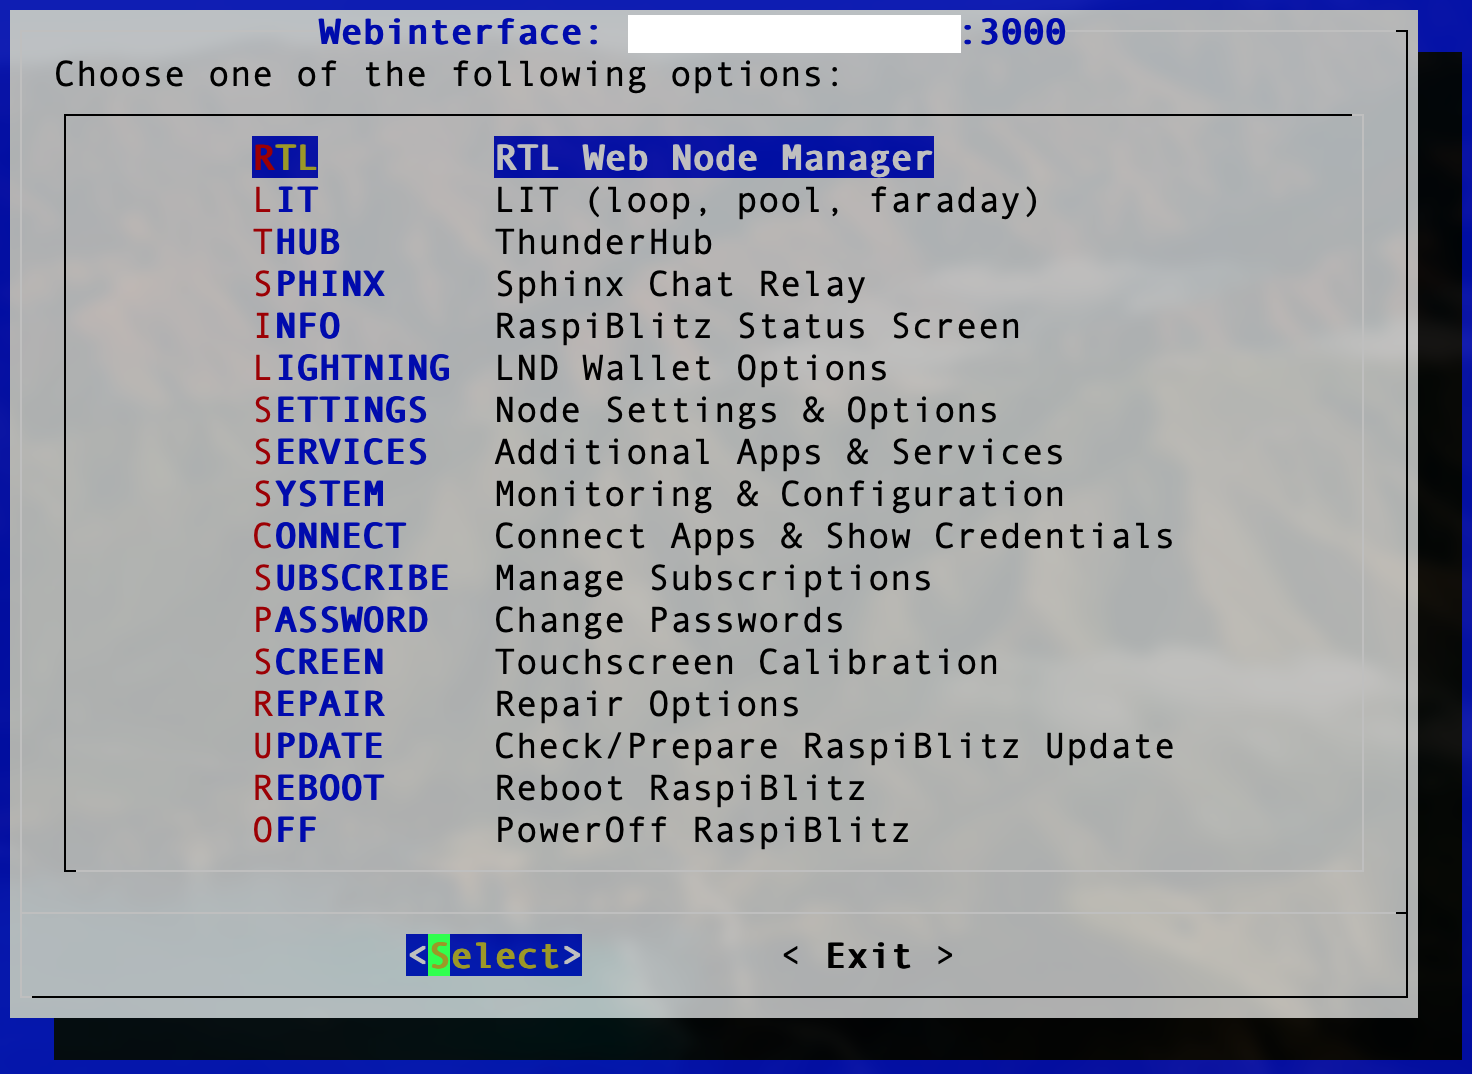 You should see LIT in the User Interface Main Menu Now
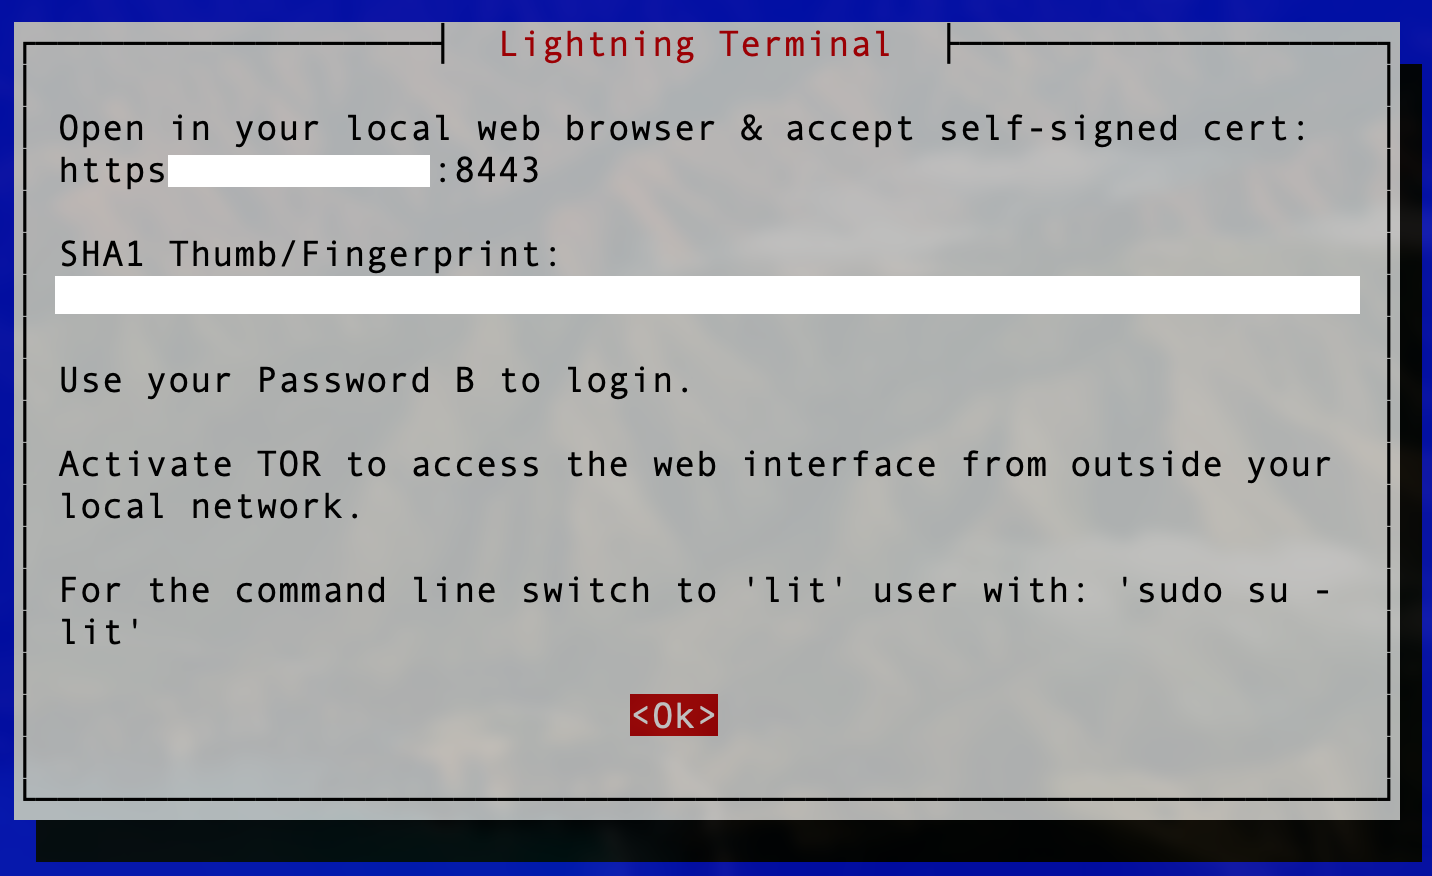 Lightning Terminal note the port and your IP Address to Log in
Initial Funding
When you start adding funds to your node, if you don’t live in the USA, you’re not big on options. In the USA, you can use Strike but otherwise there aren’t any direct Fiat–>Lightning services I’ve found to date. That’s okay but to set up your node you’ll need to buy BitCoin and face the on-chain transaction fee.
The best option I have found is MoonPay and you simply select BTC, (you can change the Default Currency through the Hamburger menu on the top-right if you like), select the value in your Fiat Currency of choice or BitCoin amount, then after you continue, enter your BitCoin/Lightning Node’s BitCoin address (NOT the Lightning Address please…) and then your EMail. Following the verification EMail, enter your payment details and it will process the transaction and your BitCoin shows up.
Previously I’ve used apps that use MoonPay integration like BlueWallet and Breez, but that’s a problem because if you do buy BitCoin, it ends up on your mobile device’s BitCoin Wallet and it’s stuck. You need to then do another on-chain transaction which will cost you more in fees. By using MoonPay directly to your own node’s BitCoin address, you only have to deal with that once.
FYI: A $50 AUD transaction cost me $8.12 AUD in fees, though this is essentially flat so doubling that to $100 AUD and you’re up for $8.14 AUD in fees therefore if you’re setting up a node for the first time, be aware it makes sense to add as much as you can manage to get started. More about that later.
Another FYI: MoonPay has a KYC (Know Your Customer) cut-off value and this is the equivalent of $118USD (0.00271BTC at time of publishing) which requires Identification before they’ll process the transaction. If you’re concerned about this, then you can make multiple transactions but that’ll obviously cost more in fees. And about those fees, you don’t get the option to set the fee in sats/vB…more about that next.
Timing Is Everything
BitCoin isn’t like banking whereby transaction fees are fixed (mind you, Fiat transaction fees are often buried so deep you’ll never see them but believe me they’re there…) as in they don’t vary over time. (Insert joke about Fiat bank fees always going up over time, but I digress…)
BitCoin is totally different. Simplistically your fees are based on transaction backlog for the current block against the current mining fee. The more demand, the bigger backlog, the higher the fees. This is a simplification, but the details are quite dry but feel free to read up if you care.
Fees are typically referred to in sats/vB (Satoshis per virtual-Byte) which you can read about here and the differences between bytes and virtual bytes here. It’s a SegWit thing. Anyhow, the lower the number, the less your fees will be for your on-chain transaction.
The mechanism for setting your level of impatience for any on-chain transaction is the Fee in sats/vB. If you’re impatient then set a really high number, if you’re in no hurry then set a low number. To get an idea of the historical and current view of the fees, have a look at Mempool.space.
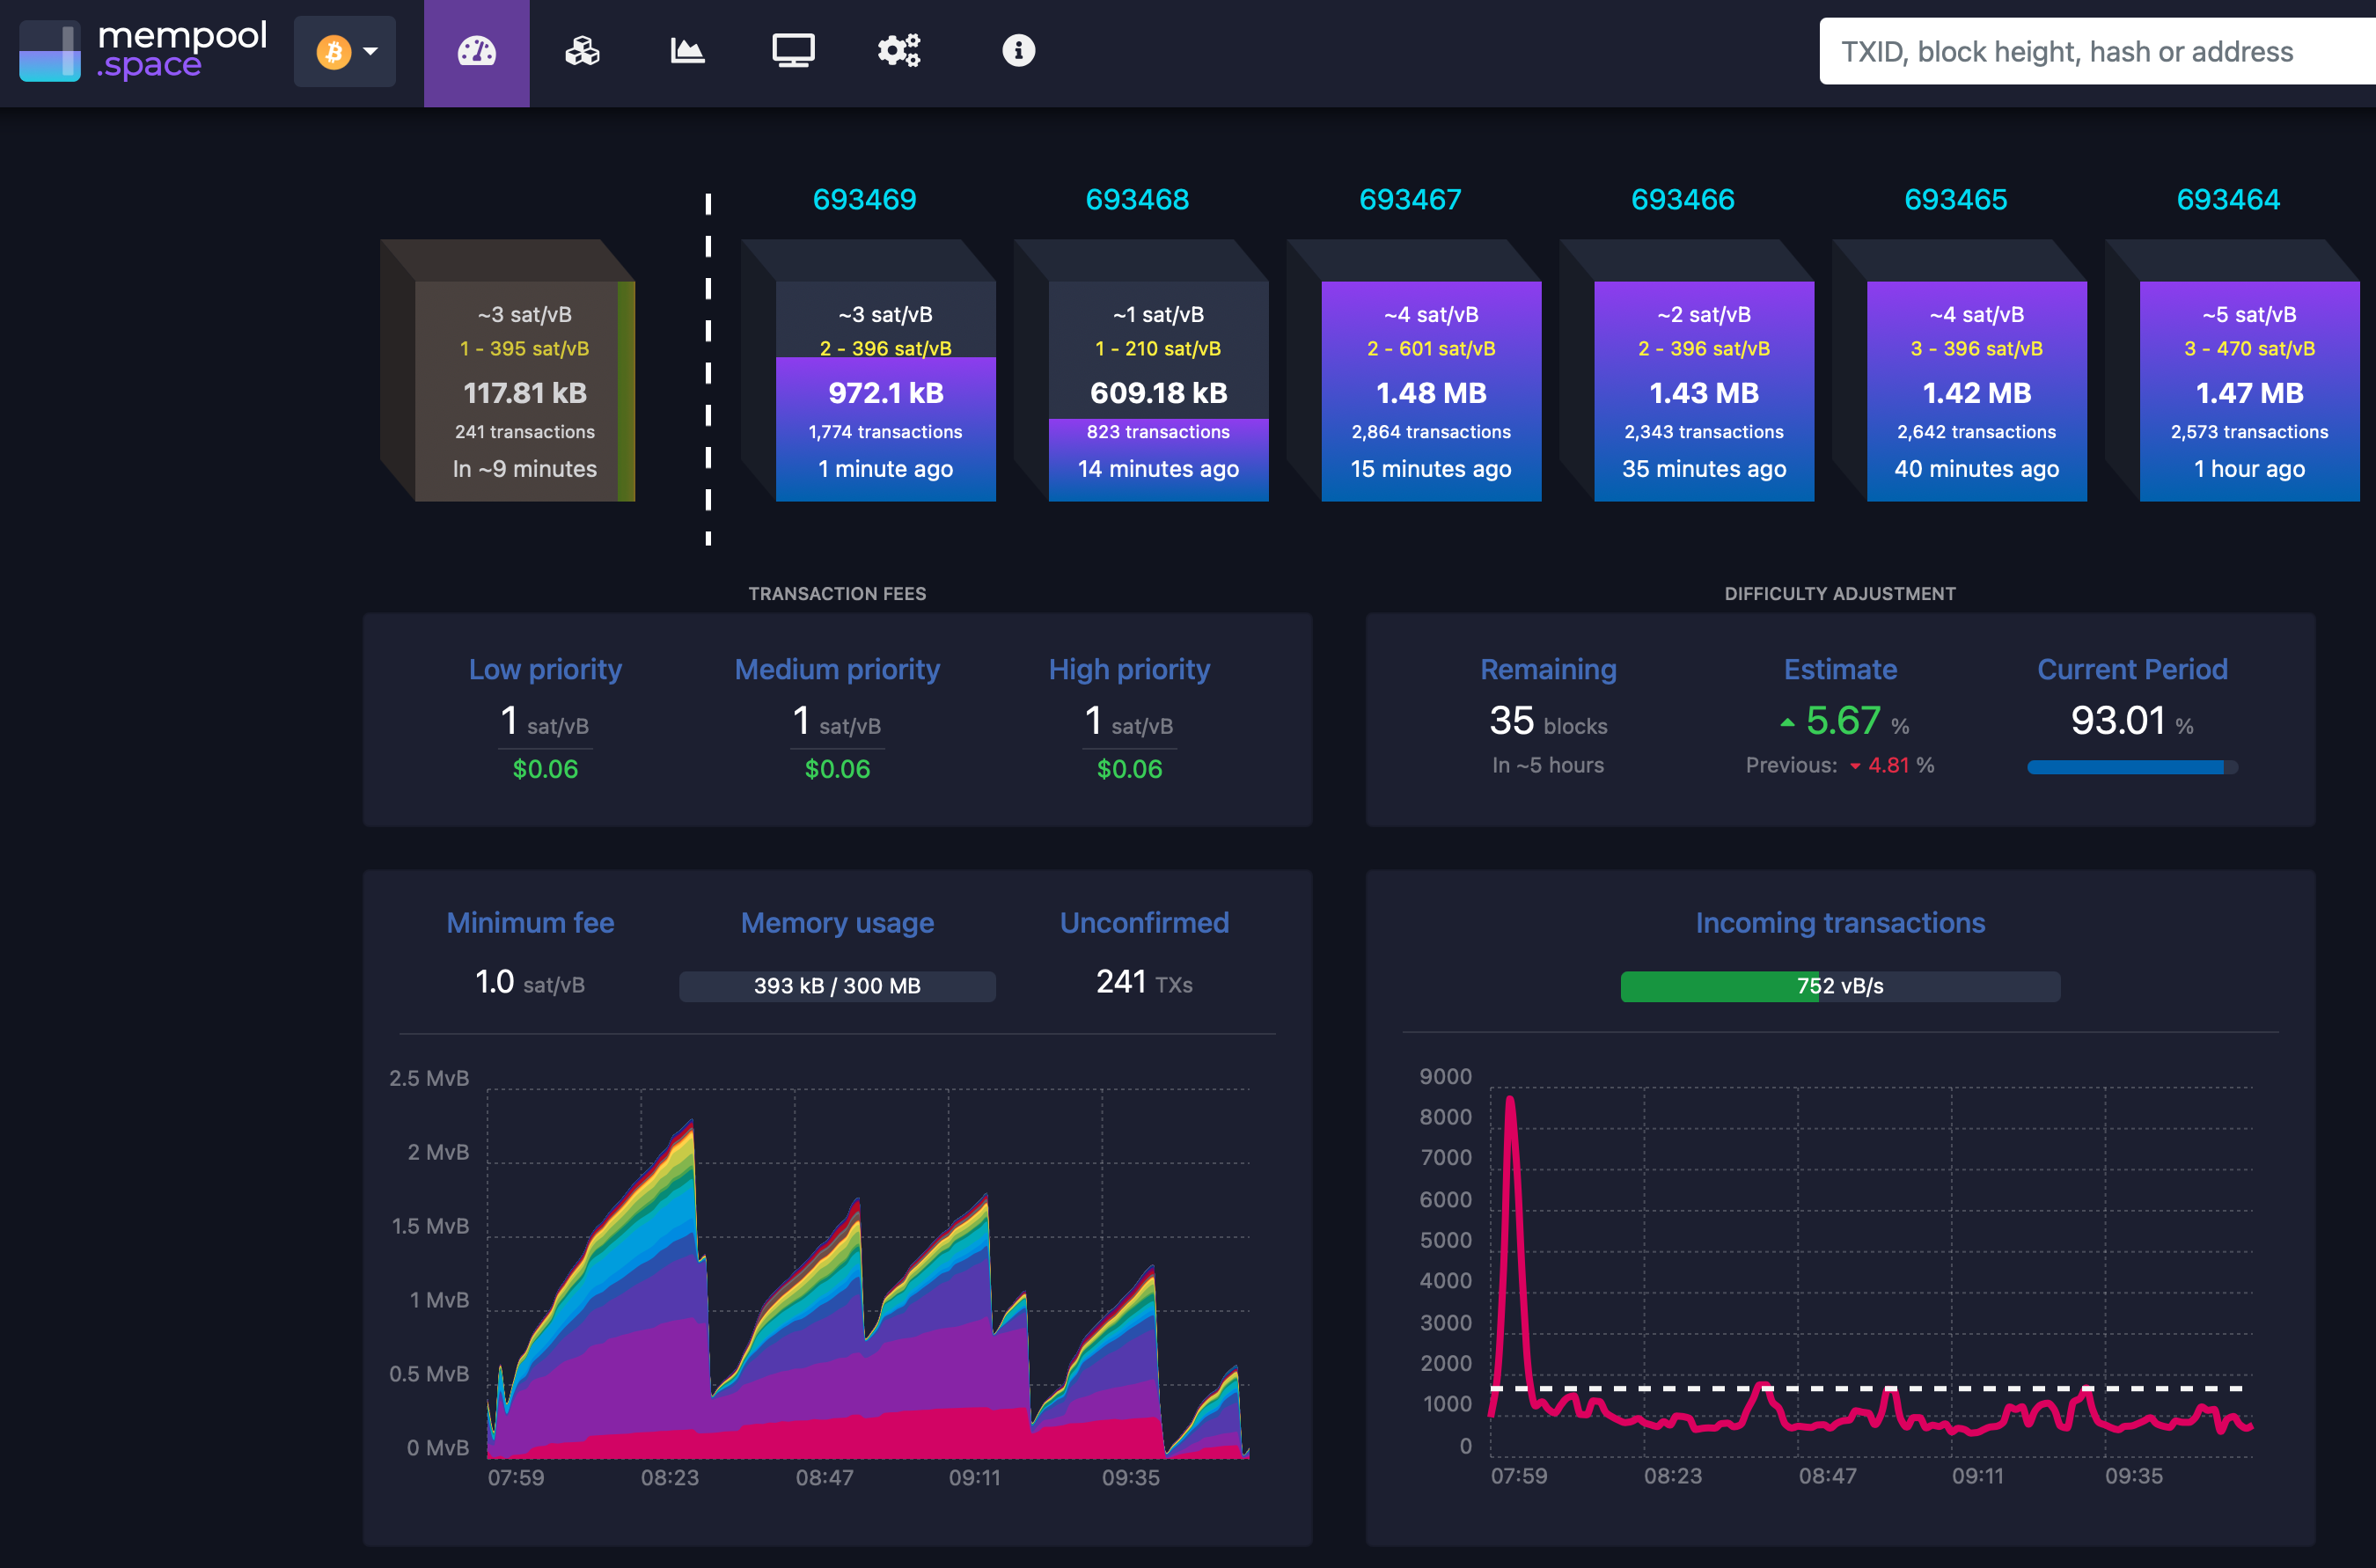 MemPool Shows Lots of Information About Block Transactions at a High Level
Fees are quite low at the moment so for transactions where you can set this, 1 sat/vB will see your transaction processed quite cheaply and very quickly - most likely even in the current block (10 minutes).
So Now You Have BitCoin
How does it feel now you have BitCoin on your Node? For me? Me’h - it’s a thing maybe I’m just used to it now, but you are effectively your own bank at this point. If you want to avoid losing money in on-chain fees then you need to stick to lightning transactions wherever you can where the fees are measured usually between 1 and 10 sats. BitCoin on-chain transactions all incur fees and using Lightning requires a Channel - multiple actually. To open a channel you need an on-chain transaction. To close a channel, you need an on-chain transaction. While that channel is open though, there are not on-chain fees at all.
To review - there are five transaction types people get charged on-chain fees for:
- Converting from Fiat to BitCoin
- Converting from BitCoin to Fiat
- Opening a Lightning Channel
- Closing a Lightning Channel
- A BitCoin transaction (i.e. purchasing something with BitCoin)
To be clear, these are all technically just a BitCoin on-chain transaction - it’s just the end purpose that I’m referring to.
Choose The Node, Choose The Channel Limits
There are two factors to consider when opening a channel to a new node: how well connected is it; and can I afford the minimum channel size?
A good resource to find the best connected node is 1ML but there’s a huge amount of information so finding the most relevant information isn’t always easy. In short, the best place to start is to think about where you’re intending to send sats to or to receive them from, simply because the more direct the connection to the node, the less fees and the more likely the transaction will succeed.
For incoming sats, in the world of podcasting, LNPay, Breez and Sphinx.
For outgoing sats, I personally use BitRefill to buy gift cards as a method to convert to Fiat from time to time. Another example of this is Fold.
However there’s an issue. There’s no indication on 1ML and no other way to easily determine the minimum channel size unless you attempt to open a channel with that node first. You first need enough sats on-chain for you to initiate an open channel request, and then if that throws an error it will tell you the minimum channel size. Thus you can only really determine this by interrogating, and poking the node. (Sigh)
For two I mentioned above, I’ve done the work for you:
- BitRefill = 0.1 BTC (10M sats)
- Fold = 0.05 BTC (5M sats)
COUGH
Well…I have 300k or so to play with, so I guess not.
The next best option is a node that’s connected to the one you want, which you can trace through 1ML if you have the patience.
Other factors to consider when choosing a node to open a channel with:
- Age: The longer the node has been around, the more likely it is to be around in future
- Availability: The more available it is the better. It’s annoying when sats are stuck in a channel with a node that’s offline and you can’t access them.
- TOR: In the IP Address space if you see an Onion address, then TOR accessibility might be useful if you are privacy concerned.
If it’s the first channel you open, your best bet is to pick a big, well connected node as most of these are connected to one of the Lightning Loop Nodes (More on that later).
Channel Size
Since we want to minimise our on-chain fees, we want to try this “Lightning” thing everyone is raving about, so we open a channel. Since we don’t want to be endlessly opening and closing channels it’s best to open the biggest channel that you can afford. In order to use Loop In and Out, you must have at least 250k sats (about $105USD at time of writing) and if you want to quickly open channels and build a node with a lot of Inbound liquidity I’d recommend starting with at least 300k or more, as we know we’ll lose some as we Loop Out and open new channels. (More on that later)
The other issue with smaller channels is that they get clogged easily. When you want to spend any sats and all you have are a bunch of small channels, if the amount you’re trying to spend requires a little bit from each channel then all it takes is for one channel to fail and the transaction will fail overall. The routing and logic continues to improve but larger channels make spending and receiving sats so much easier and keeping your node balance above 250k sats lets you use Loop.
I made the mistake early on of not investing enough when opening channels so I had lots of small channels. It was a huge pain when I was trying to move around even moderate amounts (100k sats).
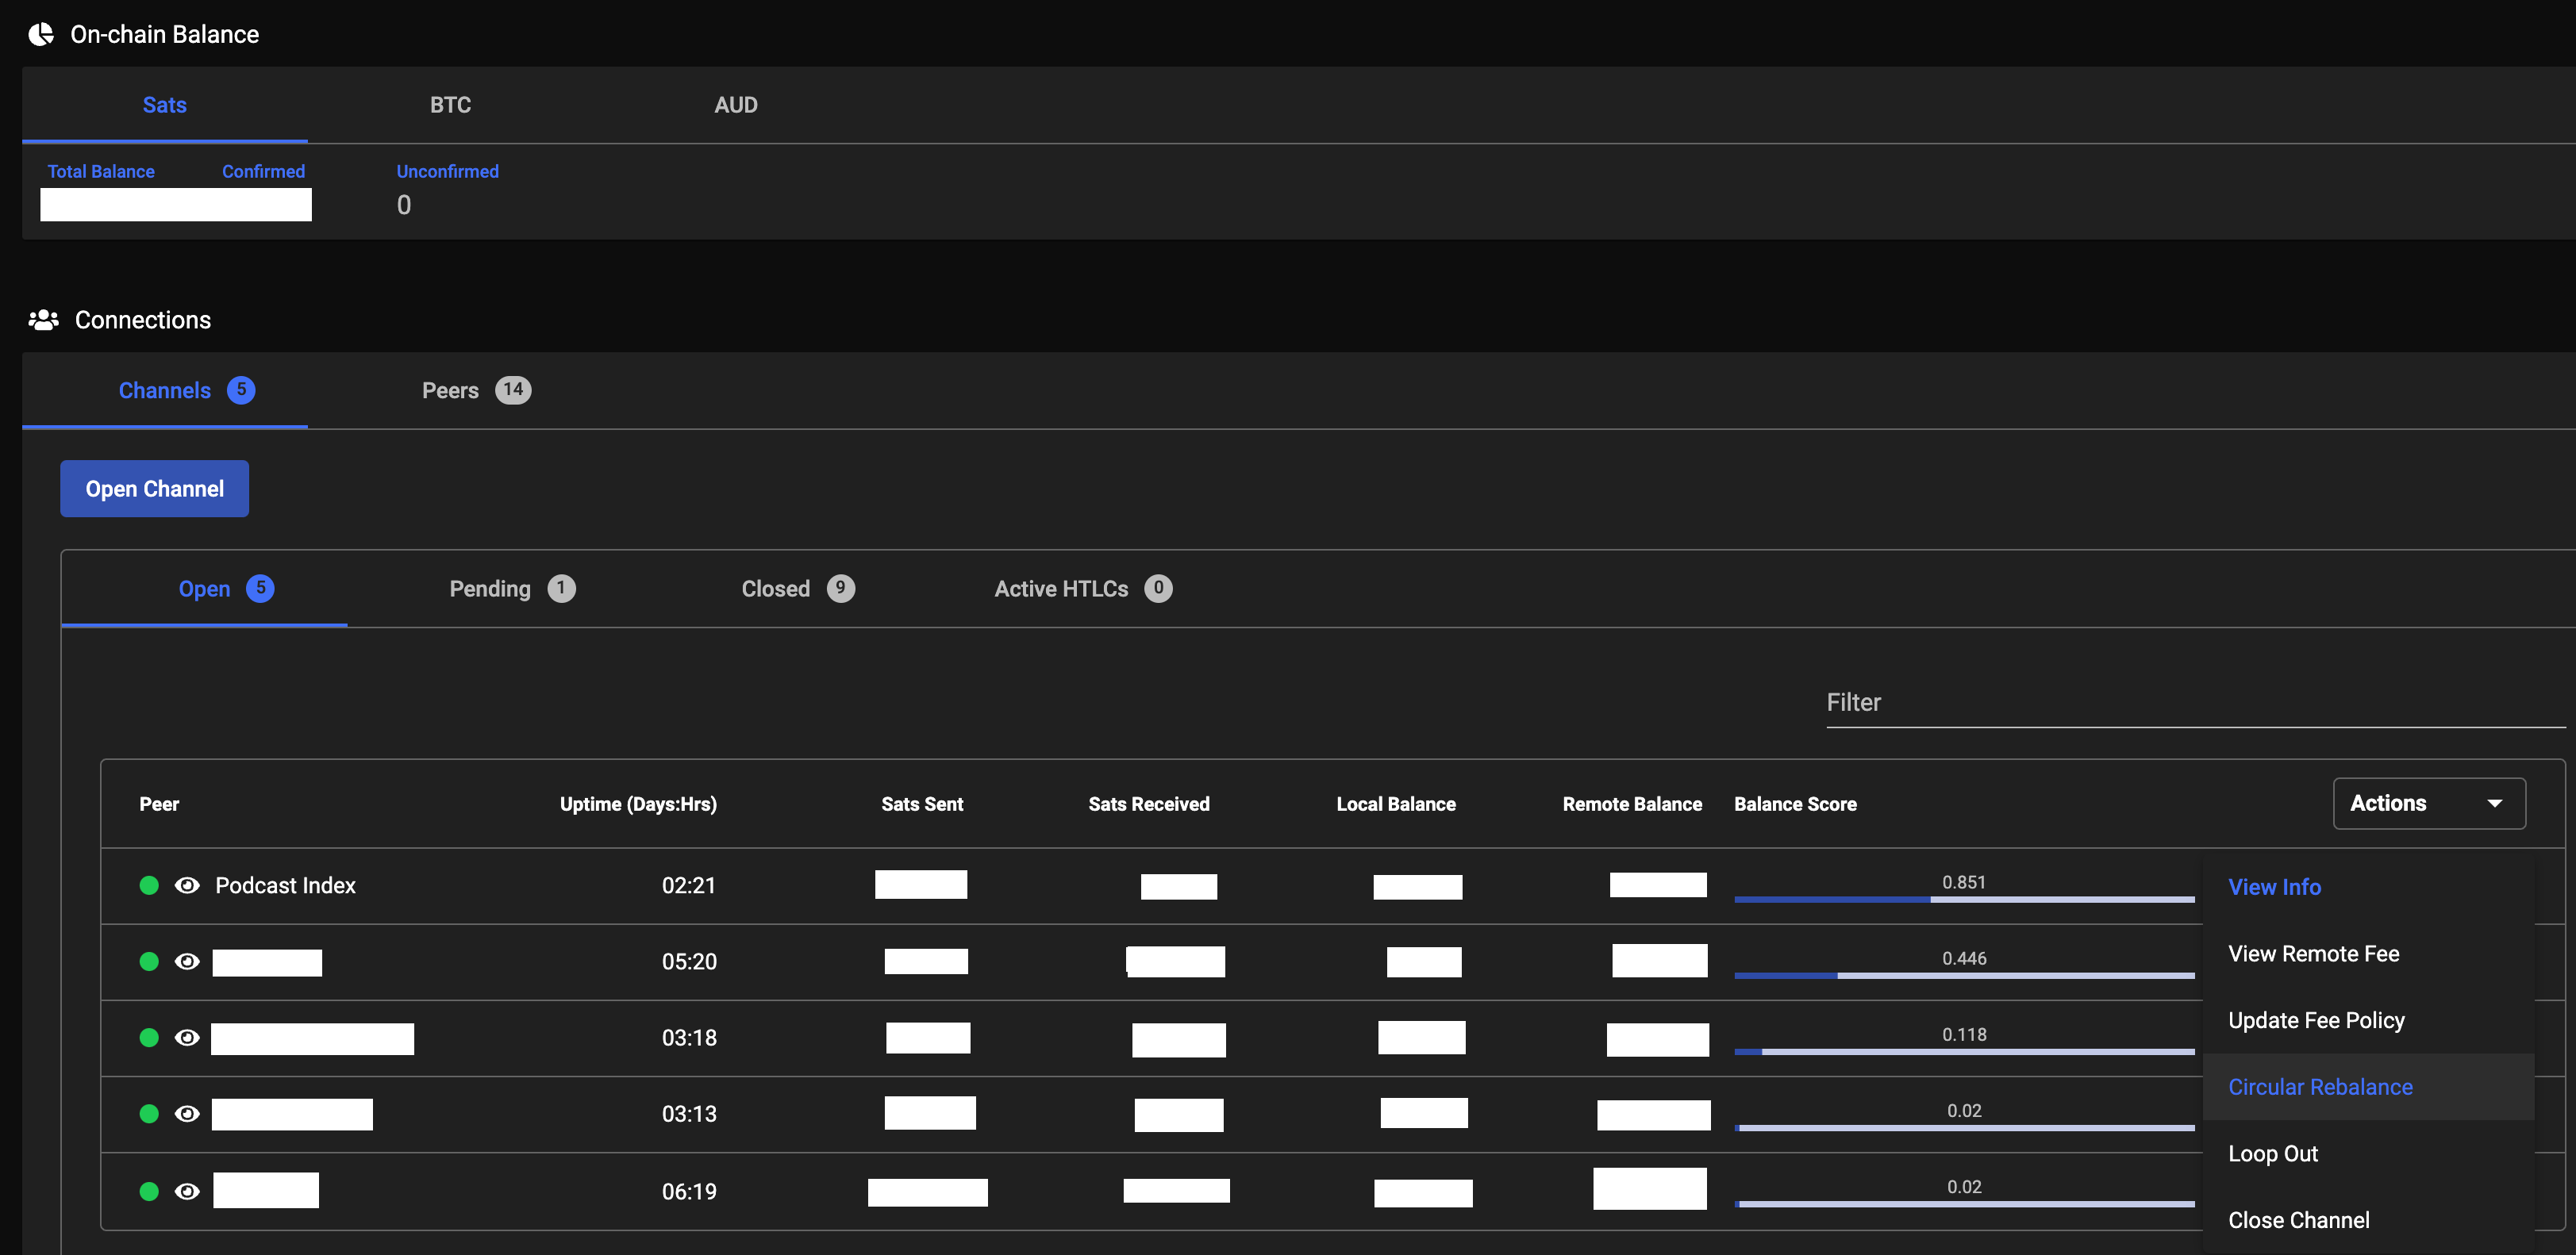
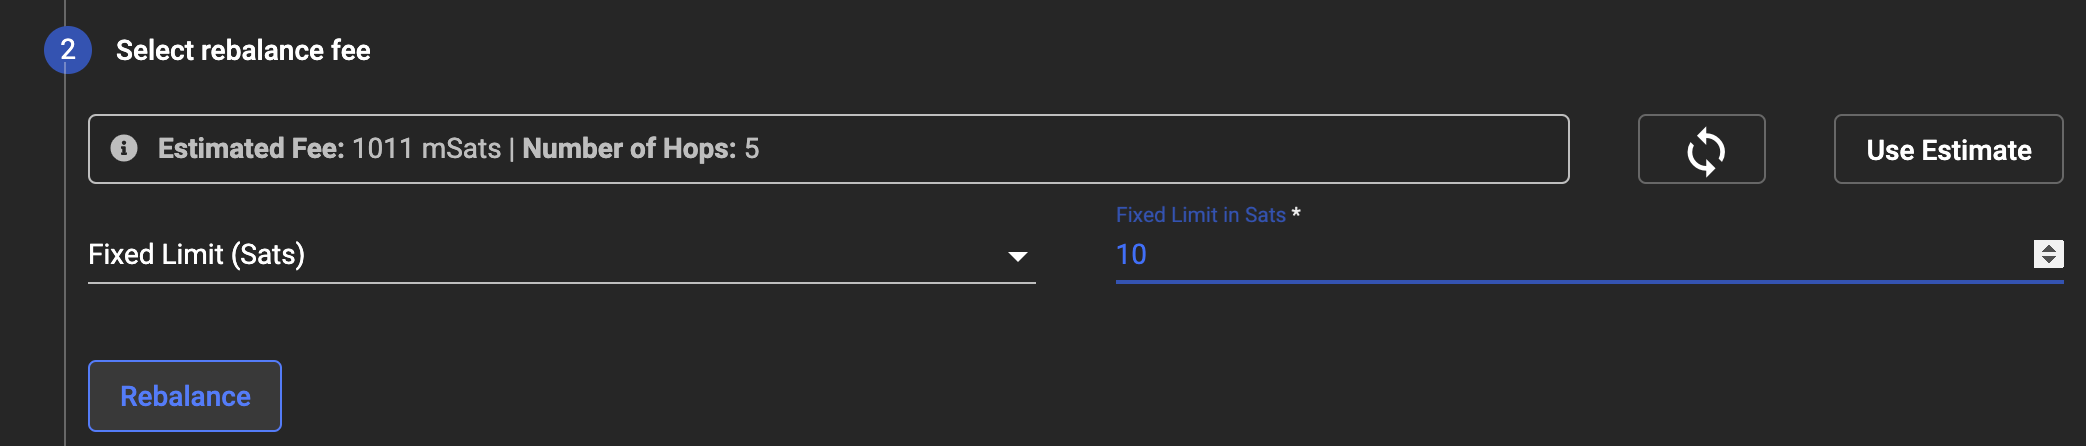
Circular Rebalance
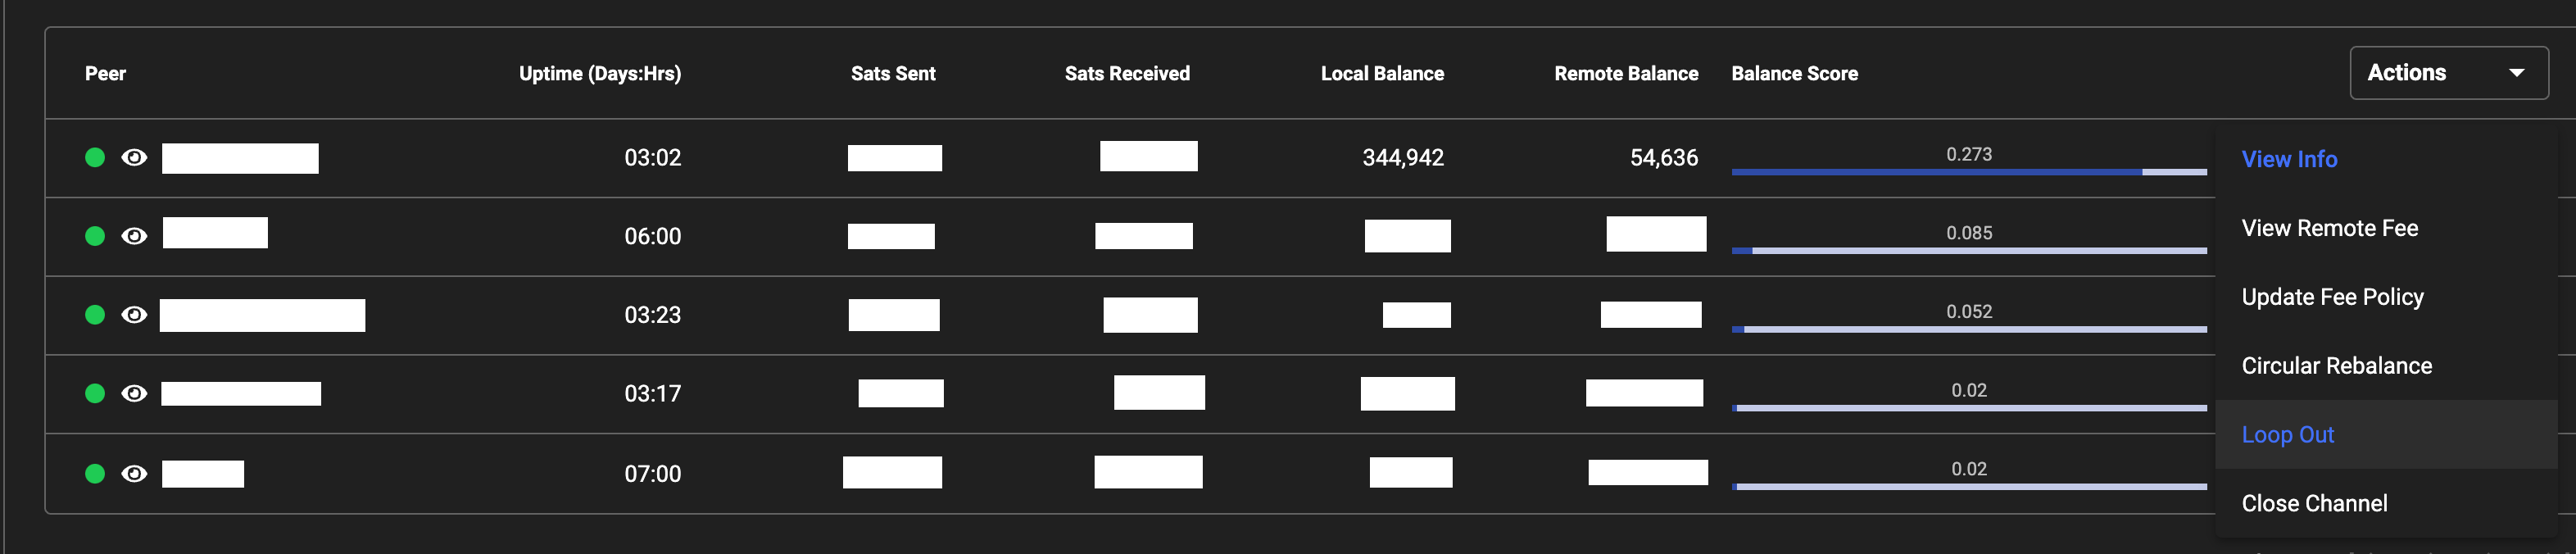
Circular rebalancing is a nice feature you can use when you have two or more channels. It allows you to move local sats from the selected channel into the local sats of the destination channel - or you can think of it as receiving a sats balance increase from the other channel. The Ride The Lightning web interface is my favourite web UI for circular rebalancing.
 Ride The Lightning Channels View
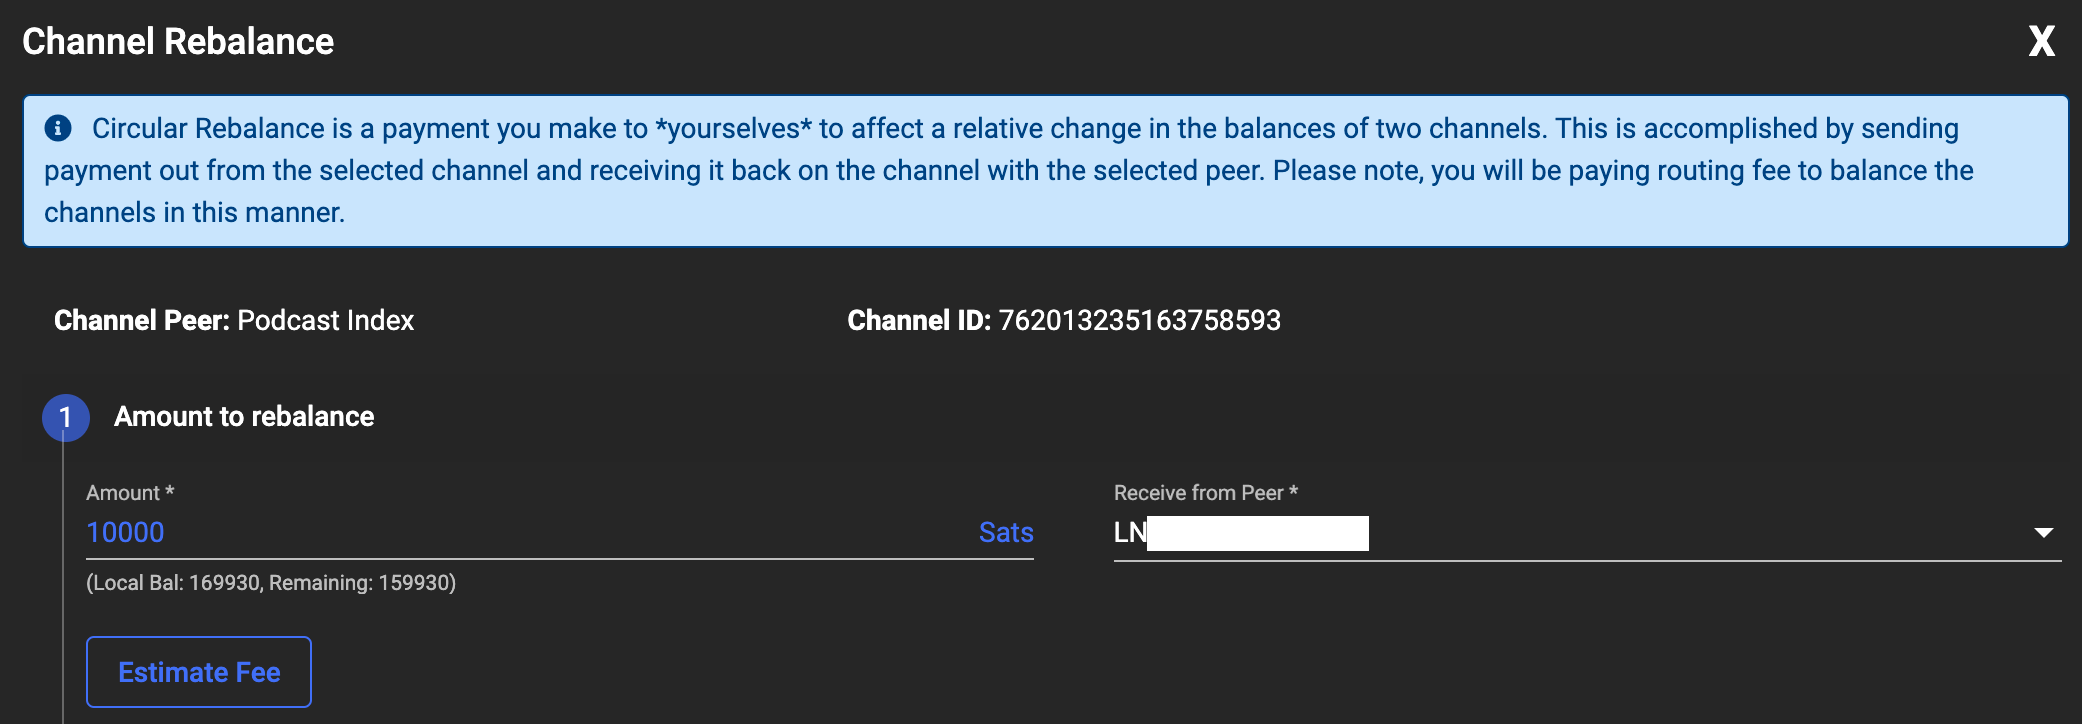 Rebalance a Channel Step One
 Rebalance a Channel Step Two
Behind the scenes it’s simply an Invoice from one channel to another channel. It gets routed outside through other Lightning Nodes and in the example above, there are 5 hops at a cost of 1011 milli-Sats (round that down to 1 sat).
Using this method you can shuffle sats between your channels for very few sats which can be handy if you want to stack your sats in one channel, distribute your sats evenly to balance your node for routing and so on.
Balancing Your Node
There are three ways you can “balance” your node:
- Outbound Priority (Spending lots of sats)
- Inbound Priority (Receiving lots of sats)
- Routing
For the longest time I was confused by the expression, “You can set up a routing node” insofar as what the hell that meant. It’s not a special “type” of node, it just means you keep all of your channels as balanced as possible - meaning your Inbound and Outbound balances are equal. Obviously to achieve a routing node it’s necessary to have 50% of the value of your channels in total in your node, otherwise it would be perfectly balanced.
Keeping in mind that “balancing” a node actually refers to the channels on that node being predominantly balanced or biased for one of the above three options. I suppose there should be a fourth option that describes my node best: “confused”.
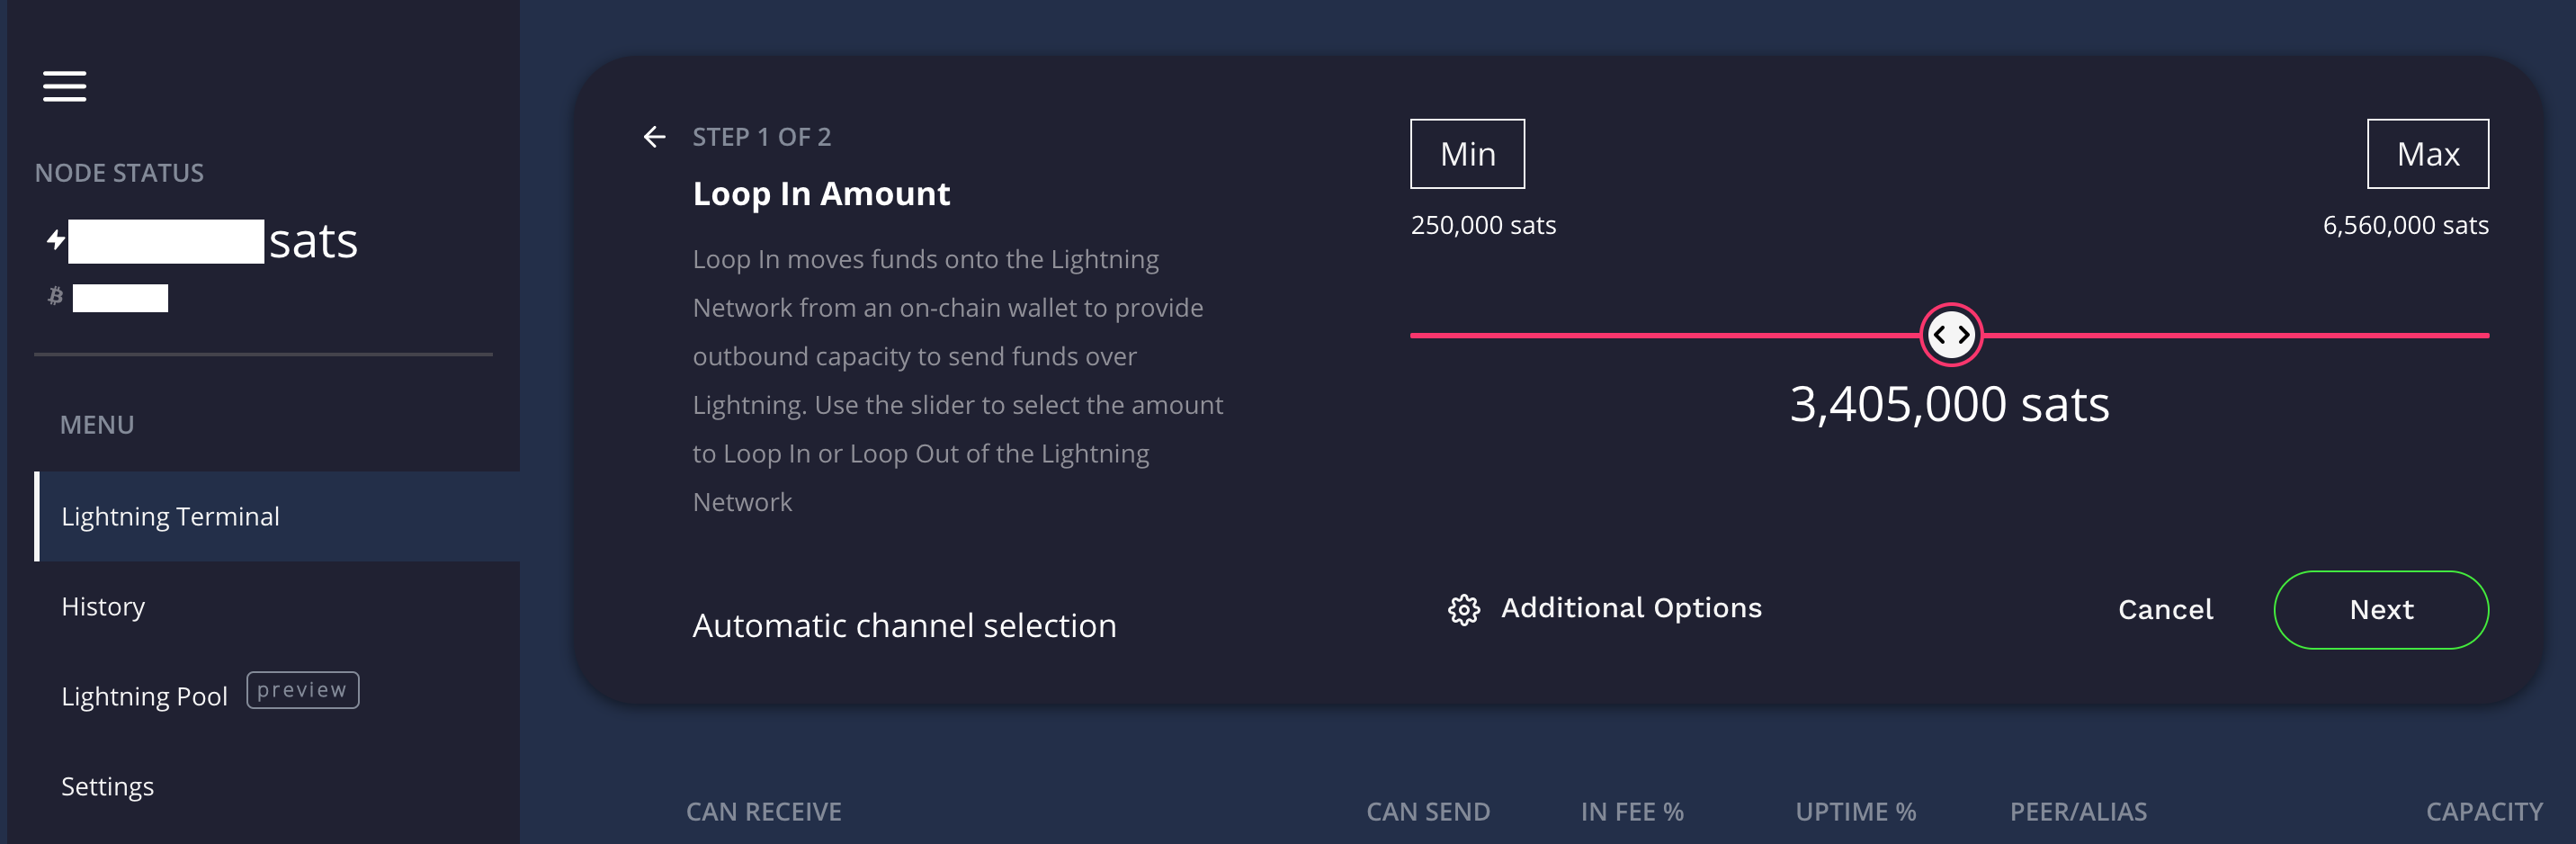
Loop In
In Lightning you can move on-chain BitCoin into a channel that you want to add Local balance to changing it to Lightning sats you can spend via Lightning. Why would you do this?
Let’s say you’ve bought some new BitCoin and it’s appeared on your node - it’s not Lightning Sats yet so you can only spend it on-chain (high fees = no good). You already have a bunch of mostly empty channels and you don’t want to open a new channel: this is when you could use Loop In.
 Loop In Interface in Lightning Terminal
Loop In only works for a single channel at a time, and with the 250k minimum, that channel must have at least that many sats of available capacity for Loop In to work.
Loop works by using a special looping Node (series of Nodes probably) maintained by Lightning Labs. At this time they enforce a 250k minimum to a 6.56M maximum per loop in a transaction. The concept is simple: reduce on-chain fees by grouping multiple loop transactions together. Your transaction attracts a significantly lower fee than if you were to open a new channel with your BitCoin balance and you don’t disturb the channels you already have.
Loop Out
Like Looping In, Out works the other way around. It some ways it’s far more useful as you can use Looping Out to build a series of channels cyclicly (more on that shortly).
Whilst Looping In carries the same 250k minimum, Loop Out is limited to your available Local capacity, though still can not exceed 6.56M maximum per loop out a transaction.
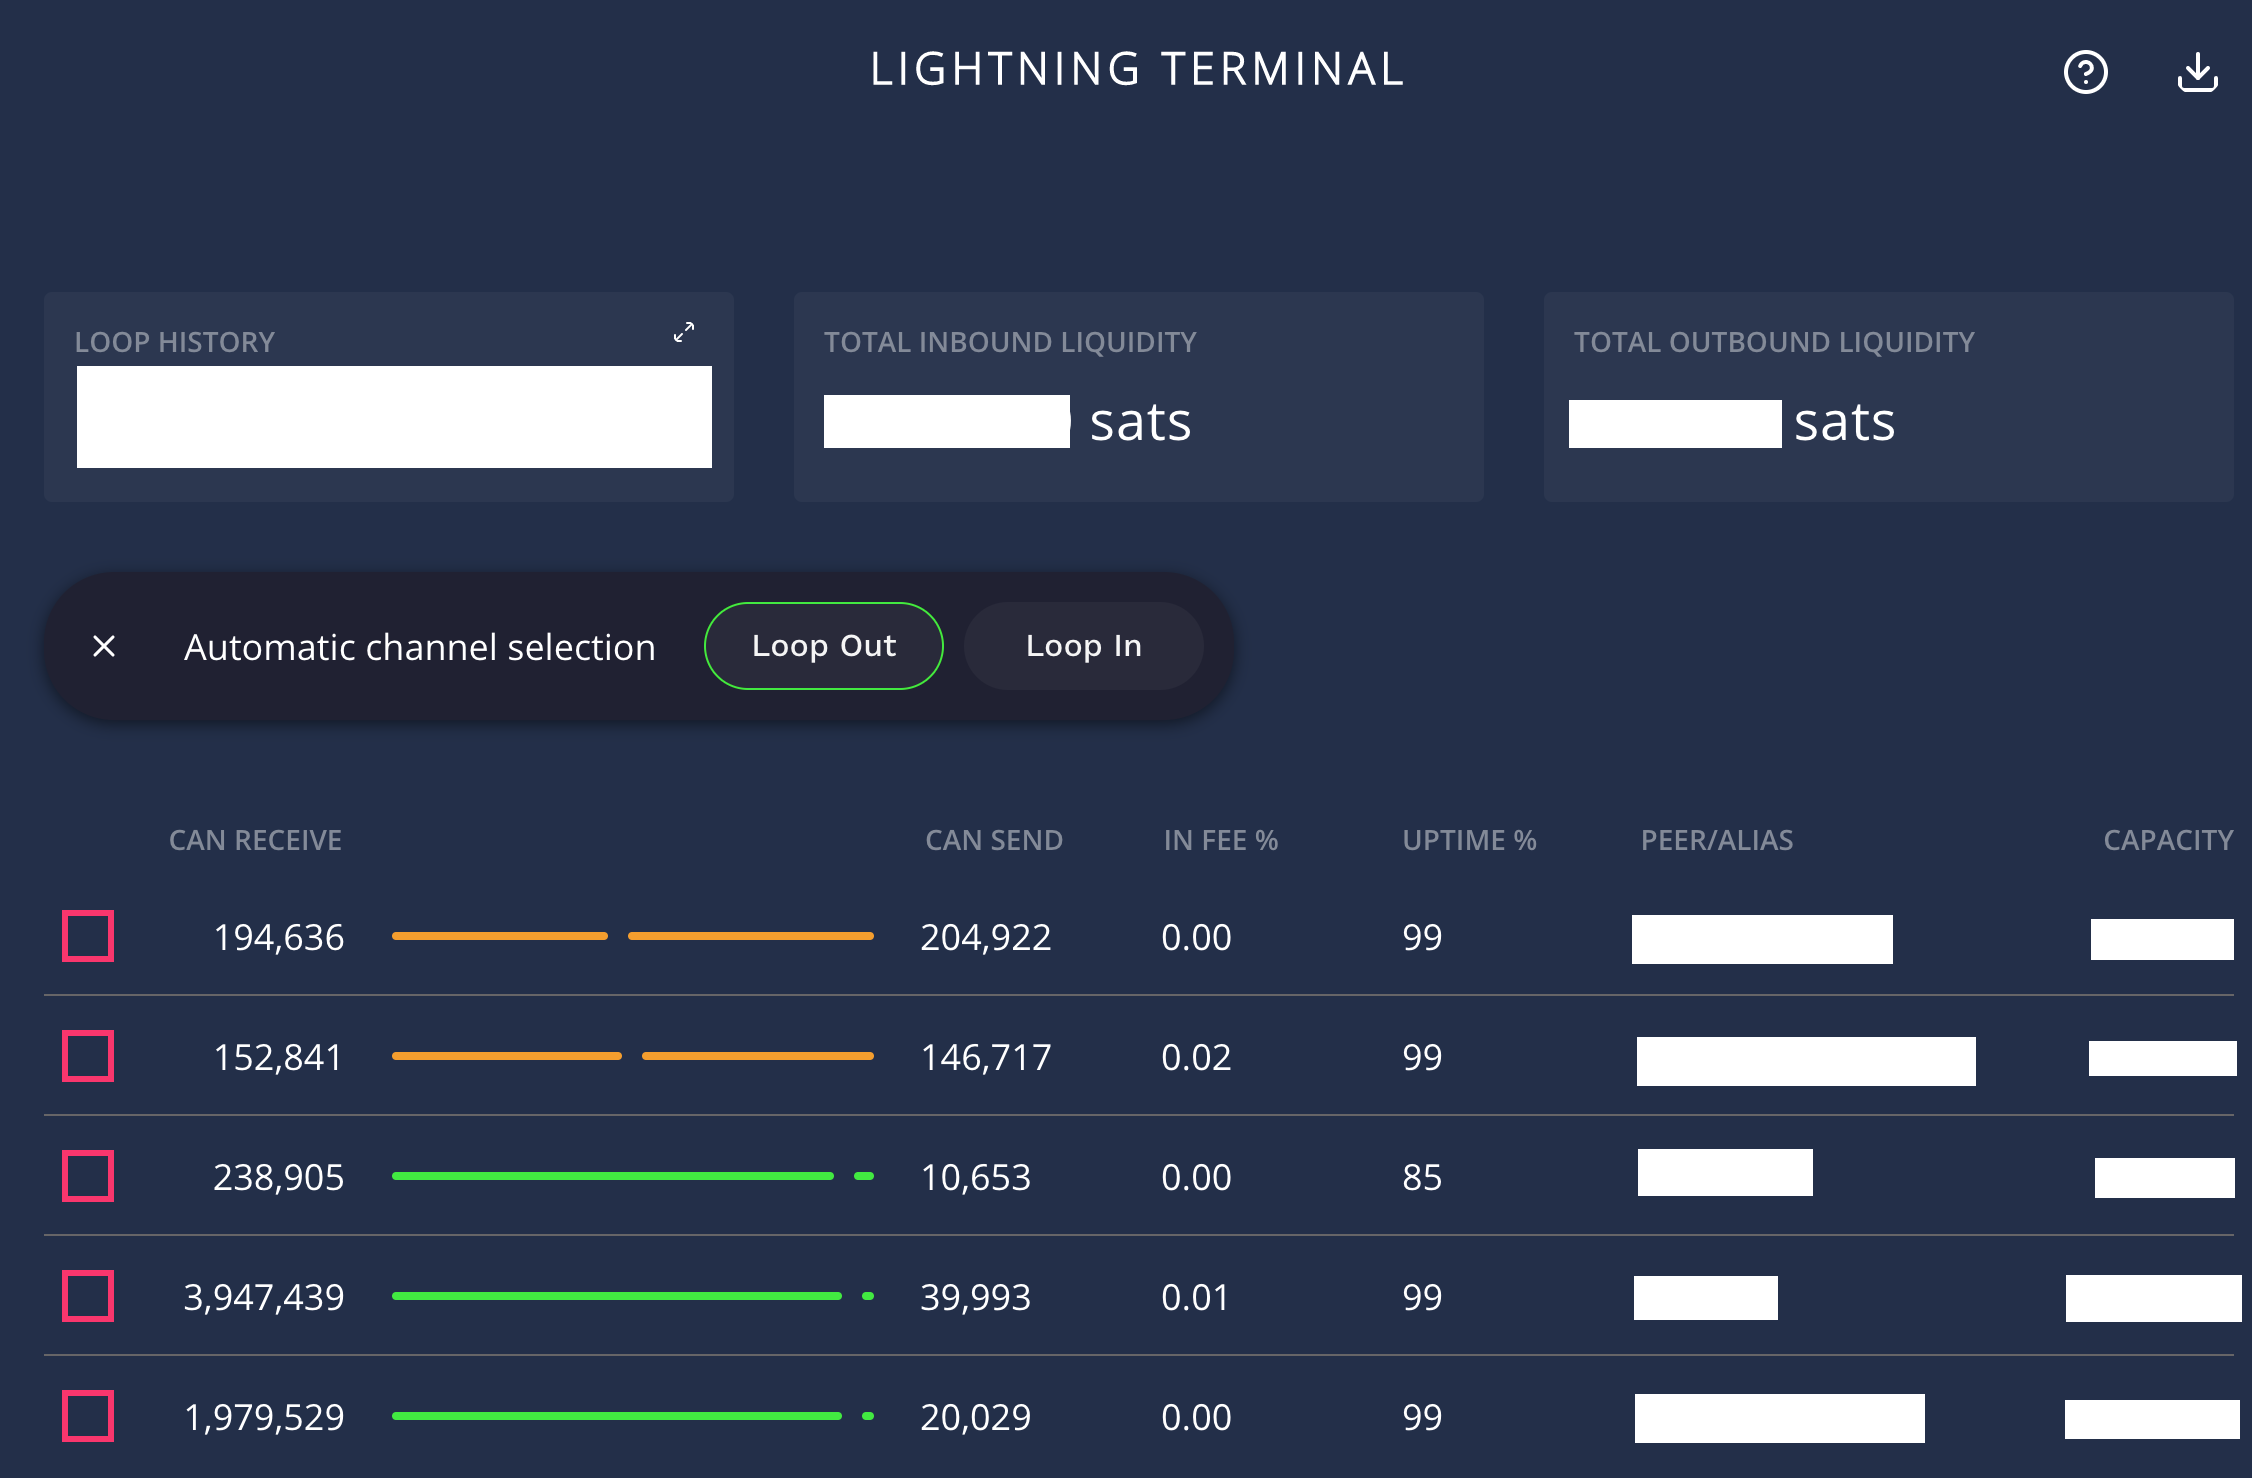 Loop Out Interface in Lightning Terminal
 Loop Out can Manually Select Specific Channels if there’s Liquidity
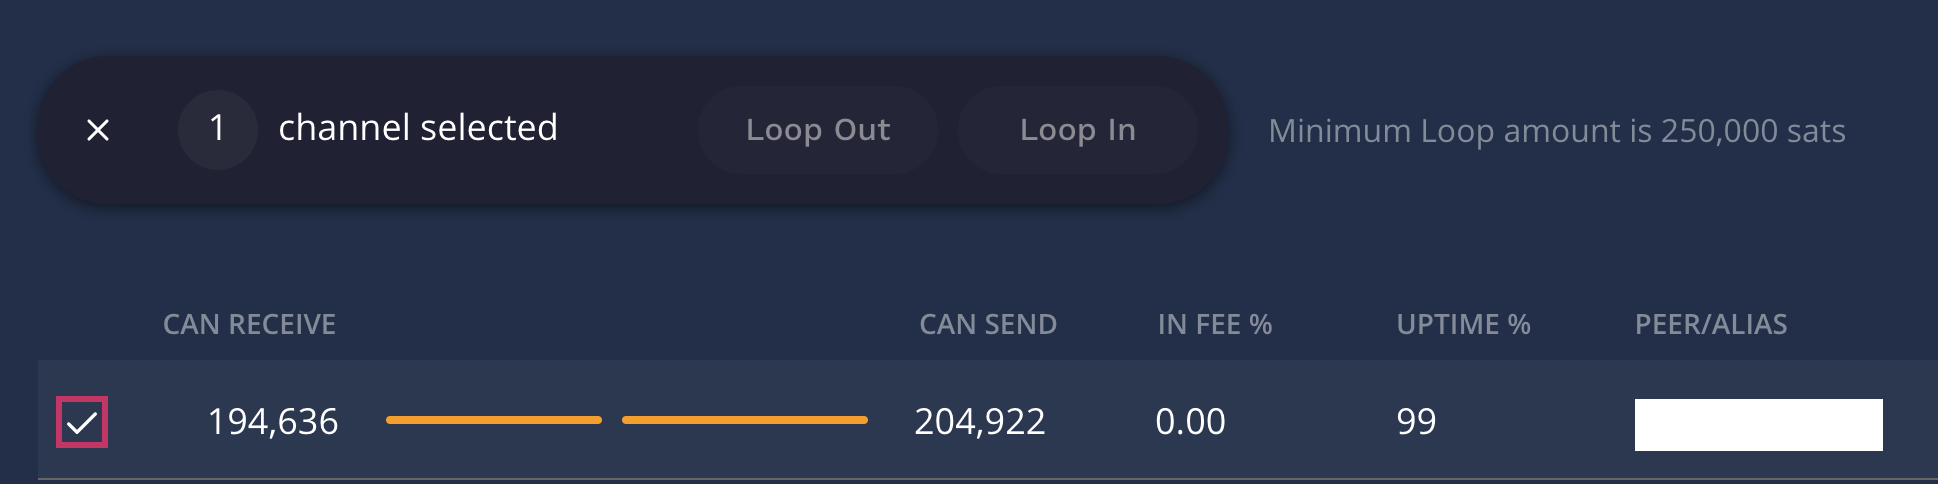
 Loop Out of 340k sats from two channels
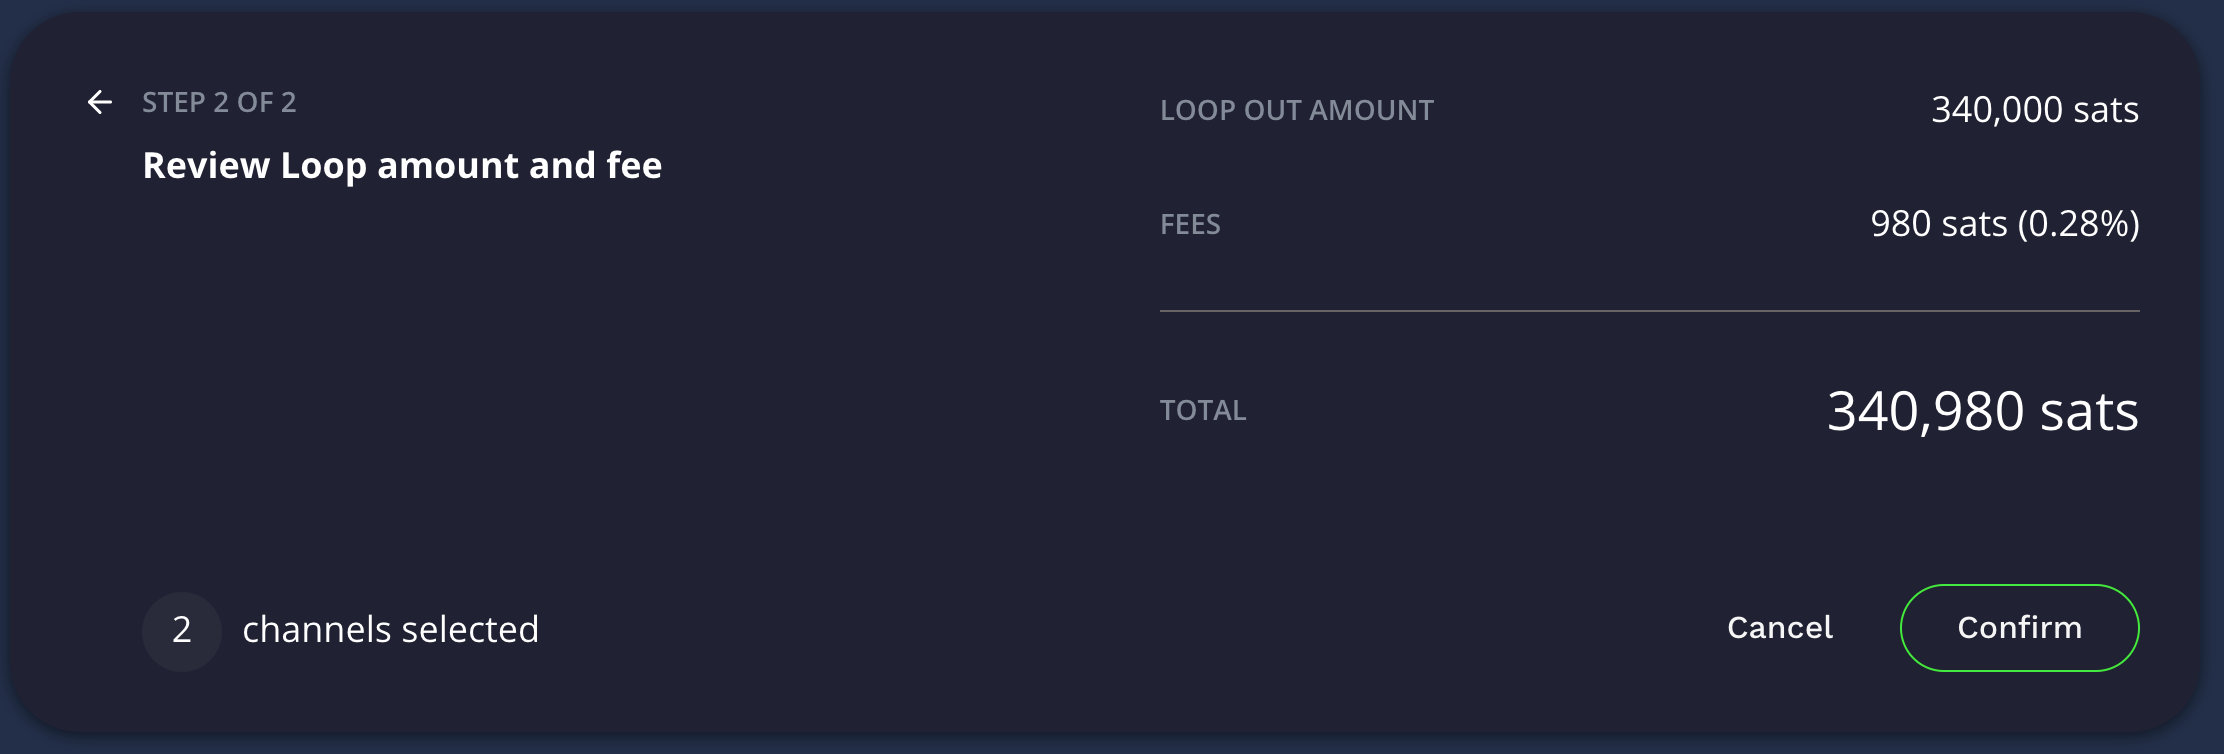 Loop Out showing a fee of 980 sats
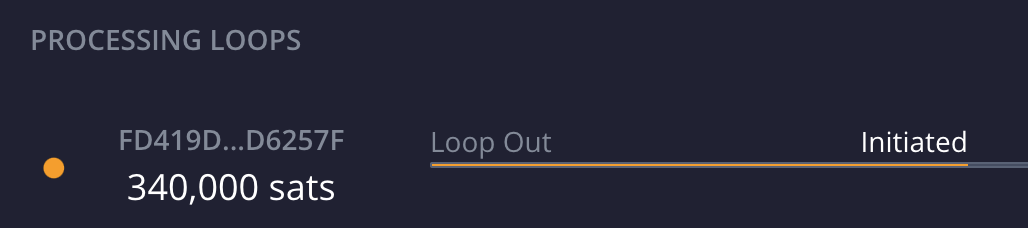 Processing the Loop Out
If the Loop Out fails, you can try to rebalance your channels to put your sats into a highly connected node prior to the loop out, or you could lower the amount and try again until it succeeds. You can adjust the Confirmation Target and send it to a specific BitCoin destination if you want (if you leave that blank, it defaults to the node you’re initiating the Loop Out from which is normally what you’d do).
If you want to keep the fees as low as possible, you should set the number of block confirmations to a larger number. By default I believe it’s 9 blocks (not completely sure) which cost me 980 sats in my example, but by setting this higher it should drop the fees however I did not test enough times to confirm this myself.
Once it completes your node will report those sats now against your on-chain balance, ready for BitCoin spending directly should you wish to.
If you stack your sats into a single channel, you can also use the RTL interface, under Channels select the right-hand side drop down and select “Loop Out”. Again, a minimum 250k sats are required.
 Looping Out via Ride The Lightning
Stack a Channel, Loop It Out, Open New Channel, Repeat
If you’re building your Node from scratch and you’ve started with a single channel that you opened with your initial BitCoin injection, then there’s a technique you can use to build your single channel node into a well connected node with many channels.
The process:
- Stack a Channel (Once you have 2 or more Channels)
- Loop It Out
- Open New Channel
- Repeat
The whole process could take multiple days to complete for multiple channels and it will consume some of your sats in the process, but you’re essentially shuffling around the same sats and re-using them to open more channels to improve your nodes connectivity.
Maintenance
Operating a node isn’t a full time job, but it’s also not a set and forget thing either. I had an issue with my DuckDNS not updating the dynamic address after a power outage at home. I noticed that there hadn’t been many streaming sats coming in for a week when I checked and found the error and corrected it. Another time I noticed I’d had a large number of transactions pass through my node and my channels were pegged and skewed and no routing was occurring. So I rebalanced my channels.
Sometimes I’ve had people open channels and then every balance/re-balance I attempted failed. Others open a channel and their end is highly unreliable trapping a lot of sats in the channel. When I need/want to use them I have to wait until they’re online again.
My observation has been that there are many people tinkering with BitCoin Lightning, and they tend not to put much money into it. That’s fine - I can’t really judge that since that’s how I started out. However these are the sorts of people that aren’t tending to their node, ensuring it’s online, ensuring it’s well funded and hence are most likely to have poor availability.
I originally allowed channels of only 30k sats, but have since increased this to 250k sats minimum channel size. Since doing this I’ve had less nuisance channels be opened and have had to prune far fewer channels. The message is: it’s not set and forget, in the same way your bank account isn’t either. If you care about your money, check your transactions.
That’s it
I think that’s it for now. Hopefully the things I’ve learned are helpful to somebody. Whilst a lot of the above is a simplification in some dimensions, I realise I still have a lot to learn and it’s a journey. Whether you think BitCoin and Lightning are the future or just a stepping stone along the way, one thing I believe for certain: it’s a fascinating system that’s truly disrupting the financial sector in a way that hasn’t previously been possible and it’s fun to learn how it works.
Many thanks to Podcasting 2.0, RaspiBlitz and both Adam Curry and Dave Jones for their inspiration.