Herein you’ll find articles on a very wide variety of topics about technology in the consumer space (mostly) and items of personal interest to me. I have also participated in and created several podcasts most notably Pragmatic and Causality and all of my podcasts can be found at The Engineered Network.
Podcasting 2.0 Phase 3 Tags
I’ve been keeping a close eye on Podcasting 2.0 and a few weeks ago they finalised their Phase 3 tags. As I last wrote about this in December 2020, I thought I’d quickly update on thoughts on each of the Phase 3 tags:
- < podcast:trailer > Is a compact and more flexible version of the existing iTunes < itunes:episodeType >trailer< /itunes:episodeType > tag. The Apple-spec isn’t supported outside of Apple, however more importantly you can only have one trailer per podcast, whereas the PC2.0 tag allows multiple trailers and trailers per season if desired. It also is more economical than the Apple equivalent, as it acts as an enclosure tag, rather than requiring an entire RSS Item in the Apple Spec.
- < podcast:license > Used to specify the licence terms of the podcast content, either by show or by episode, relative to the SPDX definitions.
- < podcast:alternateEnclosure > With this it’s possible to have more than one audio/video enclosure specified for each episode. You could use this for different audio encoding bitrates and video if you want to.
- < podcast:guid > Rather than the using the Apple GUID guideline, the PC2.0 suggests using UUIDv5 using the RSS feed as the seed value.
In terms of TEN, I’m intending to add Trailer in future and I’m considering Licence as well, but beyond that probably not much else for the moment. I don’t see that GUID adds much for my use case over my existing setup (using the CDATA URL at time of publishing) and since my publicly available MP3s are already 64kbps Mono, Alternate Enclosure for low bitrate isn’t going to add any value to anyone in the world. I did consider linking to the YouTube videos of episodes where they exist however I don’t see this as beneficial in my use case either. In future I could explore an IPFS stored MP3 audio option for resiliency, however this would only make sense if this became more widely supported by client applications.
It’s good to see things moving forward and whilst I’m aware that the Value tag is being enhanced iteratively, I’m hopeful that this can incorporate client-value and extend the current lightning keysend protocol options to include details where supporters can flag “who” the streamed sats came from (if they choose to). It’s true that customKey/Value exist however they’re intentionally generic for the moment.
Of course, it’s a work in progress and it’s amazing that it works so well already, but I’m also aware that KeySend as it exists today, might be deprecated by the AMP aka Atomic-Multipath Payment protocol, so there may be some potential tweaks yet to come.
It’s great to see the namespace incorporating more tags over time and I’m hopeful that more client applications can start supporting them as well in future.
Pushover and PodPing from RSS
In my efforts to support the Podcasting 2.0 initiative, I thought I should see how easy it was to incorporate their new PodPing concept, which is effectively a distributed RSS notification system specifically tailored for Podcasts. The idea is that when a new episode goes live, you notify the PodPing server and it then adds that notification to the distributed Hive blockchain system and then any apps can simply watch the blockchain and this can trigger the download of the new episode in the podcast client.
This has come predominantly from their attempts to leverage existing technology in WebSub, however when I tried the WebSub angle a few months ago, the results were very disappointing with many minutes, hours passing before a notification was seen and in some cases it wasn’t seen at all.
I leveraged parts of an existing Python script I’ve been using for years for my RSS social media poster, but stripped it down to the bare minimum. It consists of two files, checkfeeds.py (which just creates an instance of the RssChecker class) and then the actual code is in rss.py.
This beauty of this approach is that it will work on ANY site’s RSS target. Ideally if you have a dynamic system you could trigger the GET request on an episode posting event, however since my sites are statically generated and the posts are created ahead of time (and hence don’t appear until the site builder coincides with a point in time after that post is set to go live) it’s problematic to create a trigger from the static site generator.
Whilst I’m an Electrical Engineer, I consider myself a software developer of many different languages and platforms, but for Python I see myself more of a hacker and a slasher. Yes, there are better ways of doing this. Yes, I know already. Thanks in advance for keeping that to yourself.
Both are below for your interest/re-use or otherwise:
from rss import RssChecker

rssobject=RssChecker()
CACHE_FILE = '<Cache File Here>'
CACHE_FILE_LENGTH = 10000
POPULATE_CACHE = 0
RSS_URLS = ["https://RSS FEED URL 1/index.xml", "https://RSS FEED URL 2/index.xml"]
TEST_MODE = 0
PUSHOVER_ENABLE = 0
PUSHOVER_USER_TOKEN = "<TOKEN HERE>"
PUSHOVER_API_TOKEN = "<TOKEN HERE>"
PODPING_ENABLE = 0
PODPING_AUTH_TOKEN = "<TOKEN HERE>"
PODPING_USER_AGENT = "<USER AGENT HERE>"

from collections import deque
import feedparser
import os
import os.path
import pycurl
import json
from io import BytesIO

class RssChecker():
    feedurl = ""

    def __init__(self):
        '''Initialise'''
        self.feedurl = RSS_URLS
        self.main()
        self.parse()
        self.close()

    def getdeque(self):
        '''return the deque'''
        return self.dbfeed

    def main(self):
        '''Main of the FeedCache class'''
        if os.path.exists(CACHE_FILE):
            with open(CACHE_FILE) as dbdsc:
                dbfromfile = dbdsc.readlines()
            dblist = [i.strip() for i in dbfromfile]
            self.dbfeed = deque(dblist, CACHE_FILE_LENGTH)
        else:
            self.dbfeed = deque([], CACHE_FILE_LENGTH)

    def append(self, rssid):
        '''Append a rss id to the cache'''
        self.dbfeed.append(rssid)

    def clear(self):
        '''Append a rss id to the cache'''
        self.dbfeed.clear()

    def close(self):
        '''Close the cache'''
        with open(CACHE_FILE, 'w') as dbdsc:
            dbdsc.writelines((''.join([i, os.linesep]) for i in self.dbfeed))

    def parse(self):
        '''Parse the Feed(s)'''
        if POPULATE_CACHE:
            self.clear()
        for currentfeedurl in self.feedurl:
            currentfeed = feedparser.parse(currentfeedurl)

            if POPULATE_CACHE:
                for thefeedentry in currentfeed.entries:
                    self.append(thefeedentry.get("guid", ""))
            else:
                for thefeedentry in currentfeed.entries:
                    if thefeedentry.get("guid", "") not in self.getdeque():
#                        print("Not Found in Cache: " + thefeedentry.get("title", ""))
                        if PUSHOVER_ENABLE:
                            crl = pycurl.Curl()
                            crl.setopt(crl.URL, 'https://api.pushover.net/1/messages.json')
                            crl.setopt(pycurl.HTTPHEADER, ['Content-Type: application/json' , 'Accept: application/json'])
                            data = json.dumps({"token": PUSHOVER_API_TOKEN, "user": PUSHOVER_USER_TOKEN, "title": "RSS Notifier", "message": thefeedentry.get("title", "") + " Now Live"})
                            crl.setopt(pycurl.POST, 1)
                            crl.setopt(pycurl.POSTFIELDS, data)
                            crl.perform()
                            crl.close()

                        if PODPING_ENABLE:
                            crl2 = pycurl.Curl()
                            crl2.setopt(crl2.URL, 'https://podping.cloud/?url=' + currentfeedurl)
                            crl2.setopt(pycurl.HTTPHEADER, ['Authorization: ' + PODPING_AUTH_TOKEN, 'User-Agent: ' + PODPING_USER_AGENT])
                            crl2.perform()
                            crl2.close()

                        if not TEST_MODE:
                            self.append(thefeedentry.get("guid", ""))
The basic idea is:
- Create a cache file that keeps a list of all of the RSS entries you already have and are already live
- Connect up PushOver (if you want push notifications, or you could add your own if you like)
- Connect up PodPing (ask @[email protected] or @[email protected] for a posting API TOKEN)
- Set it up as a repeating task on your device of choice (preferably a server, but should work on a Synology, a Raspberry Pi or a VPS)
VPS
I built this initially on my Macbook Pro using the Homebrew installed Python 3 development environment, then installed the same on a CentOS7 VPS I have running as my Origin web server. Assuming you already have Python 3 installed, I added the following so I could use pycurl:
CENTOS
yum install -y openssl-devel
yum install python3-devel
yum group install "Development Tools"
yum install libcurl-devel
python3 -m pip install wheel
python3 -m pip install --compile --install-option="--with-openssl" pycurl
Alpine Linux
apk add openssl-dev
apk add python3-dev
python3 -m pip install --upgrade pip
apk add curl-dev
python3 -m pip install --compile --install-option="--with-openssl" pycurl
Whether you like “pycurl” or not, obviously there are other options but I stick with what works. Rather than refactor for a different library I just jumped through some extra hoops to get pycurl running.
Finally I bridge the checkfeeds.py with a simply bash script wrapper and call it from a CRON Job every 10 minutes.
Job done.
Enjoy.
Fun With Apple Podcasts Connect
Apple Podcasts will shortly open to the public but for podcasters like me, we’ve been having fun with Apple’s first major update to their podcasting backend in several years, and it hasn’t really been that much fun. Before talking about why I’m putting so much time and effort into this at all, I’ll go through the highlights of my experiences to date.
Fun Times at the Podcasts Connect Mk2
Previously I’d used the Patreon/Breaker integration but that fell apart when Breaker was acquired by Twitter and the truth was that very, very few Patrons utilised the feature and the Breaker app was never big enough to attract any new subscribers. The Breaker audio integration and content has since been removed even though the company had the service taken over (to an extent) as it was one less thing for me to upload content to. In a way…this has been a bit déjà-vu and “here we go again…” 1
The back-catalogue of ad-free episodes as well as bonus content between Sleep, Pragmatic, Analytical and Causality adds up to 144 individual episodes.
For practically every one I had the original project files which I restored and re-exported in WAV format then uploaded them via the Apple Podcasts updated interface. (The format must be WAV or FLAC and Stereo, which is funny for a Mono podcast like mine and added up to about 50GB of audio) It’s straight-forward enough although there were a few annoying glitches that after using it for 10 days were still unresolved. Each of the key issues I encountered: (there were others but some were resolved at time of writing this so I’ve excluded those)
- Ratings and Reviews made a brief appearance then disappeared and still haven’t come back (I’m sure they will at some point)
- Not all show analytics time spans work (Past 60 days still doesn’t work, everything is blank)
- Archived shows in the Podcast-drop-down list appear but don’t in the main overview even when displaying ‘All’
- The order you save and upload audio files, changes the episode date such that if you create the episode meta-data, set the date, then upload the audio the episode date defaults to todays date. It does this AFTER you leave the page though, so it’s not obvious, but if you upload the audio THEN set the date it’s fine.
- The audio upload hit/miss ratio for me was about 8 out of 10, meaning for every 10 episodes I uploaded, 2 got stuck. What do I mean? The episode WAV file uploads, completes and then the page shows the following:
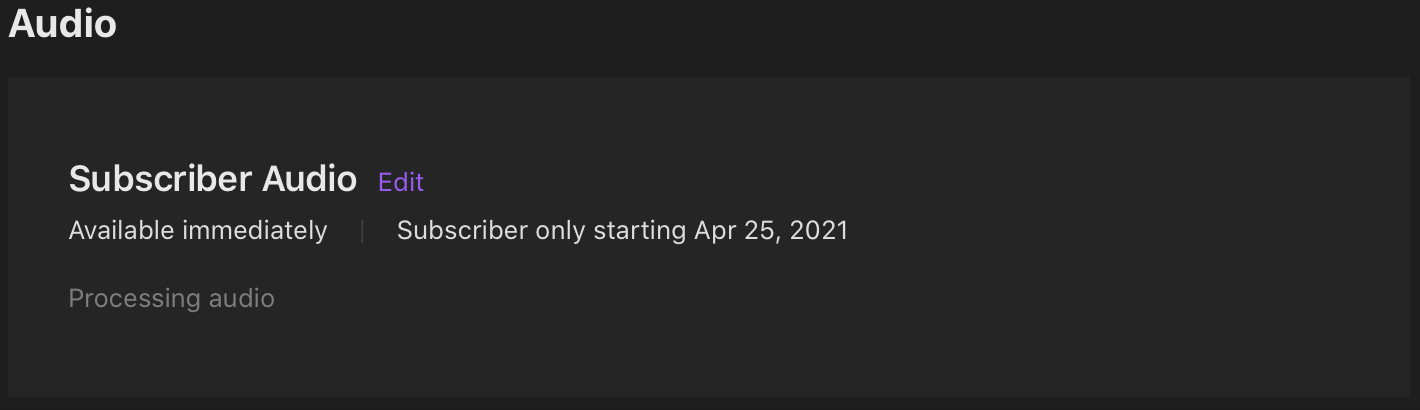
…and the “Processing Audio” never actually finishes. Hoping this was just a back-log issue with high end user demand I uploaded everything and came back minutes, hours then days later and finally after waiting five days I set about to try to unstick it.
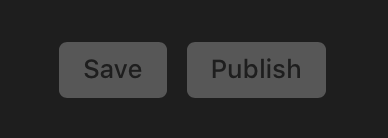 Five Days of Waiting and seeing this I gave up waiting for it to resolve itself…
The obvious thing to try: select “Edit” and delete then re-upload the audio. Simple enough, keeps the meta-data intact (except the date I had to re-save after every audio re-upload) then I waited another few days. Same result. Okay, so that didn’t work at all.
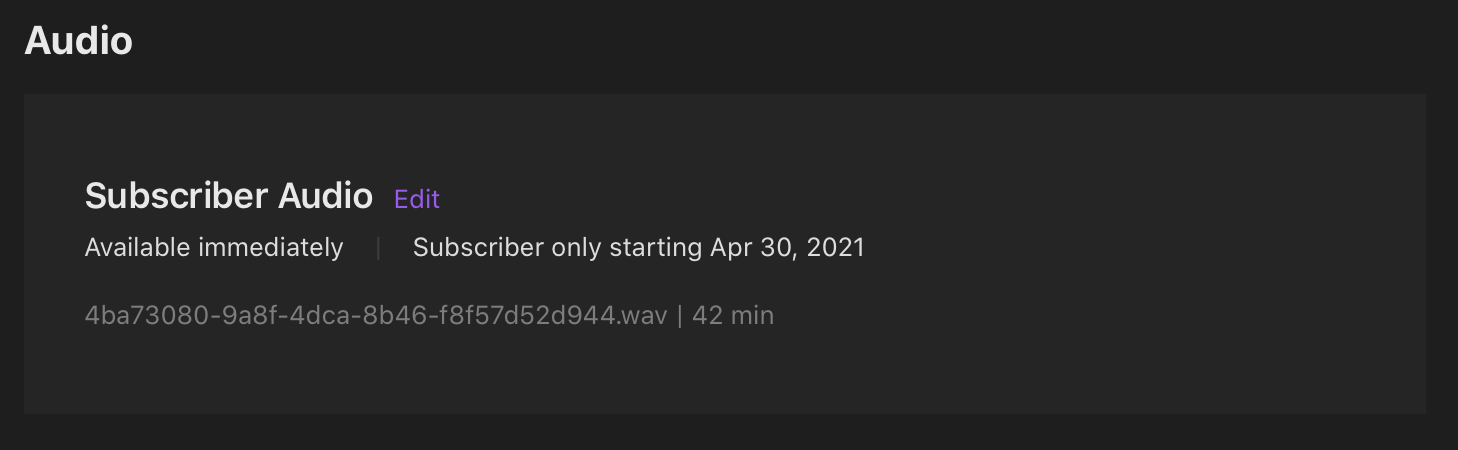
Next thing to try, re-create the entire episode again from scratch! So I did that for the 30 episodes that were stuck. Finally I see this (in some cases up to an hour later):

And sure enough…
Of course, that only worked for 25 episodes out of the 30 I uploaded a second time. I then had to wash-rinse-repeat for the 5 that had failed for a second time and repeated until they all worked. I’d hate to think about doing this on a low-bandwidth connection like I had a decade ago. Even at 40Mbps up it took a long time for the 2GB+ episodes of Pragmatic. The entire exercise has probably taken me 4 work-days of effort end to end, or about 32 hours of my life. There’s no way to delete the stuck episodes either so I now have a small collection of “Archived” non-episodes. Oh well…
Why John…Why?
I’ve read a lot of differing opinions from podcasters about Apples latest move and frankly I think the people most dismissive are those with significant existing revenue streams for their shows, or those that have already made their money and don’t need/want income for their show(s). Saying that you can reduce fees by using Stripe and your own website integration, by using Memberful, Patreon, or more recently by streaming Satoshis (very cool BTW), all have barriers to entry for the Podcast creator that can not be ignored.
For me, I’m a geek and I love that stuff so sure, I’ll have a crack at that (looks over at the Raspberry Pi Lightning Node on desk with a nod) but not everyone is like me (probably a good thing on balance).
So far as I can tell, Apple Podcasts is currently the most fee-expensive way for podcasters to get support from listeners. It’s also a walled garden2, but then so is Patreon, Spotify/Anchor (if you’re eligible and I’m not…for now), Breaker, and building your own system with Memberful or Stripe website integration requires developer chops most don’t have so isn’t an option. By far the easiest (once you figure out BitCoin/Lightning and set up your own Node) is actually streaming Sats, but that knowledge ramp is tough and lots of people HATE BitCoin. (That’s another, more controversial story).
Apple Podcasts has one thing going for it: It’s going to be the quickest, easiest way for someone to support your show coupled with the biggest audience in a single Podcasting ecosystem. You can’t and shouldn’t ignore that, and that’s why I’m giving this a chance. The same risks apply to Apple as to all the other walled gardens (Patreon, Breaker, Spotify/Anchor etc): you could be kicked-off the platform, they could stop supporting their platform slowly, sell it off or shut it down entirely and if any of that happens, your supporters will mostly disappear with it. That’s why no-one should rely on it as the sole pathway for support.
It’s about being present and assessing after 6-12 months. If you’re not in it, then you might miss out on supporters that love your work and want to support it and this is the only way they’re comfortable doing that. So I’m giving this a shot and when it launches for Beta testing will be looking for any fans that want to give it a try so I can tweak anything that needs tweaking, and will post publicly when it goes live for all. Hopefully all of my efforts (and Apples) are worth it for all concerned.
Time will tell. (It always does)
-
Realistically if every Podcasting-walled-garden offers something like this (as Breaker did and Spotify is about to) then at some point Podcasters have to draw a line of effort vs reward. Right now I’m uploading files to two places, and with Apple that will be a third. If I add Spotify, Facebook, Breaker then I’m up to triple my current effort to support 5 walled gardens. Eventually if the platform isn’t popular then it’s not going to be worth that effort. Apple is worth considering because its platform is significant. The same won’t always be true for the “next walled garden” whatever that may be. ↩︎
-
To be crystal clear, I love walled gardens as in actual GARDENS, but I don’t mean those ones, I mean closed ecosystems aka ‘walled gardens’, before you say that. Actually no geek thought that, that’s just my sense of humour. Alas. ↩︎
Causality Transcriptions
Spurred on by Podcasting 2.0 and reflecting on my previous attempt at transcriptions, I thought it was time to have another crack at this. The initial attempts were basic TXT files that weren’t time-synced nor proofed and used a very old version of Dragon Dictate I had laying around.
This time around my focus is on making Causality as good as it possibly can be. From the PC2.0 guidelines:
SRT: The SRT format was designed for video captions but provides a suitable solution for podcast transcripts. The SRT format contains medium-fidelity timestamps and are a popular export option from transcription services. SRT transcripts used for podcasts should adhere to the following specifications.
Properties:
- Max number of lines: 2
- Max characters per line: 32
- Speaker names (optional): Start a new card when the speaker changes. Include the speaker’s name, followed by a colon.
This is closely related to defaults I found using Otter.ai but that’s not free if you want time-sync’d SRT files. So my workflow uses YouTube (for something useful)…
STEPS:
- Upload episode directly converted from the original public audio file to YouTube as a Video (I use Ferrite to create a video export). Previously I was using LibSyn as part of their YouTube destination which also works.
- Wait a while. It can take anywhere from a few minutes to a few hours, then go to your YouTube Studio, pick an episode, Video Details, under the section: “Language, subtitles, and closed captions”, select “English by YouTube (automatic)” three vertical dots, “Download” (NOTE BELOW). Alternatively select Subtitles, and next to DUPLICATE AND EDIT, select the three dots and Download, then .srt
- If you can only get the SBV File: Open this file, untitled.sbv in a raw text editor, then select all, copy and paste it into: DCMP’s website, click Convert, select all, then create a new blank file: untitled.srt and paste in the converted format.
- If you have the SRT now, and don’t have the source video (eg if it was created by LibSyn automatically, I didn’t have a copy locally) download the converted YouTube video using the embed link for the episode to: SaveFrom or use a YouTube downloader if you prefer.
- Download the Video in low-res and put all into a single directory.
- I’m using Subtitle Studio and it’s not free but it was the easiest for me to get my head around and it works for me. Open the SRT file just created/downloaded then drag the video for the episode in question onto the new window.
- Visually skim and fix obvious errors before you press play (Title Case, ends of Sentences, words for numbers, MY NAME!)
- Export the SRT file and add to the website and RSS Feed!
NOTE: In 1 case out of 46 uploads it thought I was speaking in Russian for some reason? The auto-translation in Russian was funny but not useful, but for all others it correctly translated automatically into English and the quality of the conversion is quite good.
I’ve also flattened the SRT into a fixed Text file, which is useful for full text search. The process for that takes me two steps:
- Upload the file to Happy Scribe and select “Text File” as the output format.
- Open the downloaded file in a text editor, select all the text and then go to Tool Slick’s line merge tool, pasting the text into the Input Text box, then “Join Lines” and select all of the Output Joined Lines box and paste over what you had in your local text file.
- Rename the file and add to the website and RSS Feed!
As of publishing I’ve only done the sub-titles in SRT and TXT formats of two episodes, but I will continue to churn my way through them as time permits until they’re all done.
Of course you could save yourself a bit of effort and use Otter, and save yourself even more effort and don’t proof-read the automatically converted text. If I wasn’t so much of a stickler for detail, I’d probably do that myself but it’s that refusal to just accept that, that makes me the Engineer I am I suppose.
Enjoy!