Herein you’ll find articles on a very wide variety of topics about technology in the consumer space (mostly) and items of personal interest to me. I have also participated in and created several podcasts most notably Pragmatic and Causality and all of my podcasts can be found at The Engineered Network.
My Cars Through Time
For something completely different I felt like doing a bit of a personal retrospective of different cars I’ve owned over the last 28 years for anyone that’s interested (probably not many).
1 Ford Laser 1996 - Oct 1999

My first car was a hand-me-down from my mother. My grandparents had passed away and there was an excess of vehicles, leaving me with an Automatic Red 1988 Ford Laser Hatchback. This car did the round-trip between Rockhampton and Sydney three times during 1999 when I worked at COM10. This is one of only a small number of photos I have of the Laser.
To drive it was sluggish, handled very imprecisely and was the entry level model with no air-conditioning and manual windows. I did fit a few things though in my teenage years: a decent stereo, a cruise control aftermarket kit, a CB Radio and later my IC-706 Amateur Radio (2M band whip shown in the photo). It was a good, reliable car though that I serviced myself where I could, changing the oil several times. Ultimately though I took a permanent job with Nortel in Calgary and returned the Laser to my mother, and it then went to my other sister, Alana for her to use.
2 Subaru Impreza Oct 2000 - Feb 2001
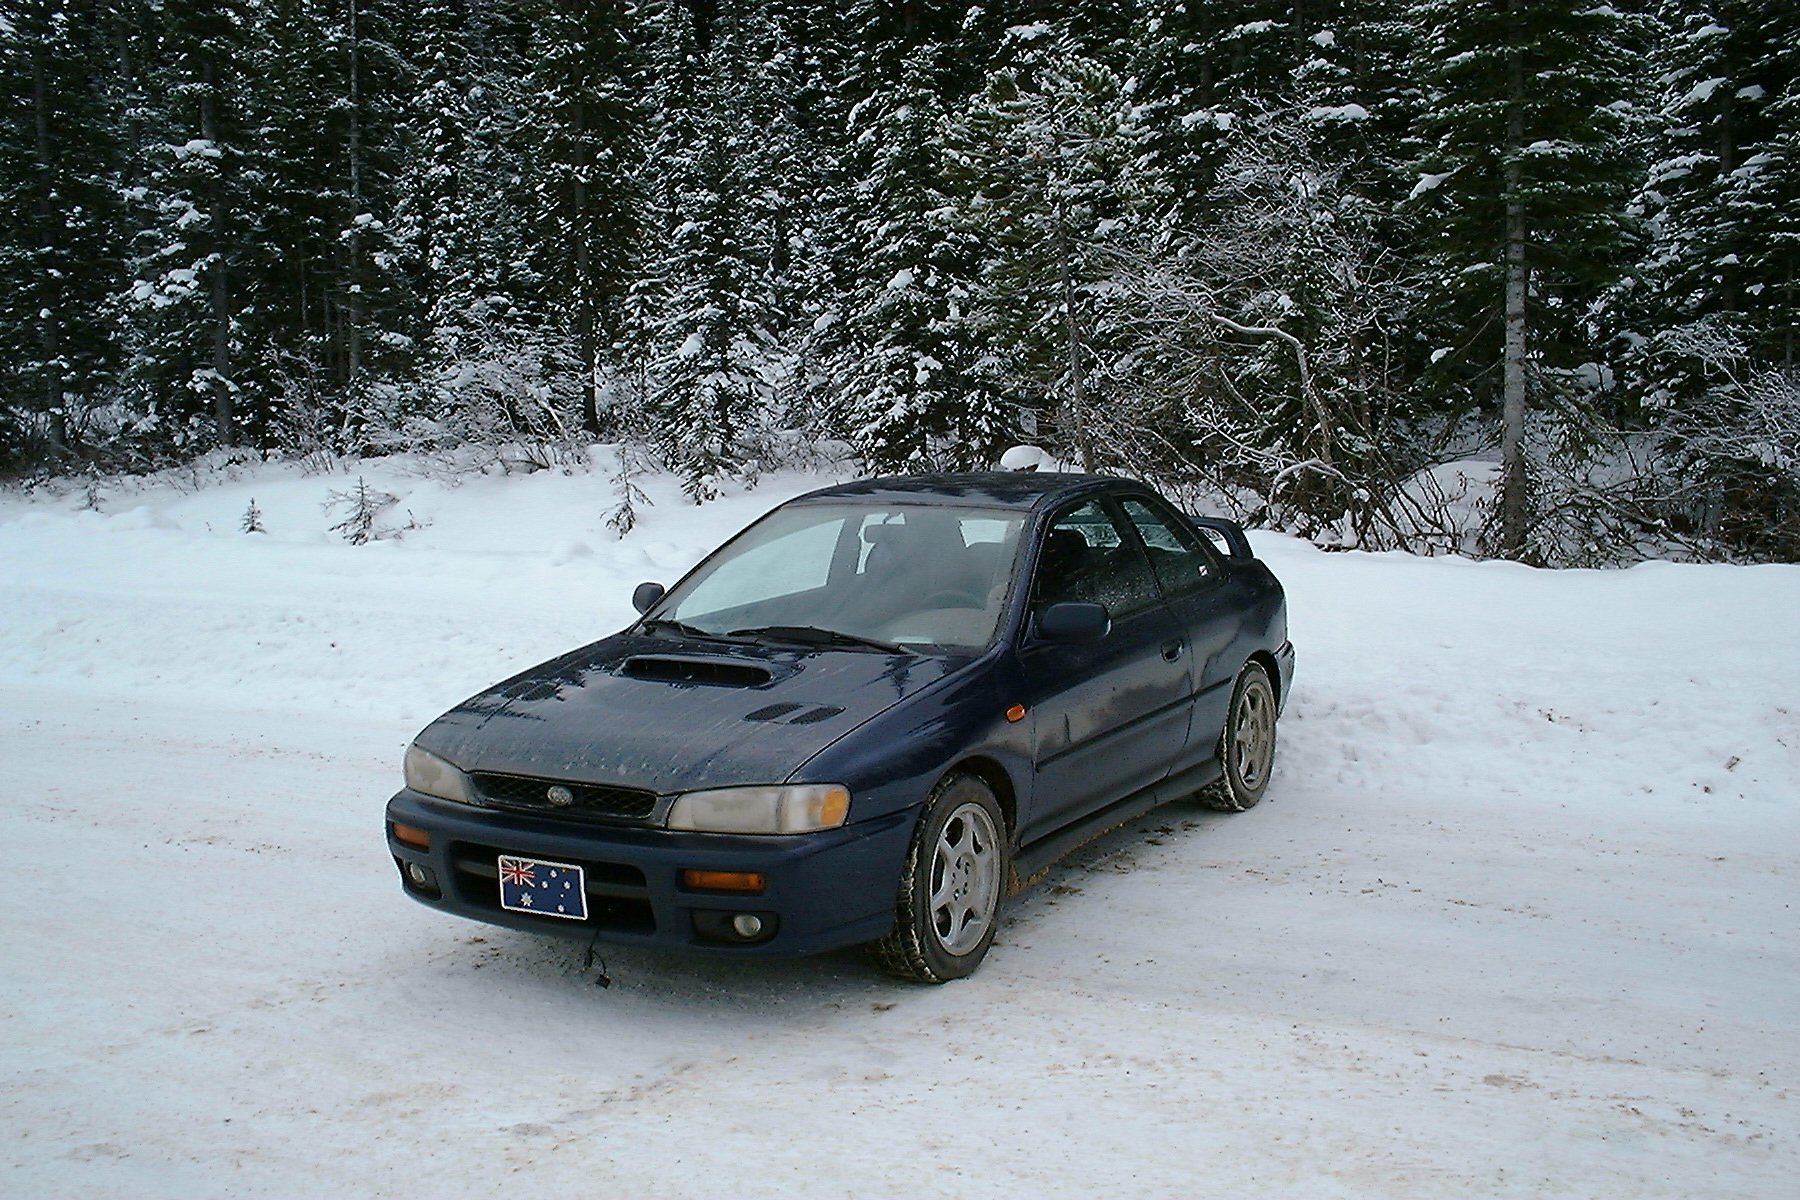
With my Canadian Permanent Residency and Alberta drivers licence in hand, I was able to buy a car finally in September, 2000. Heavily influenced by my environment I chose a car with All-Wheel Drive presenting excellent grip in the snowy conditions for a quarter of the year in Calgary. The WRX model that I wanted wasn’t available in Canada at that point, so I settled with a Manual 2000 Subaru Impreza 2.5RS Coupe in Blue, since the Red Subaru offered at that time wasn’t a very nice Red.
It had the usual Canadian fittings, like a block heater (note the cable under the number plate), but I supplied my own decorative front number plate since in Alberta only the rear plate is required by law. The photo was taken in the car park at Lake Louise. It was a joy to drive this car, though I owned it only for a very short period (about four months). It had a sunroof and excellent heating as I owned it through a Calgarian winter, I only drove with with the windows down and sunroof open a handful of times, rugged up to the nines.
When Nortel sacked half of it’s global employees (including me) I returned home, and since the car wouldn’t fit in my pocket, and was for a LHD country, I had to sell it at a mind-blowing loss. It wasn’t as upsetting as selling my Kawai though. I left the country with effectively nothing, having lost my entire redundancy payout in the debt gap from selling those two items.
3 MGF Aug 2001 - Aug 2003
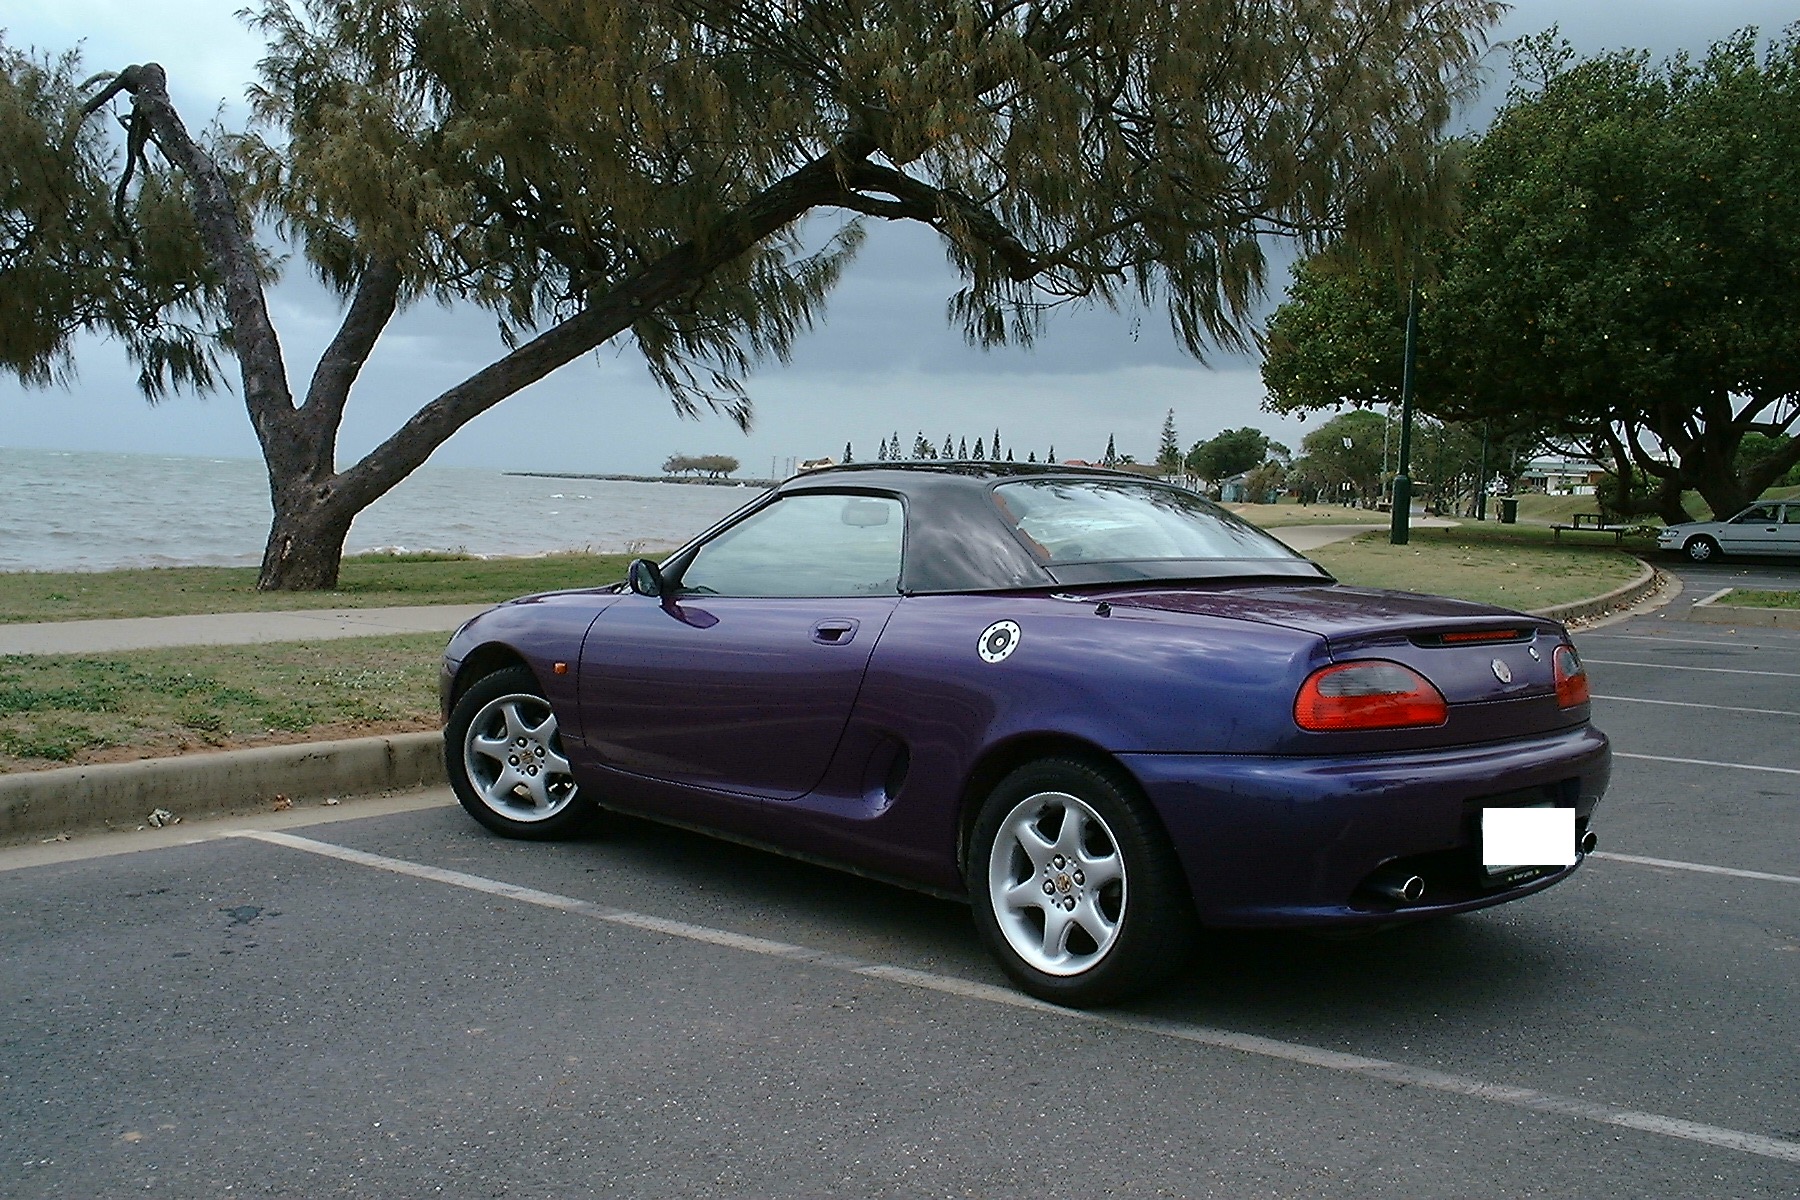
Returning to Australia was both a relief and traumatic, with the job hunt in Brisbane taking four months to land a job at Boeing Australia. With a few months to lick my wounds I set about investing in a very different car. My father had rebuilt a White MGB of which I had a fond memory of driving in, sitting on the battery box, and MG had re-opened (again) and in 1997 released the MG(F). I test drove one on the Gold Coast and couldn’t afford a new model, so picked a used Manual 1997 1.8L VT in Amaranth (call it Purple) Pearlescent finish, and grabbed a Hard Top to go with it for longer road trips (so much quieter and air-conditioning worked better with the hardtop on)
The MGF was a mid-engine car and whilst it wasn’t the fastest it was so low to the ground and with near-perfect weight distribution it cornered almost like it was on rails. So much fun to drive but not without its quirks. The soft-top leaked (common problem with convertibles), the bonnet-boot (Frunk if you’re American) was spatially challenged, the boot (Trunk) was poorly insulated behind the engine and got REALLY hot (cold shopping items need not apply) and the transmission was a wire-pulley system, not a direct linkage which made gear changes feel sloppy and imprecise. Top it off with needing 98RON fuel which was sometimes hard to find, it wasn’t cheap to insure, maintain or run.
Despite this, I took the MG on a road trip from Brisbane to Rockhampton, and when I met the woman I would marry we fitted a luggage rack and drove to Tasmania and back in it for our Honeymoon. It was truly the most fun car I’ve ever driven, despite its flaws, and I still miss it today. That said, the Hydragas suspension and tyres cost $2,250AUD to replace in early 2003 and with my first child on the way, it was a wholly family incompatible car. The repayments were fine when I was single…but I had to make the grown-up (but soul-crushing) decision to sell the MGF, and get a car that was cheaper to own, operate and maintain.
4 Suzuki Sierra Aug 2003 - 2007
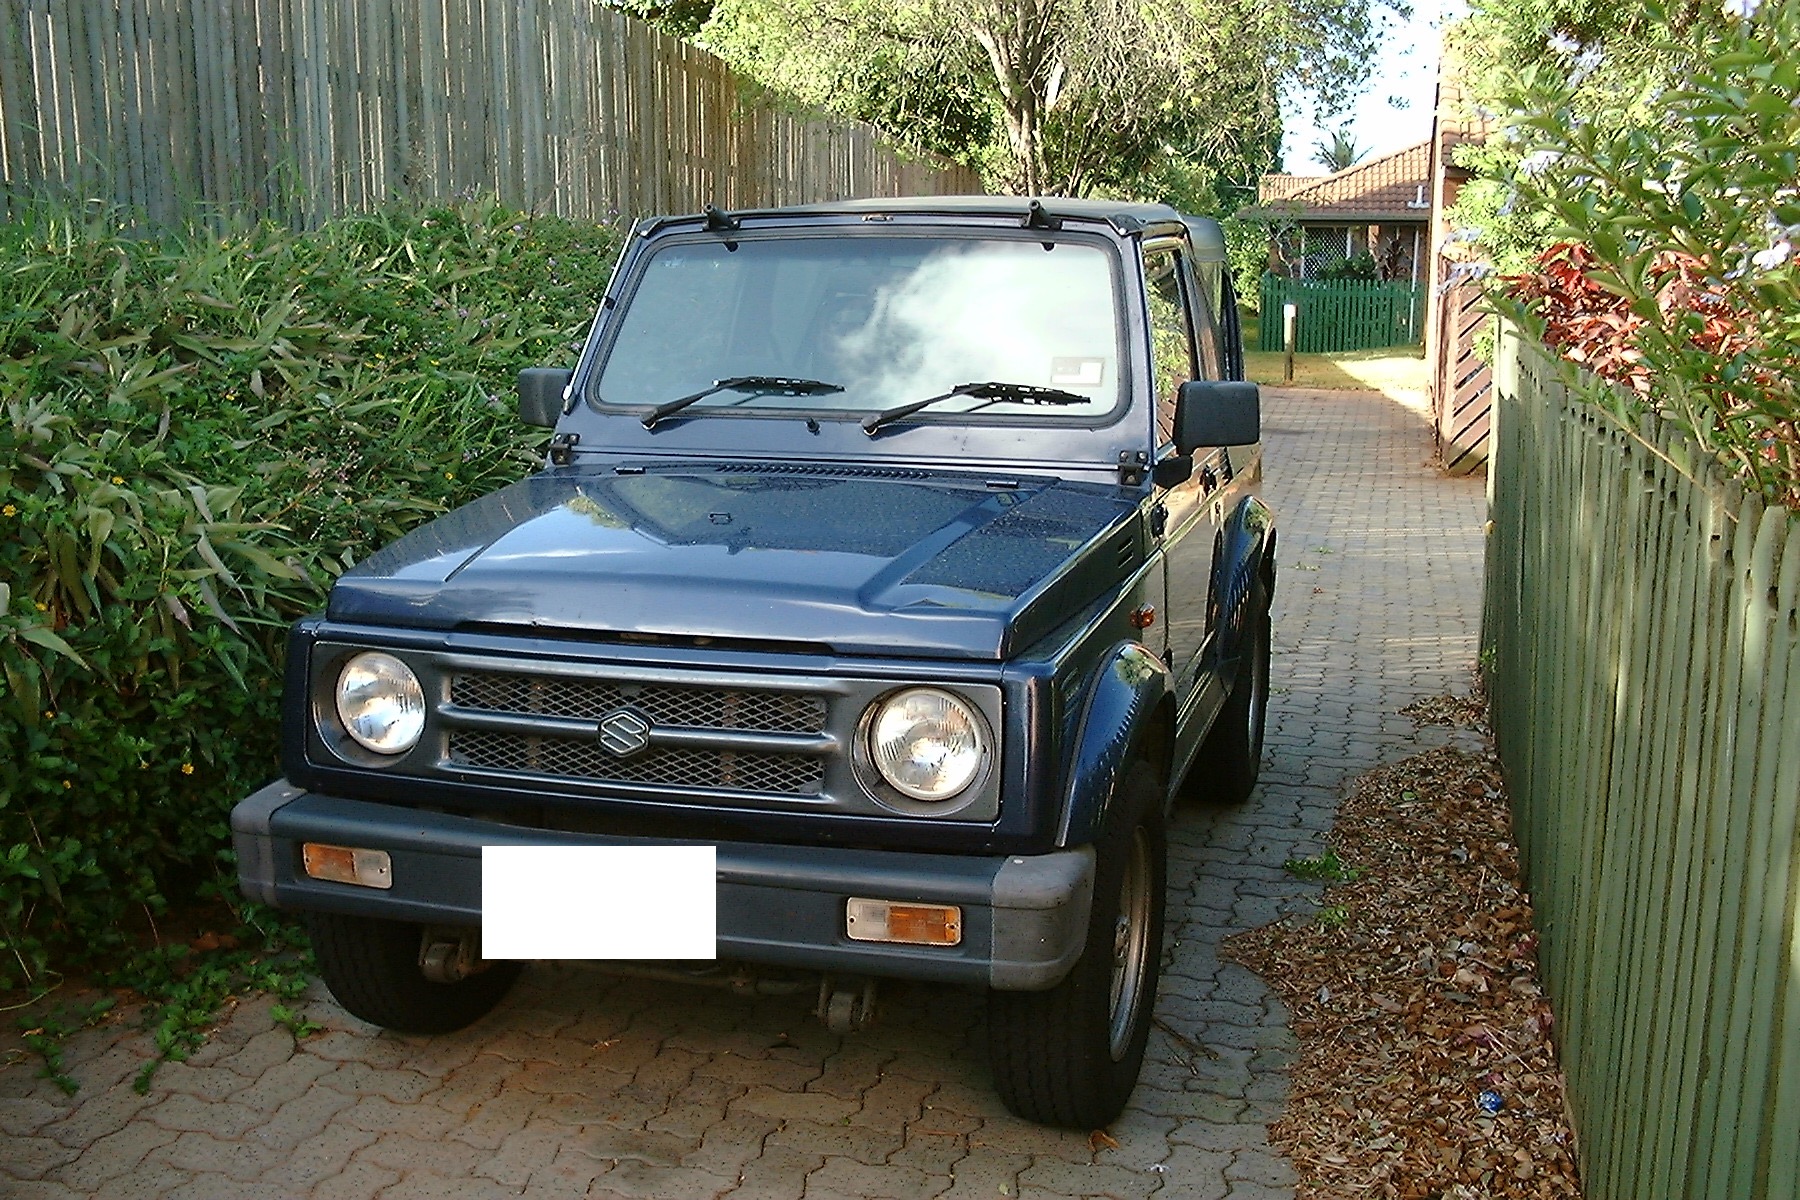
The Suzi was not the car I had intended. My budget was strict and tight, and whilst I’d wanted a 4WD, hard-top, automatic, air-conditioned car which would be more appropriate in my new job at MPA Engineering that required a lot more driving as part of it, it’s not what happened. My new father-in-law got a great deal on a Blue 1995 Manual Suzuki Sierra, soft-top. It needed a new engine, had no air-conditioning and the soft-top was ripped and leaked in many places, however it was within the budget and he helpfully took care of everything for me through a private sale.
The car barely held 110kph on the freeway and was so light it got blown all over the road at speed. The gearbox felt like a truck, it was clunky, rigid, and not at all what I was used to in my last two cars. That said, take this thing on the sand, off-road, and it was amazing! Once I’d mastered the art of running it at high revs in low gears in the soft sand, there was nothing it couldn’t handle. The only time it got bogged in soft sand, we all jumped out and a simple push got it going again - it was so light.
During it’s life I invested in a new canvas soft top that didn’t leak and it excelled in fuel economy. The company was required to reimburse people for kilometers travelled in their own vehicle and the economy was so good, I was actually making a decent amount of money from driving my own vehicle. As I rose through the ranks to Senior, got my RPEQ and was sent on still more jobs I was given a company car that would spell the end for the Suzi. The garage could only fit two cars: the family car and the work car and as our driveway was still unsealed at that point, we parked the Suzi on the grass.
It sat there for too long, undriven and unloved and eventually was sold to someone to try and get it to run again. It left on a car carrier. Despite its flaws, it was a unique car to drive and took me places on Moreton Island and Bribie Island I’ve never been able to get back to.
5 Daewoo Matiz Jan 2010 - May 2013
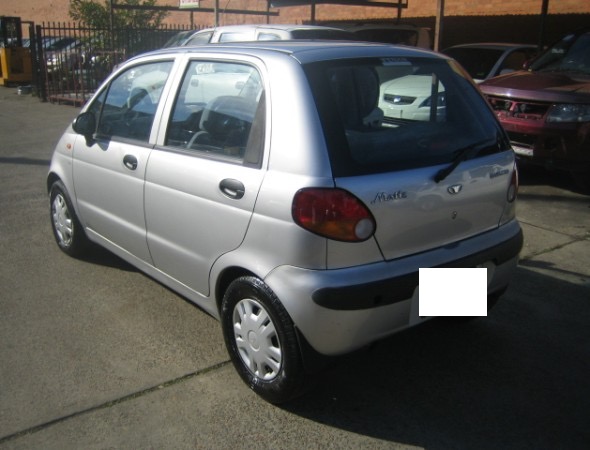
From approximately 2006 to 2009 MPA Engineering provided me with a company vehicle, so I didn’t need my own. With the Suzi long gone and my career changing I had to once again buy a car. Taking a pay cut to get into KBR I had even less money than the Suzi. It led me to a Manual 2005 Daewoo Matiz in Silver. In time I came to refer to it as the “Silver Bullet” which was a name laced with no small measure of cold hatred. It travelled somewhat slower than a bullet, for example. Daewoo were already out of business and support locally was scarce but I had no budget for much else.
The Air-conditioning barely worked and it couldn’t maintain 110kph on the freeway, with less power than even the Suzi I was lucky to get 105kph without a headwind. The car was tiny inside and out; cramped and the gears were sloppy and inconsistent. It had manual windows and when the passenger was sitting next to me, our shoulders would touch, meaning three people on the back row was not possible despite the number of seat belts fitted.
I hated this car so much, I never took a single direct photo of it, hence the photo above isn’t of my Silver Bullet, but rather some other unfortunate persons. The role at KBR put me on the NPI Stage 2 project and with it came use of a project vehicle which I gladly accepted and used for nearly 18 months leaving the Silver Bullet in the driveway, though now we’d managed enough money to seal it with asphalt at least. It’s end came in April of 2013 when I was driving on the highway at 100kph when the steering stopped being fully responsive.
The steering column has an upper and lower collet bearing, which Daewoo thoughtfully made out of plastic. When they both broke within a few weeks of each other, the steering arm flexed and bent in the column leading to an effective deadspot of about +/-25 degrees from center. Practical upshot: to drive in a straight line you needed to turn the wheel left to beyond 25 degrees then back right to beyond 25 degrees to try and keep it straight. Needless to say the car was no longer safe to drive (if it ever was) and I was lucky to get $500 trade-in for it off my next car, which I insisted would be new.
6 Honda Jazz May 2013 - CURRENT
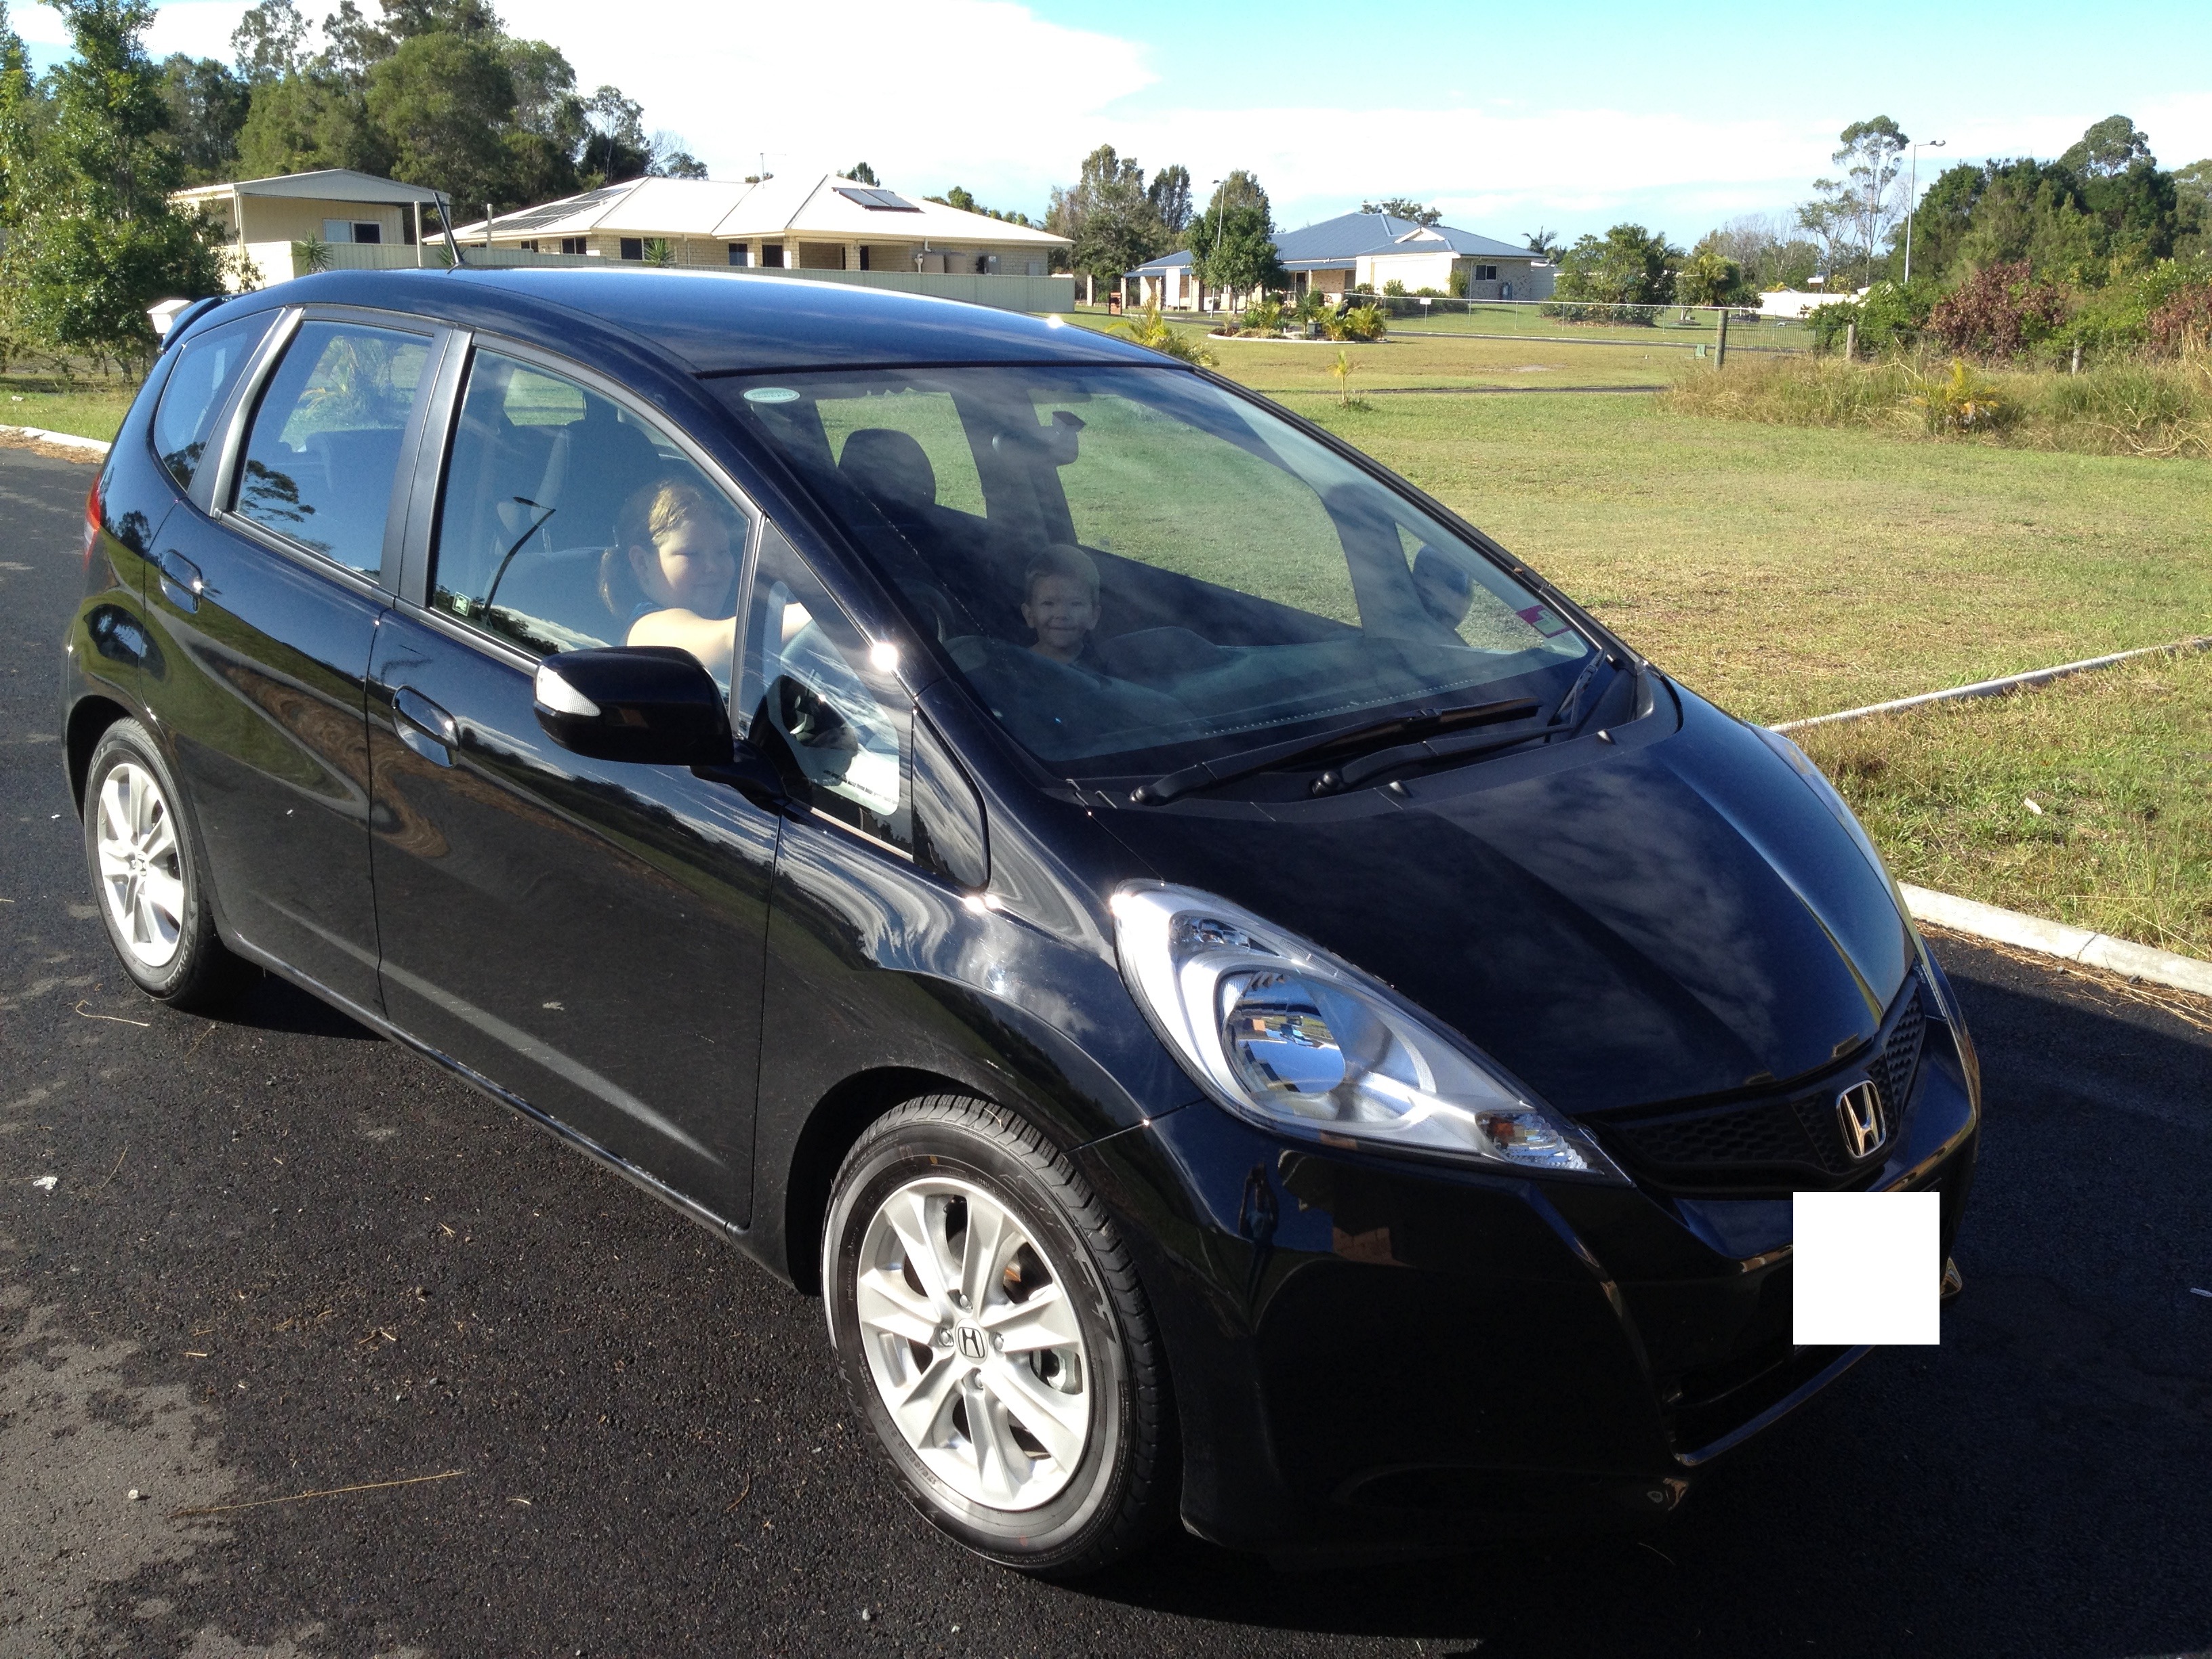
With a much healthier budget this time I researched a lot and test drove multiple cars but fell in love with Hondas - specifically the Jazz. The dealership had a floor stock of the previous years model, a Manual Black 2012 Honda Jazz Vibe Hatchback. I really wanted Red (still) but couldn’t afford to wait or to stretch the budget any further. What struck me about the car was how responsive its steering was compared to every other car I’d driven. (No, the Silver Bullet doesn’t count) It had good acceleration for its class and handled nicely in the corners. It was nicely finished inside and had a surprising amount of space given it’s small stature.
Originally intended to be a run-about car between home and the train station, I spent my budget on something that was nicer to drive, rather than an Automatic but worse handling car. In time I came to regret the decision to get a manual, after several incidents on public transport I changed to driving into the city in 2016 and did so until the COVID19 pandemic, 5 days a week, every week. The commuting in traffic in a manual was unbelievably punishing.
That said…I still have it! It’s running exceptionally well and my oldest son is learning to drive a manual and it will be his car once he gets his Provisional licence, hopefully in a few months time. It’s fair to say that the Jazz has been the most reliable and consistent car I’ve ever owned, but with our family holiday dreams being shot to hell by the pandemic, my wife and I decided to focus on home rather than travel and after driving the Jazz for 8-1/2 years it was time for a car I really, really wanted.
7 Tesla Model 3 Nov 2021 - CURRENT
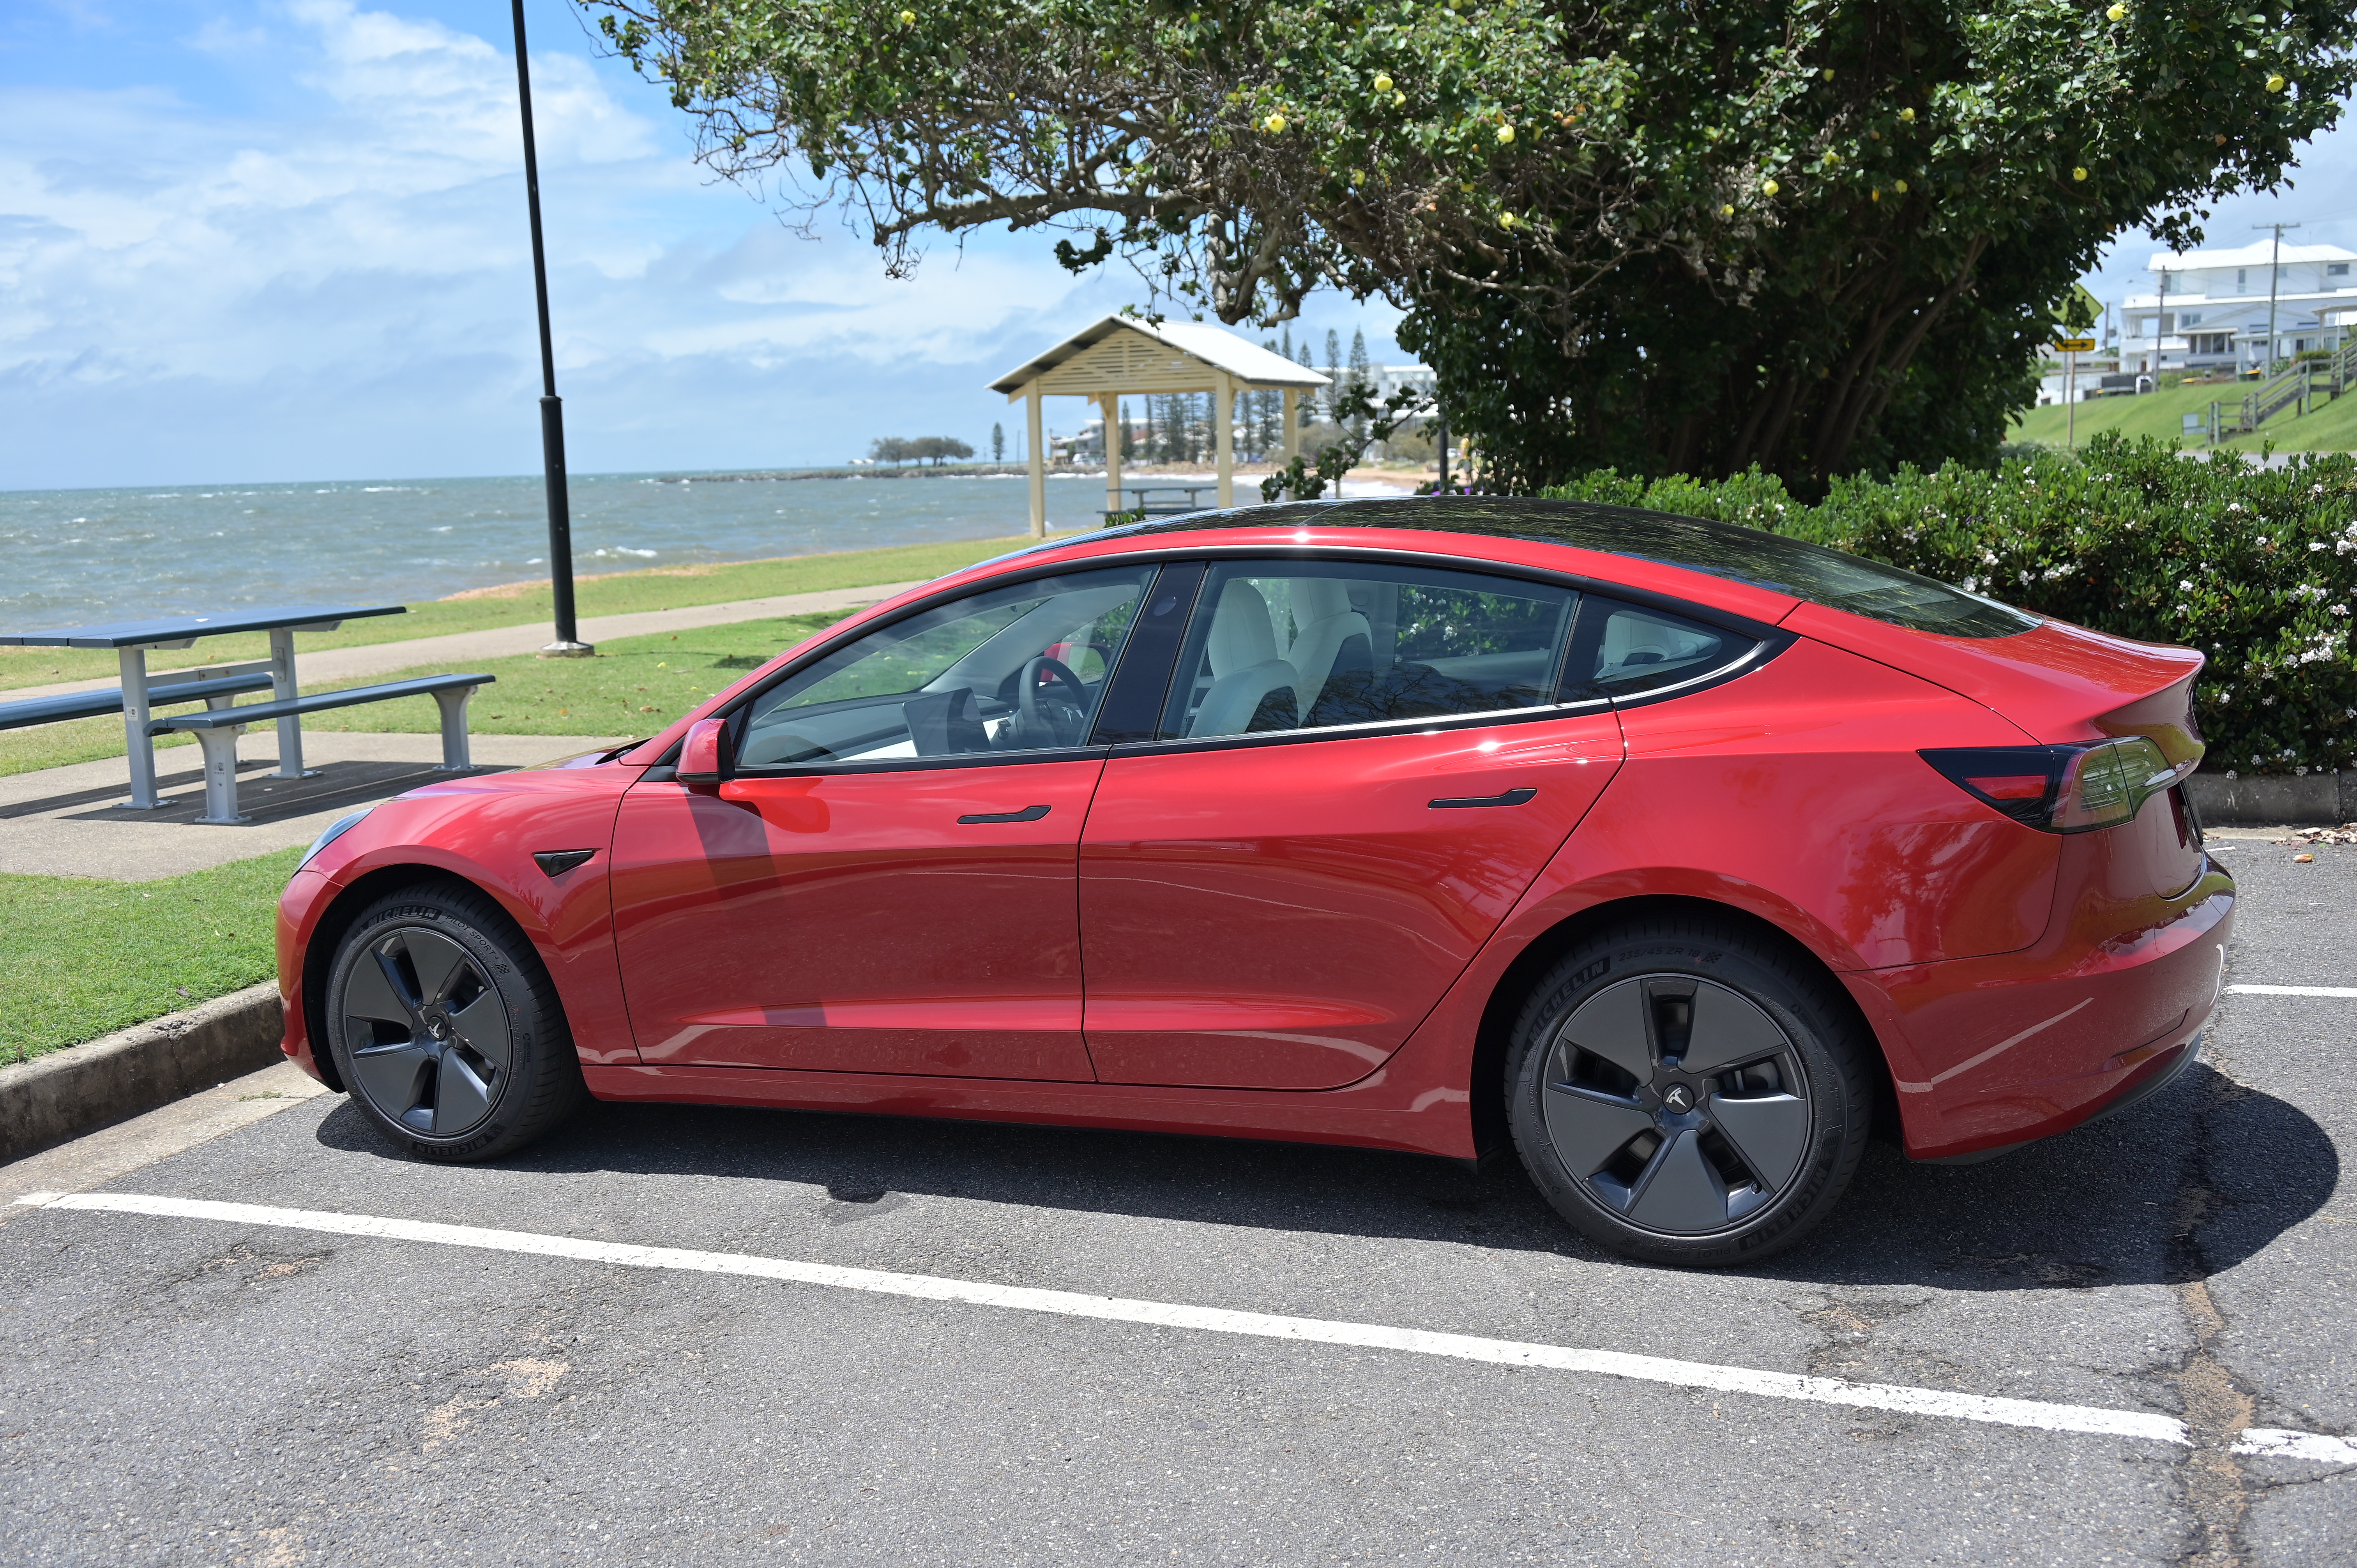
Despite the frustration of dealing with Tesla, after three months wait I finally received my 2021 Red Tesla Model 3 SR+ with White Interior. Being somewhat of a nostalgic person (in some instances) I took the Tesla to the same car park where I’d taken the photo above of the MGF some 20 years prior.
I’d been obsessed with electric cars since the EV1 and more recently the Nissan Leaf, however the range wasn’t quite enough for me, living a 120k round trip commute to work each day. The Model 3 I originally christened the Tessalecta, but the family refers to her as Tessie, which has now stuck. The acceleration of 0-100kph in 5.6 seconds makes it the fastest accelerating car I’ve ever owned, pipping the Impreza by 1.5 seconds, but in the end that’s not why I bought it. Its low center of gravity and weight distribution makes it corner like it’s glued to the ground and the Auto-pilot functionality is incredible, though not without it’s issues (don’t try to over-use it on city streets).
The car is the most comfortable car I’ve ever driven or owned and it’s changed my perception of driving from what had become a monotonous, sometimes stressful experience (especially to/from the office) back into something enjoyable. I remember with the MGF taking weekend drives to Rainbow Beach just to enjoy the drive (and the beach) and I recently did that trip again with my wife and daughter and it felt very much today in the Model 3, like it did in the MGF, 20 years ago.
Conclusion
I’m 45 years old now so I know that I’ll probably have another car or two before I hand my licence in, so it’s probably not the end of the story. For now at least the cars I’ve had the pleasure (and otherwise…Silver Bullet I’m looking at you…) of driving has been a reflection of the many different stages of my life, what fit my needs and what my budget could afford at that time.
It’s been a crazy three decades that’s for sure…
Upgrading the Mac Pro RAM
I’ve been enjoying my 2013 Mac Pro immensely and wrote about it here seven months ago, and two months ago I upgraded the SSD, with the further thought that someday:
"…I can upgrade…and go to 64GB RAM for about $390 AUD…"
Today I did exactly that, although I’m not normally drawn-in by Boxing Day sales that start the week before Christmas Day and end on the last day of December (that’s not a “Day” kids…that’s two weeks…SIGH) but I fell for the deal and spent $321AUD on the RAM I had intended from Day 1 when I bought the secondhand Mac Pro.
I’d done my research (IKR…me?) and it turns out that due to the fact that the Mac Pro 2013 was designed and released before 32GB SDRAM DIMMs were available, whilst you can fit 32GB modules in the Mac Pro, if you do the bus speed clocks down from 1866MHz to 1333MHz due to bandwidth limits on the memory bus. The chances I’m going to push beyond the 64GB RAM mark in my use cases is zilch hence I have no intention of sacrificing speed for space and went with the maximum speed 64GB.
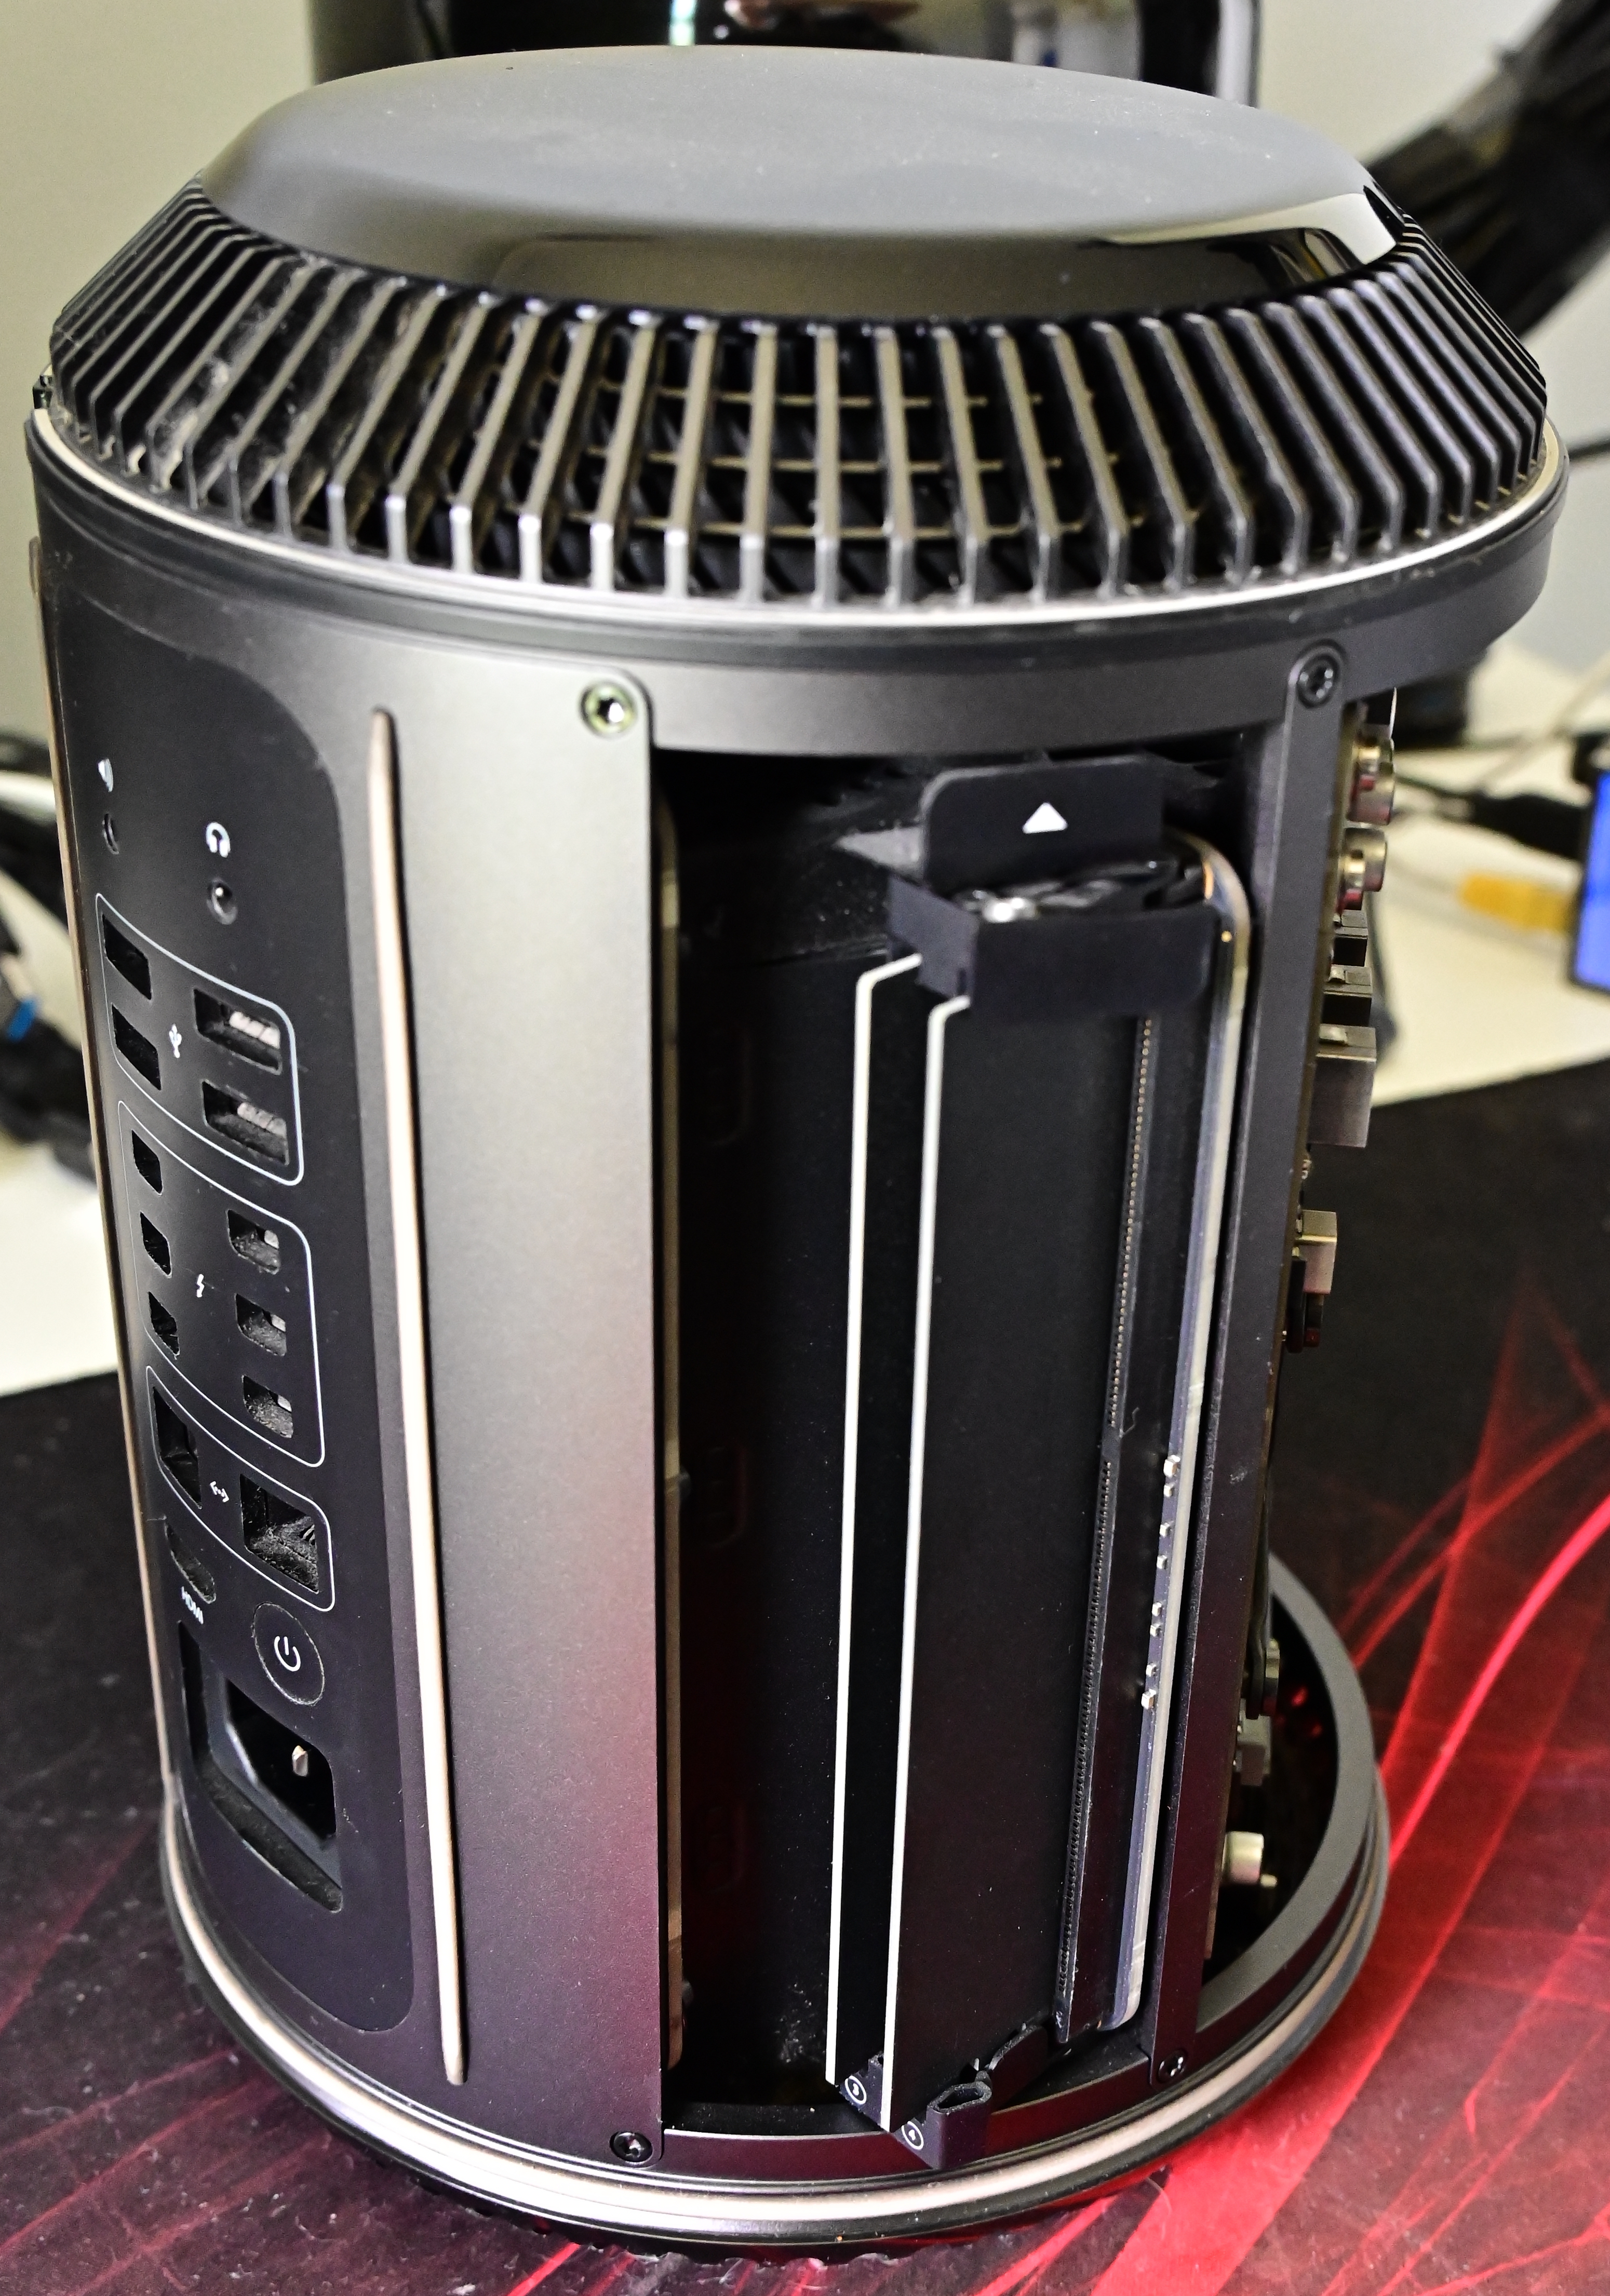
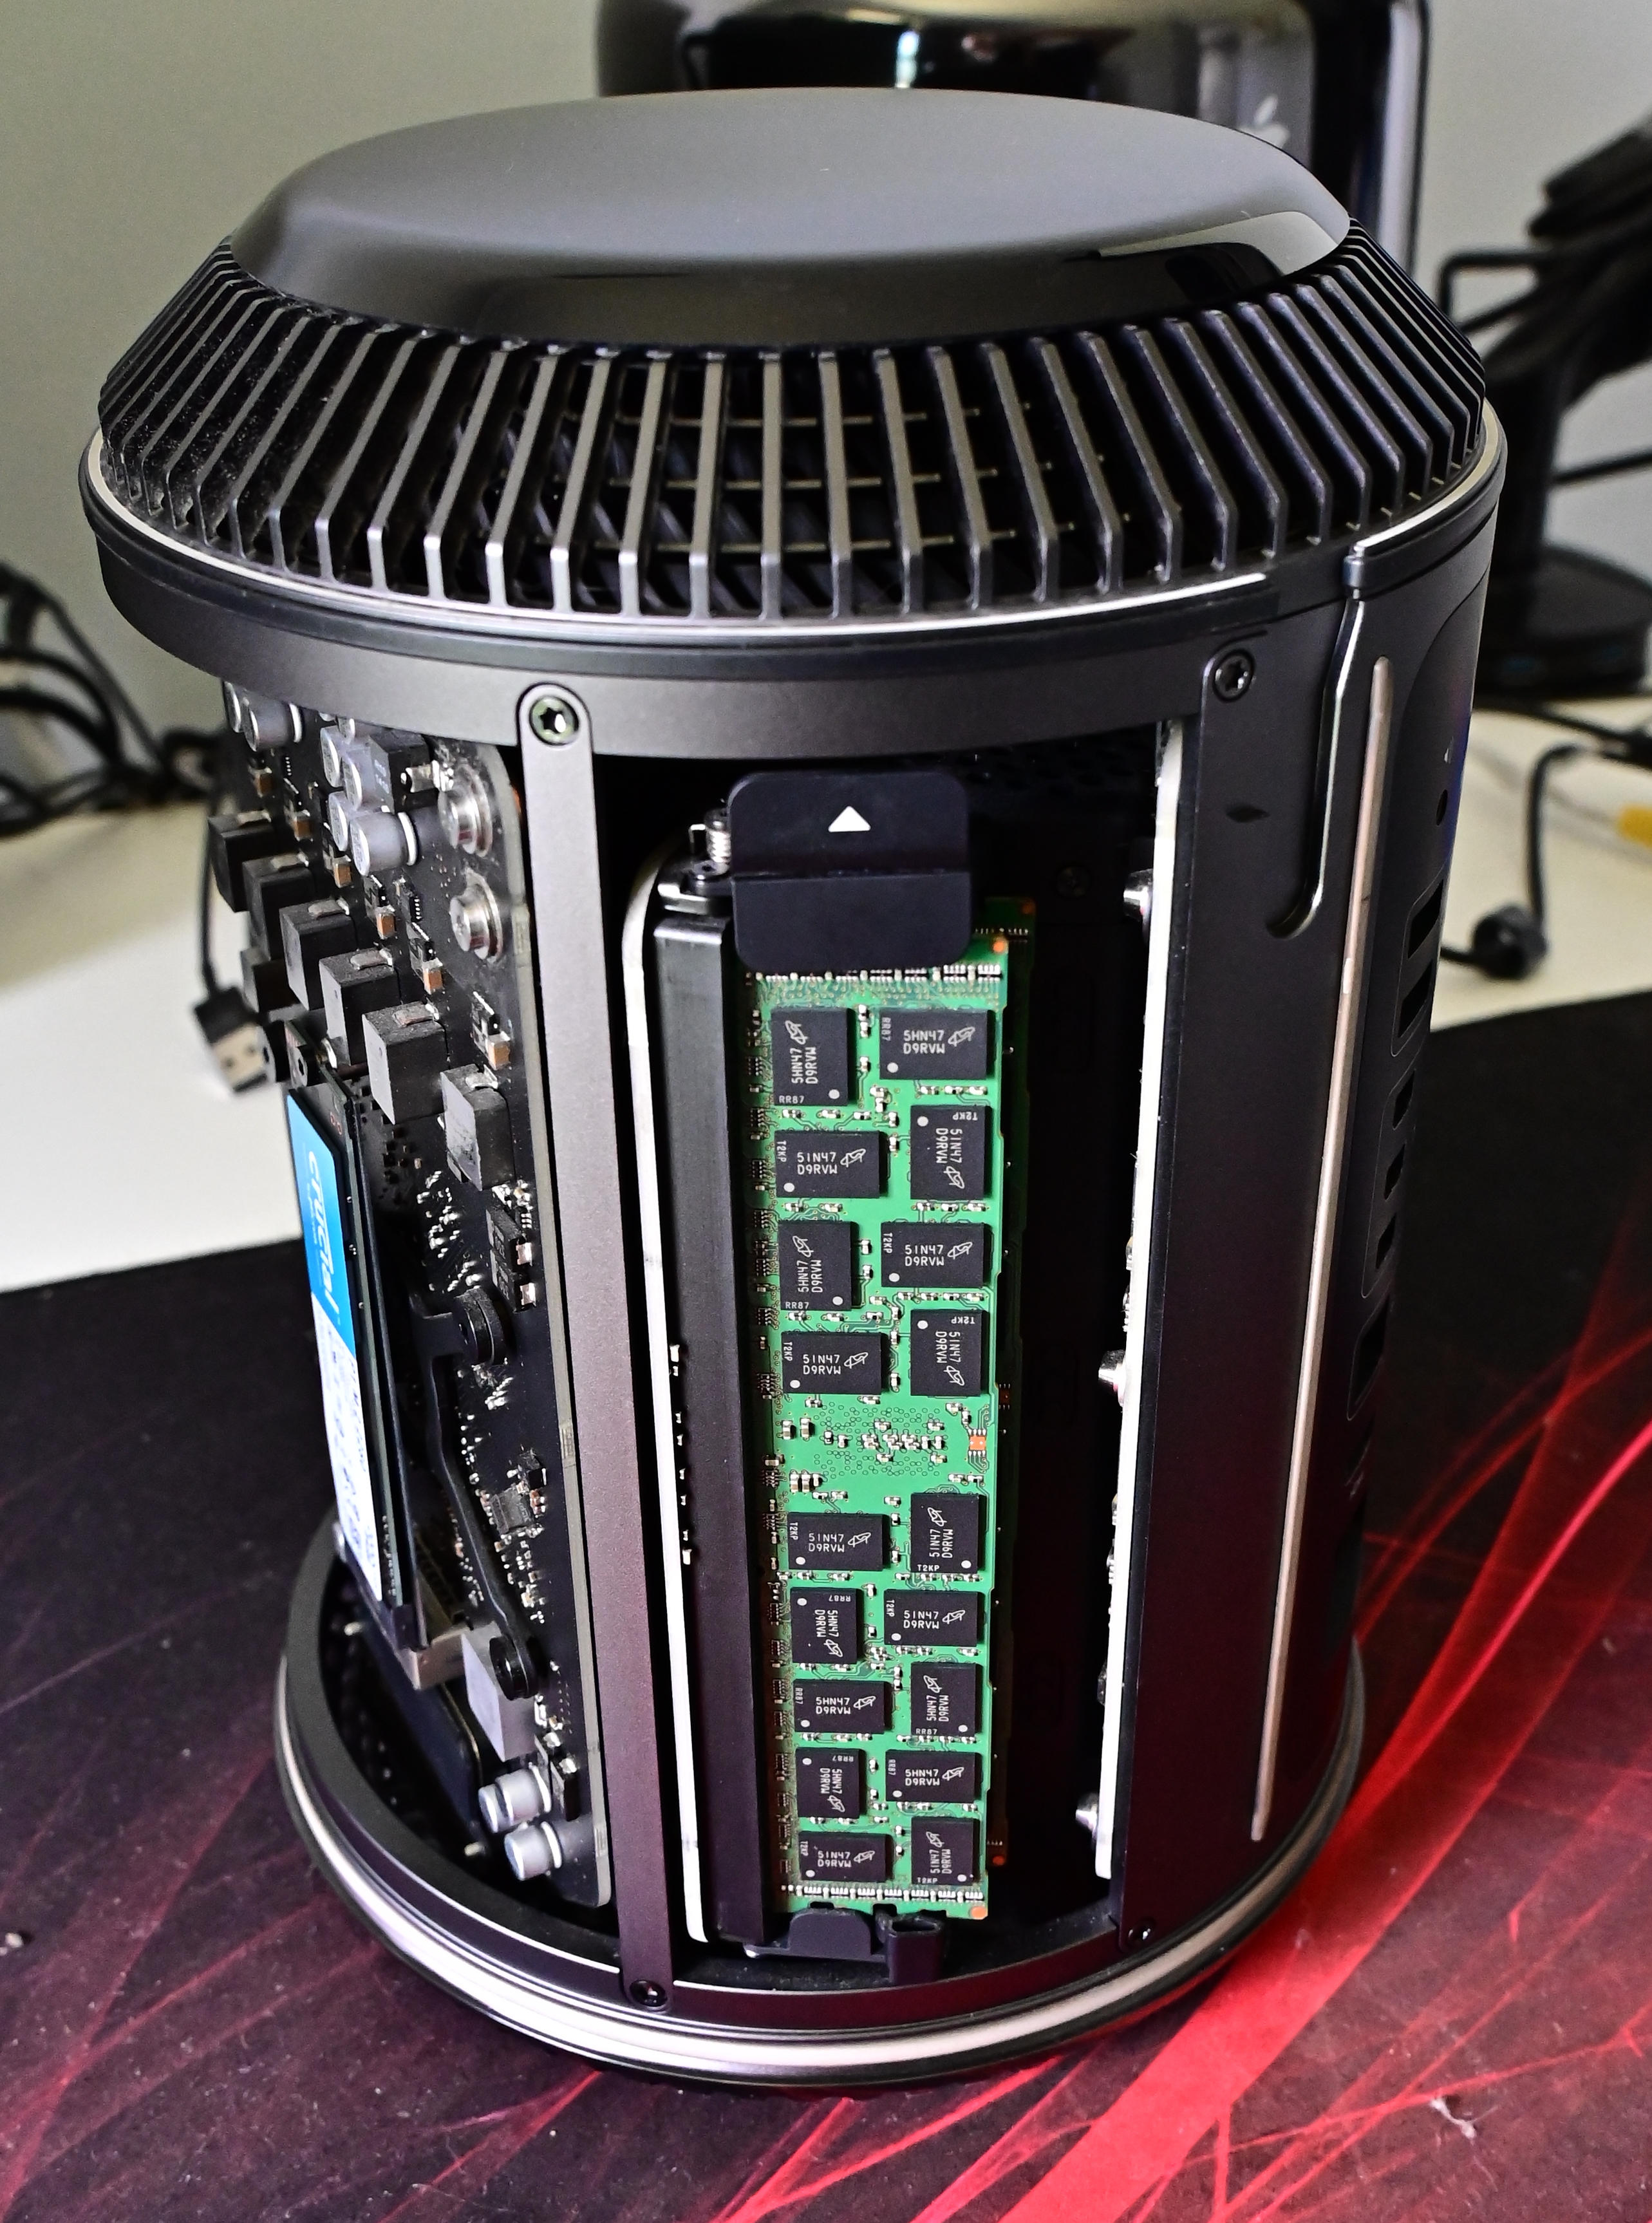
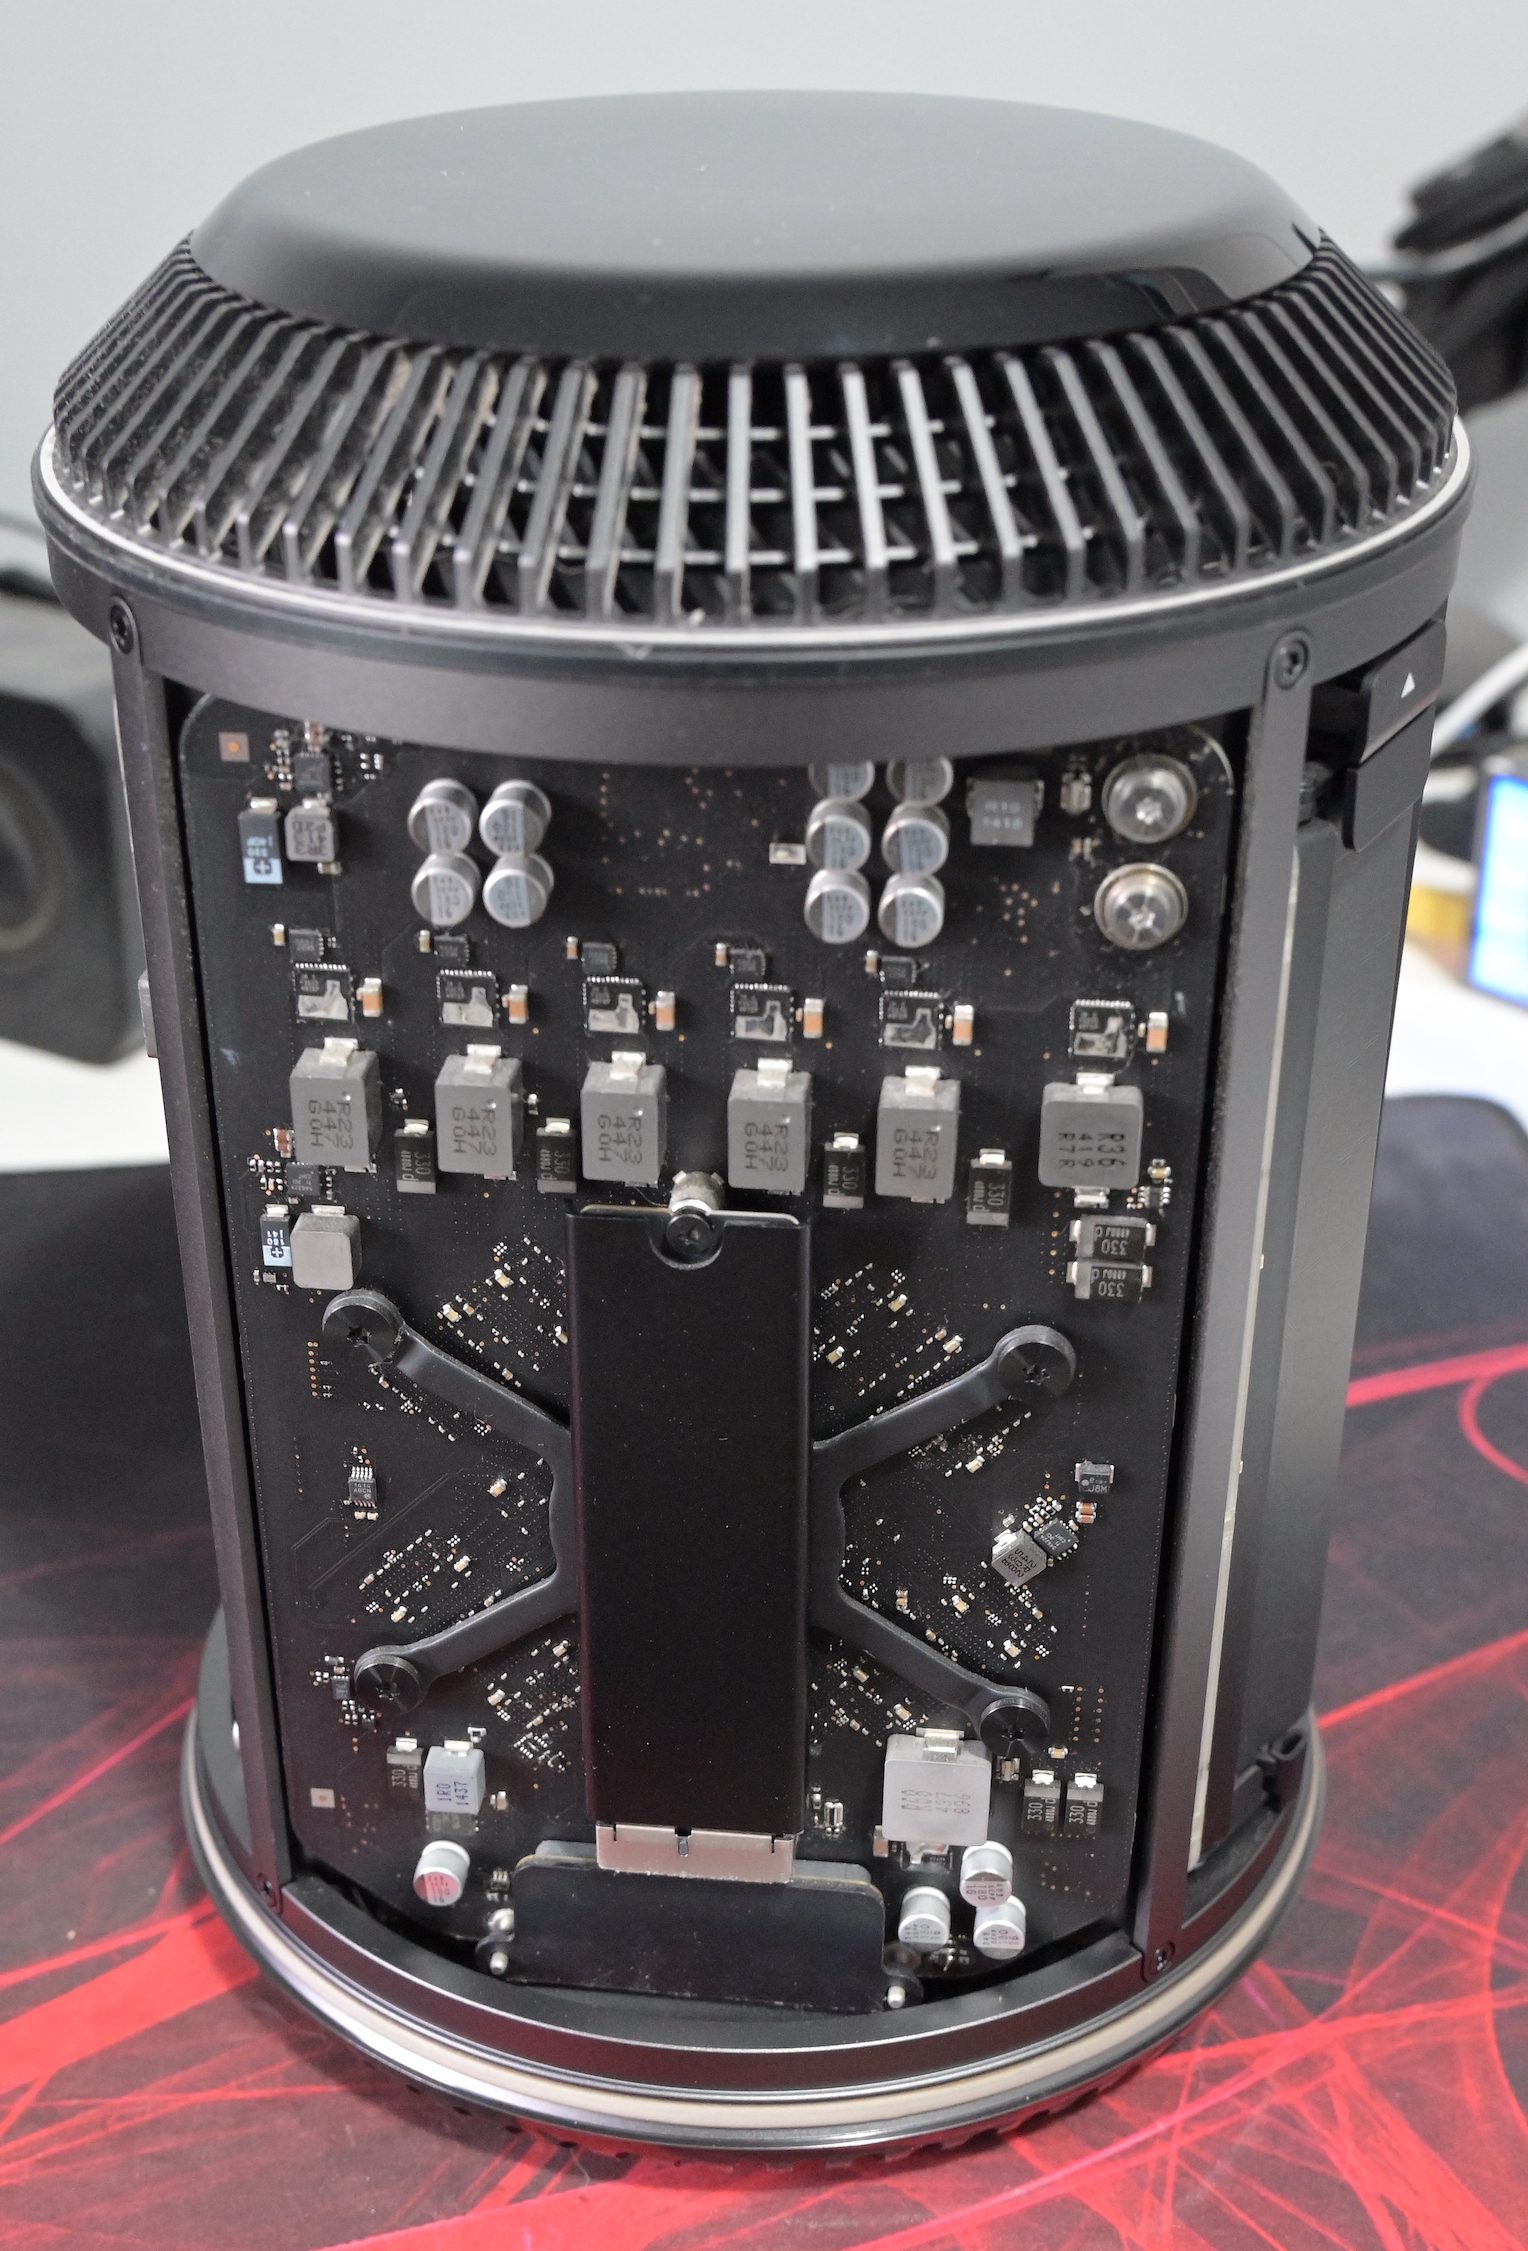
Shutting down and powering off, unlocking the cover and lifting it off reveals the RAM waiting to be upgraded:
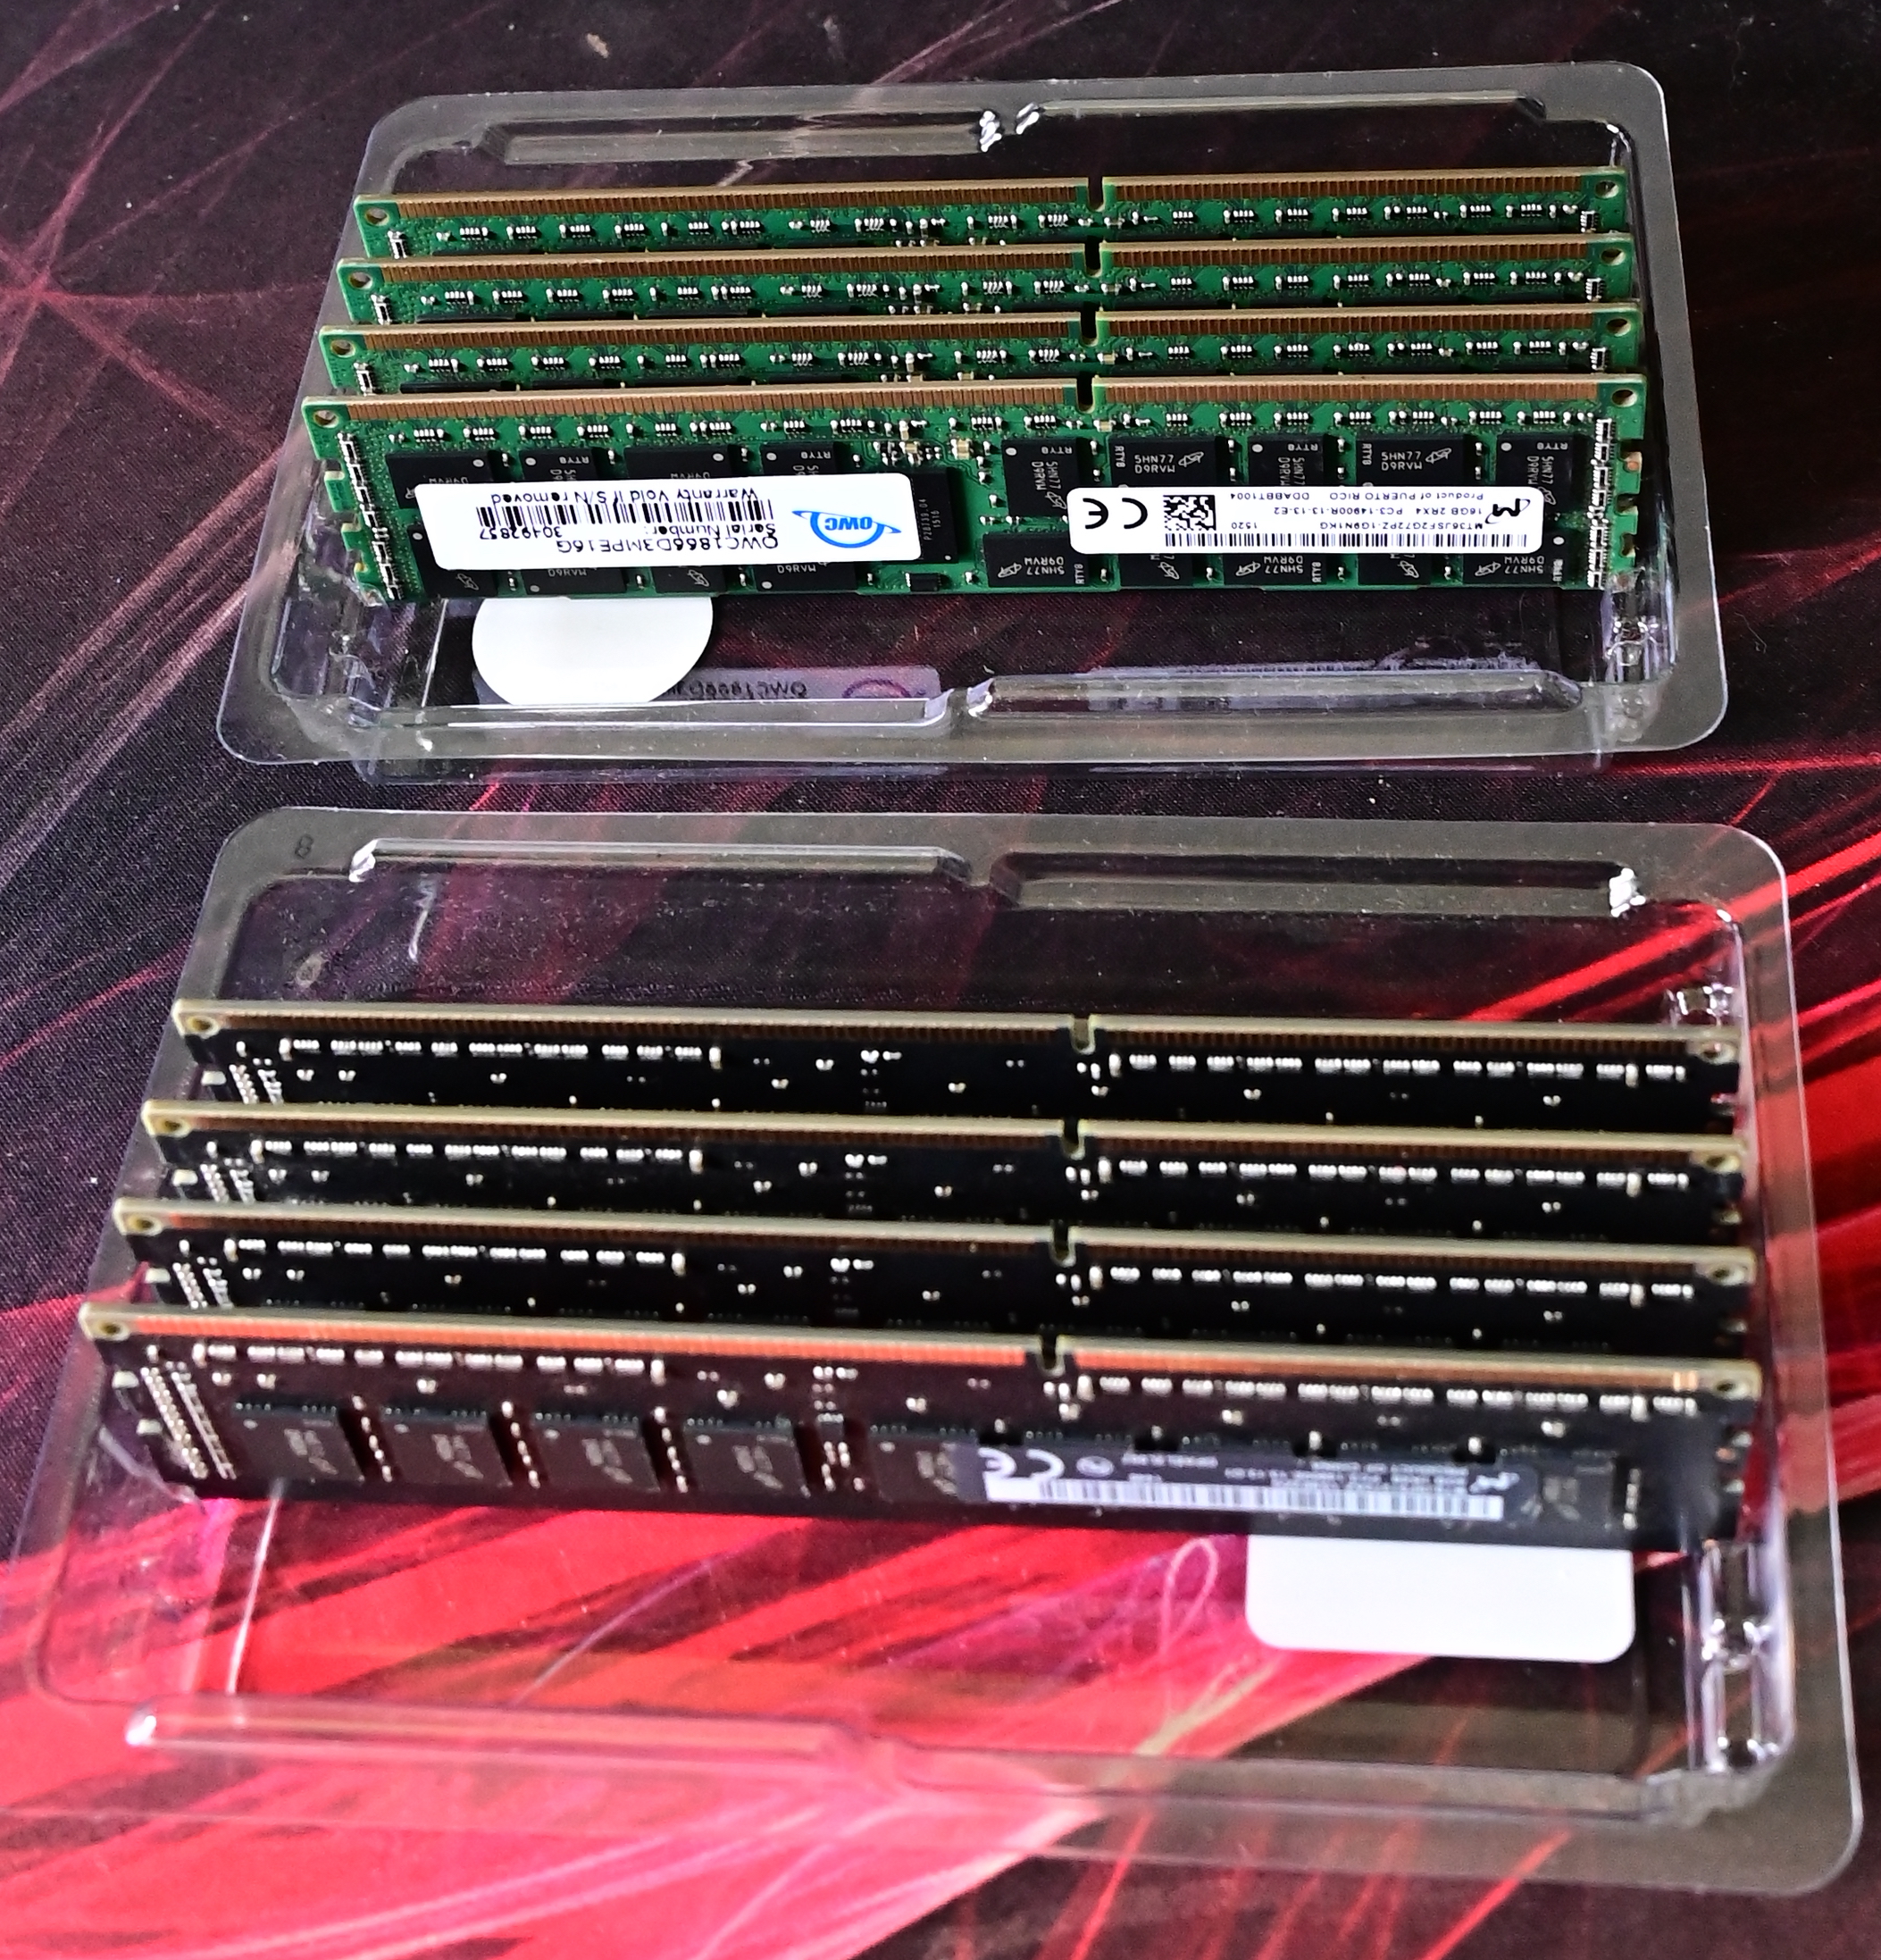
Depressing the release tab at the top of each bank of two RAM modules was quite easy and OWC’s suggested spudger wasn’t necessary. The new RAM is ready to be opened and installed:
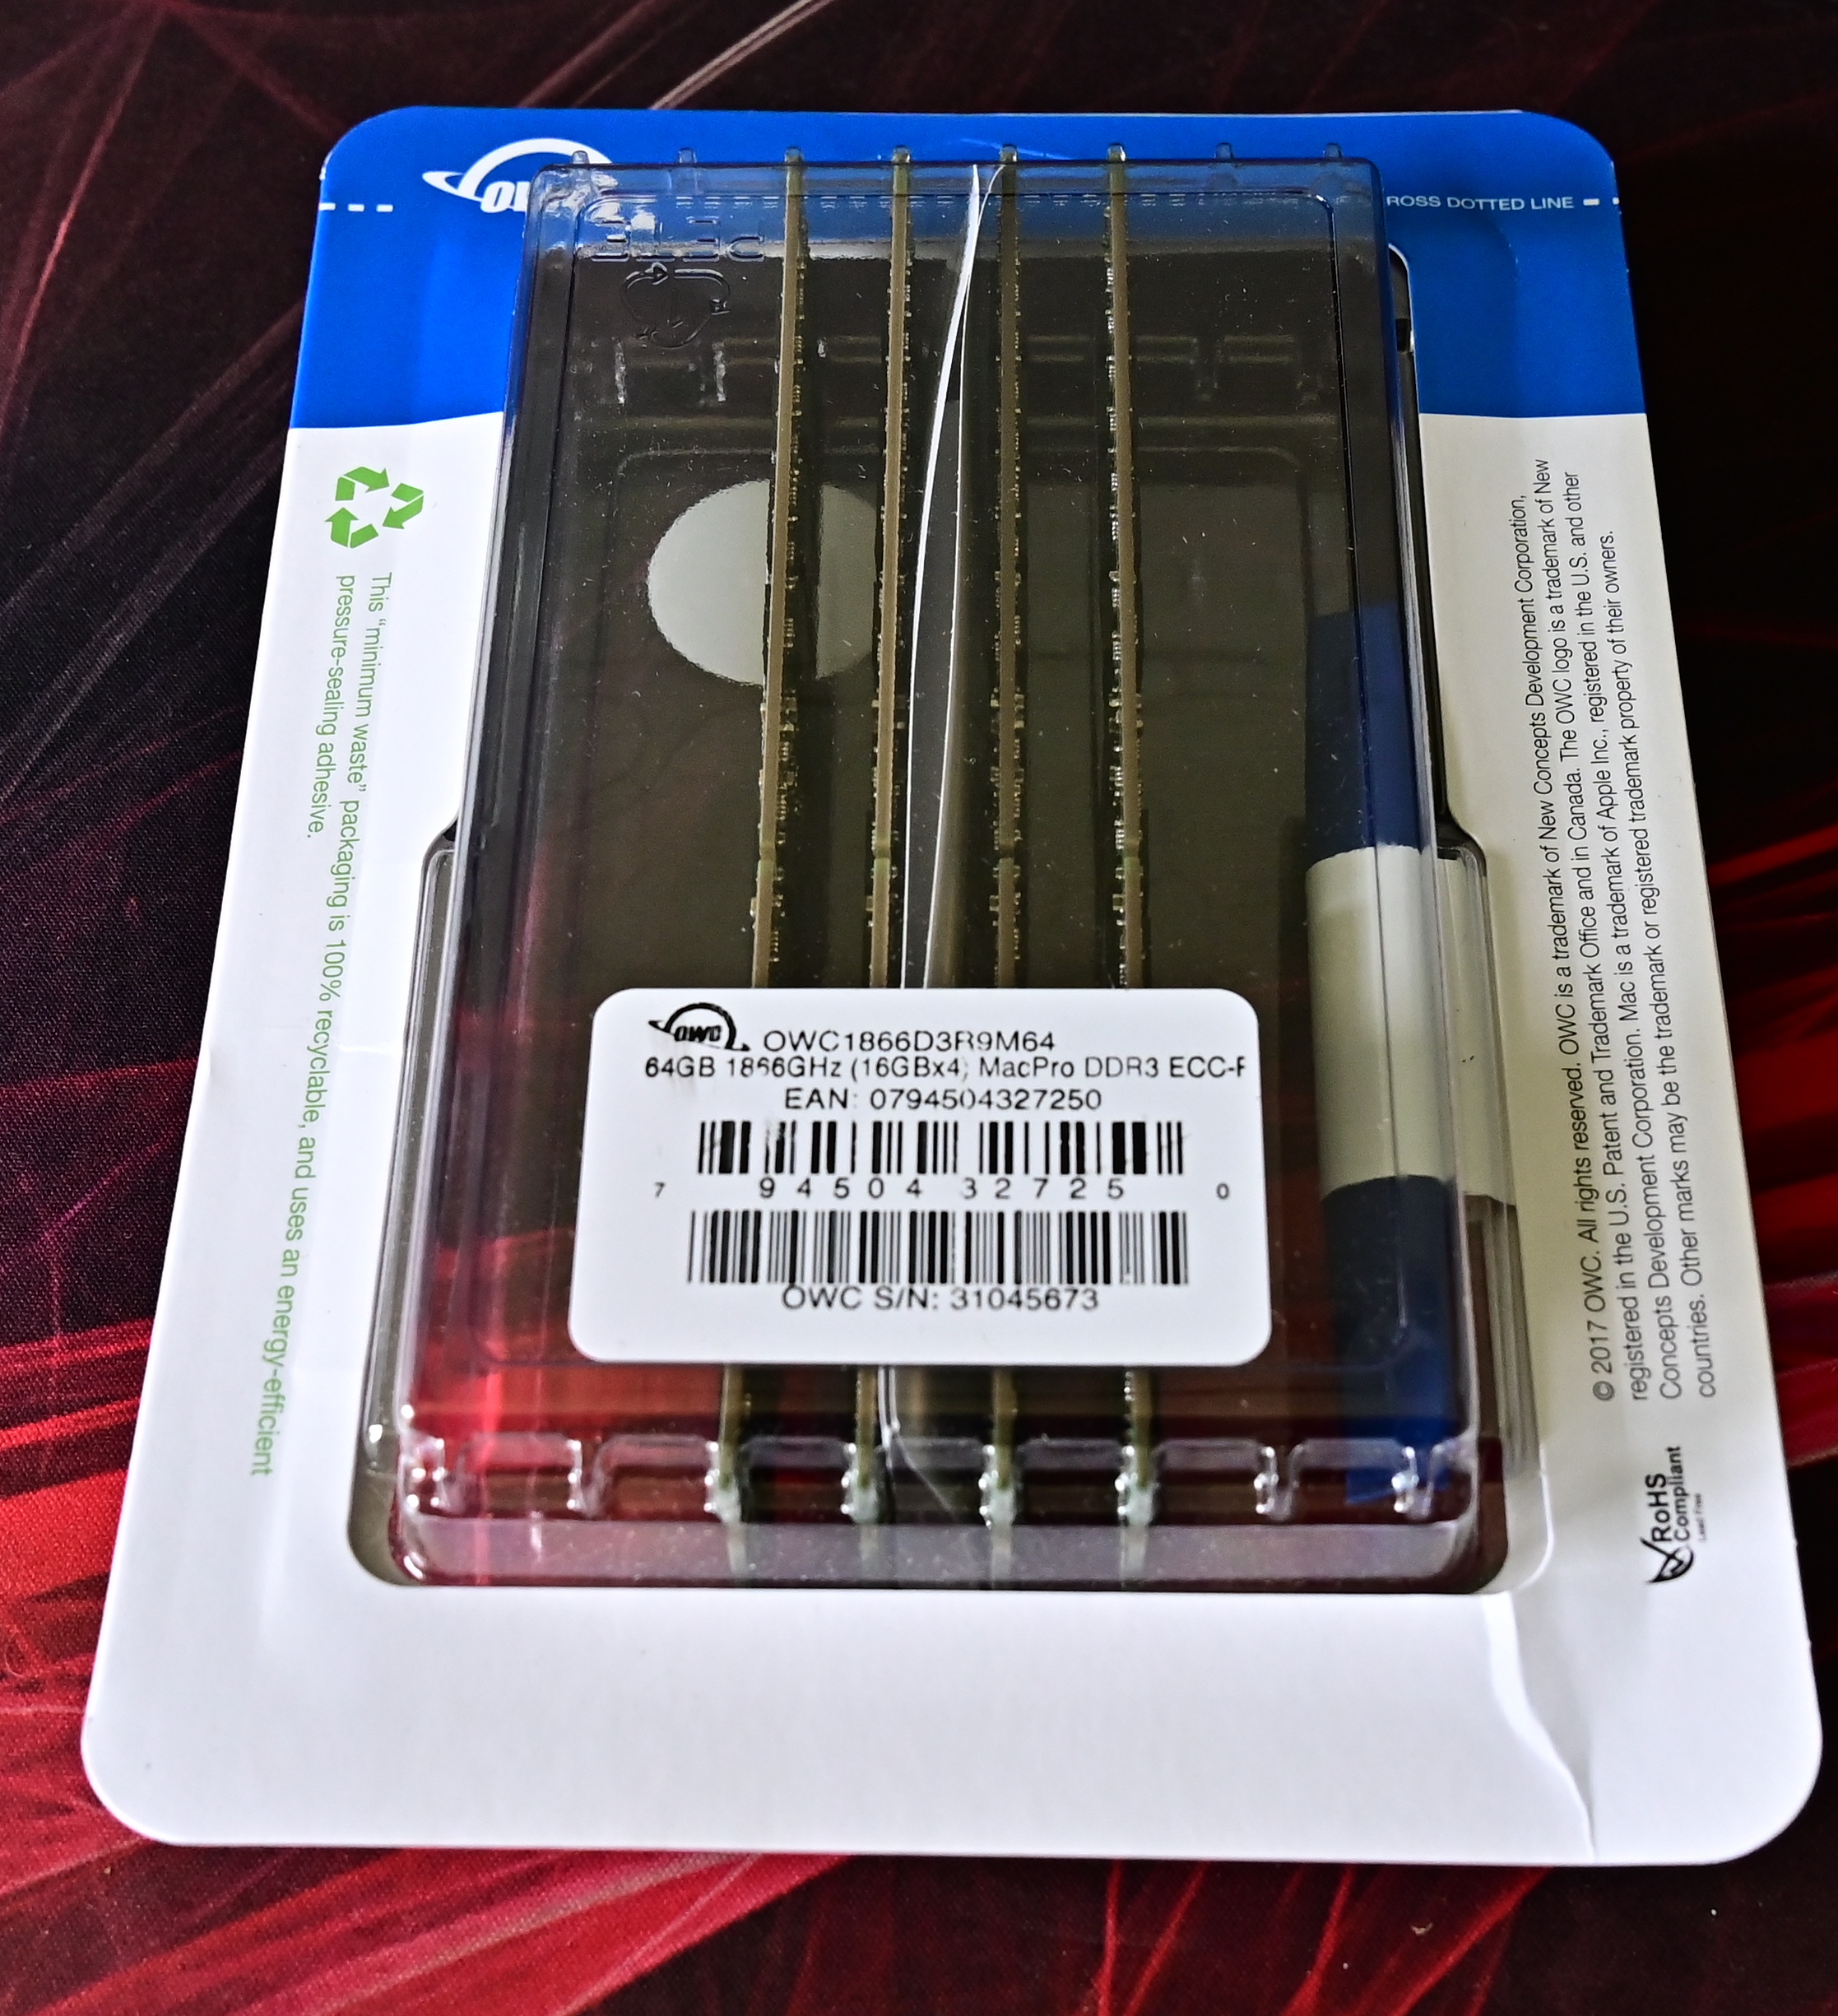
Taking out the RAM was a bit awkward but with a bit of wriggling it came loose okay. I put the old modules in the Top of the packaging, leaving the new modules still in the Bottom of the packaging:
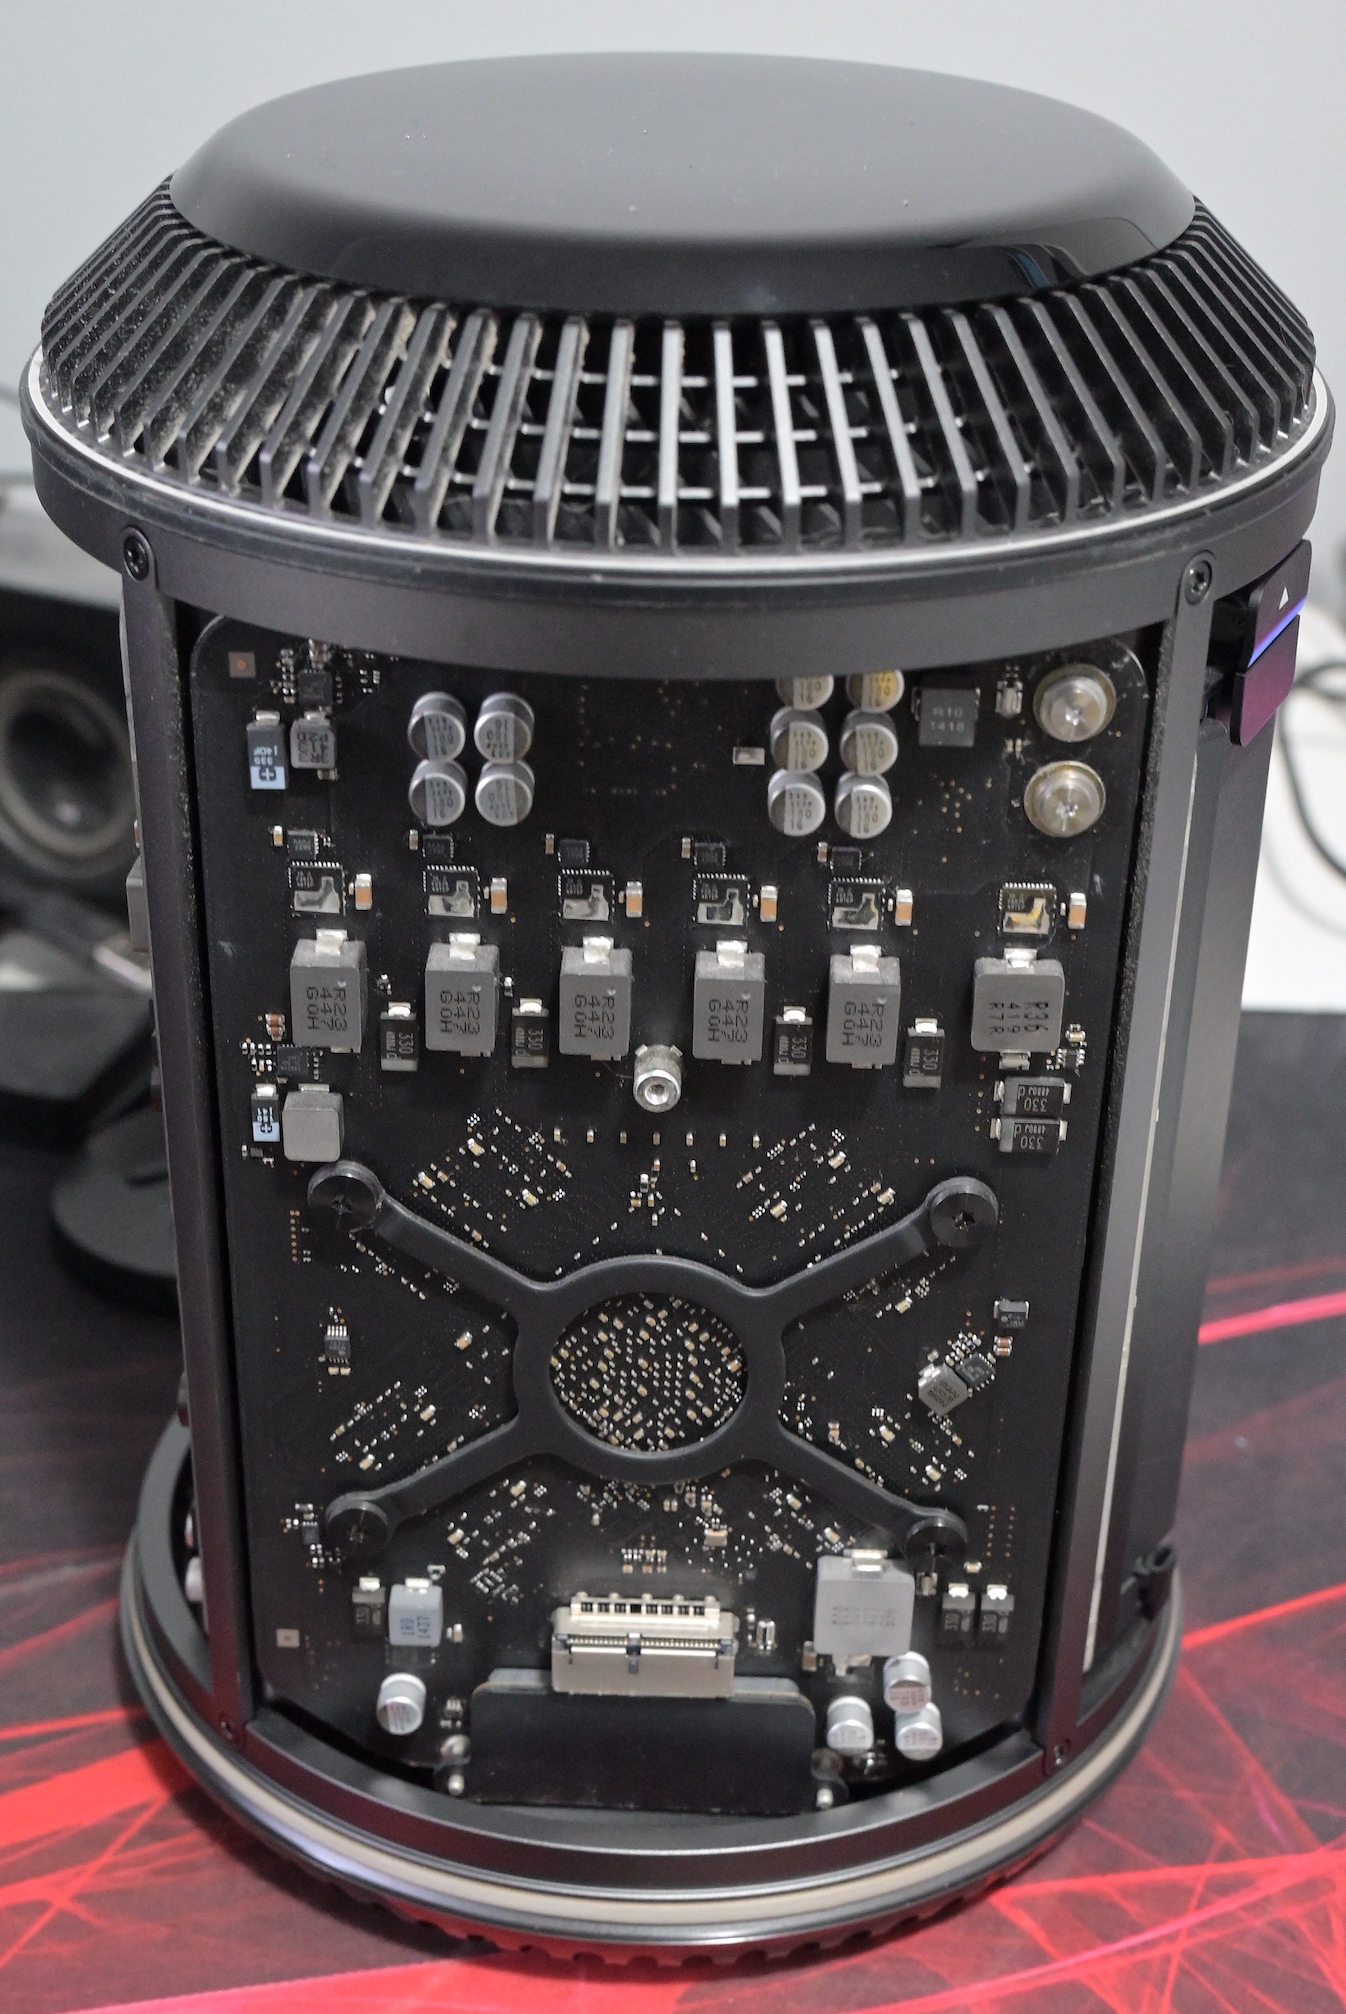
Fitting the RAM felt a bit strange as too much pressure on insertion starts to close the pivot/lever point of the RAM “sled”. Wasn’t too hard though and here it is now installed ready to be powered on:
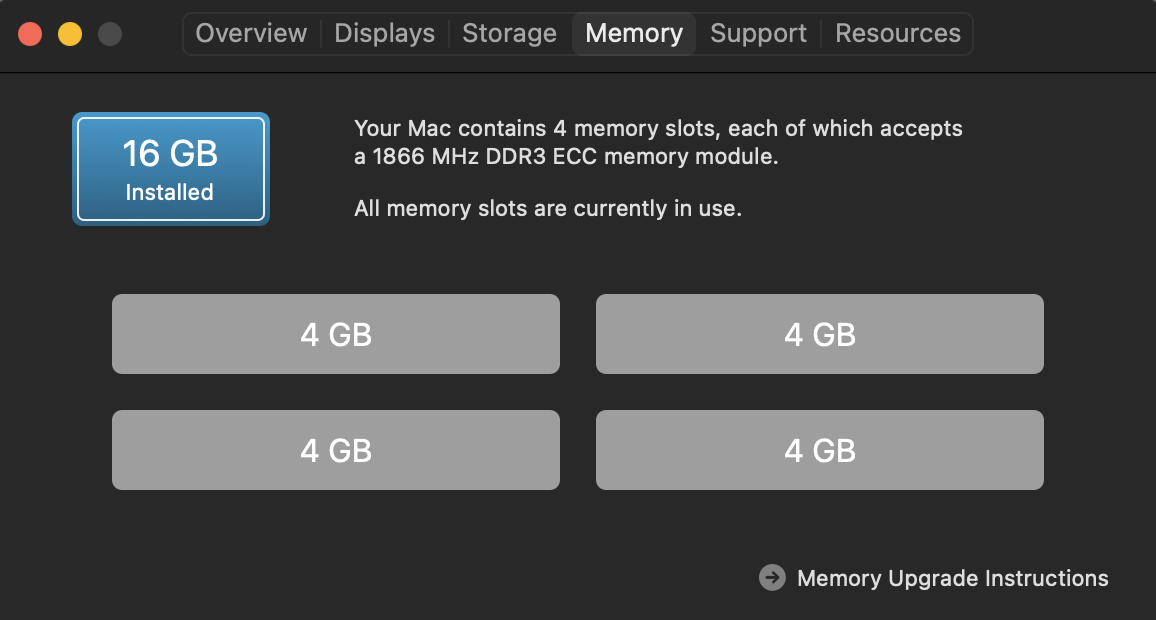
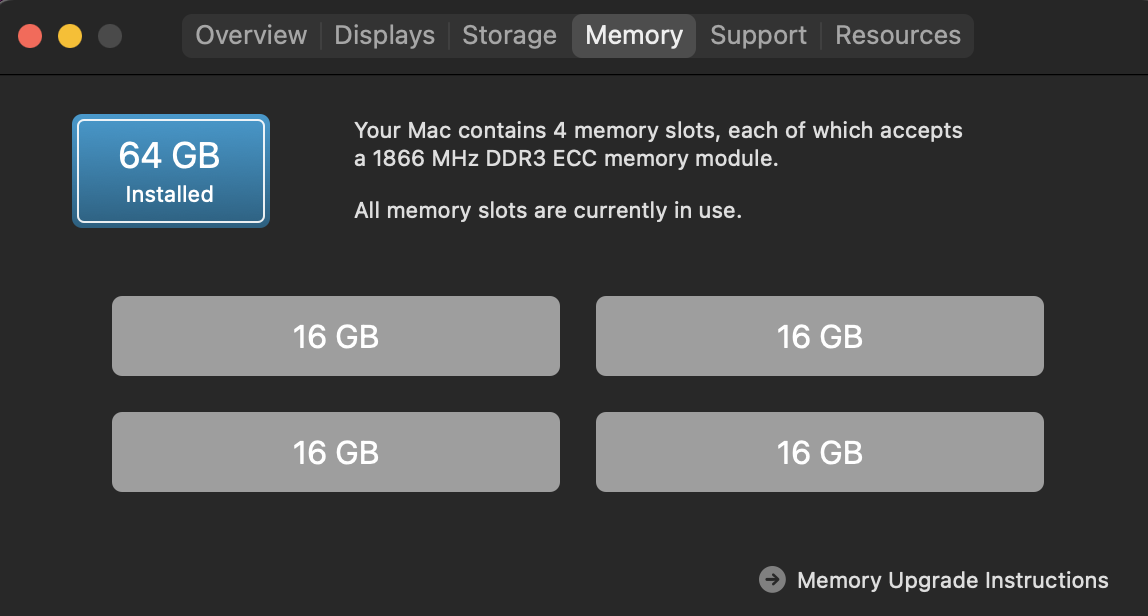
Once we’ve booted back up again I confirmed that the system now recognised the new RAM:
Original 16GB RAM
Upgraded to 64GB RAM
The improvement in performance was quite obvious. I run several Alpine VMs headless for various tasks as well as have multiple Email clients open, five different messaging applications (that’s getting out of hand world at large…please stop…) between home and work needs as well as browsers with lots of tabs open. Unlike with 16GB RAM, once the applications were launched, they stayed in RAM and nothing slowed down at all! It’s just as quick with 20 windows open as it is with 1 open. The RAM Profiler demonstrates the huge difference:
RAM 24hr Profile
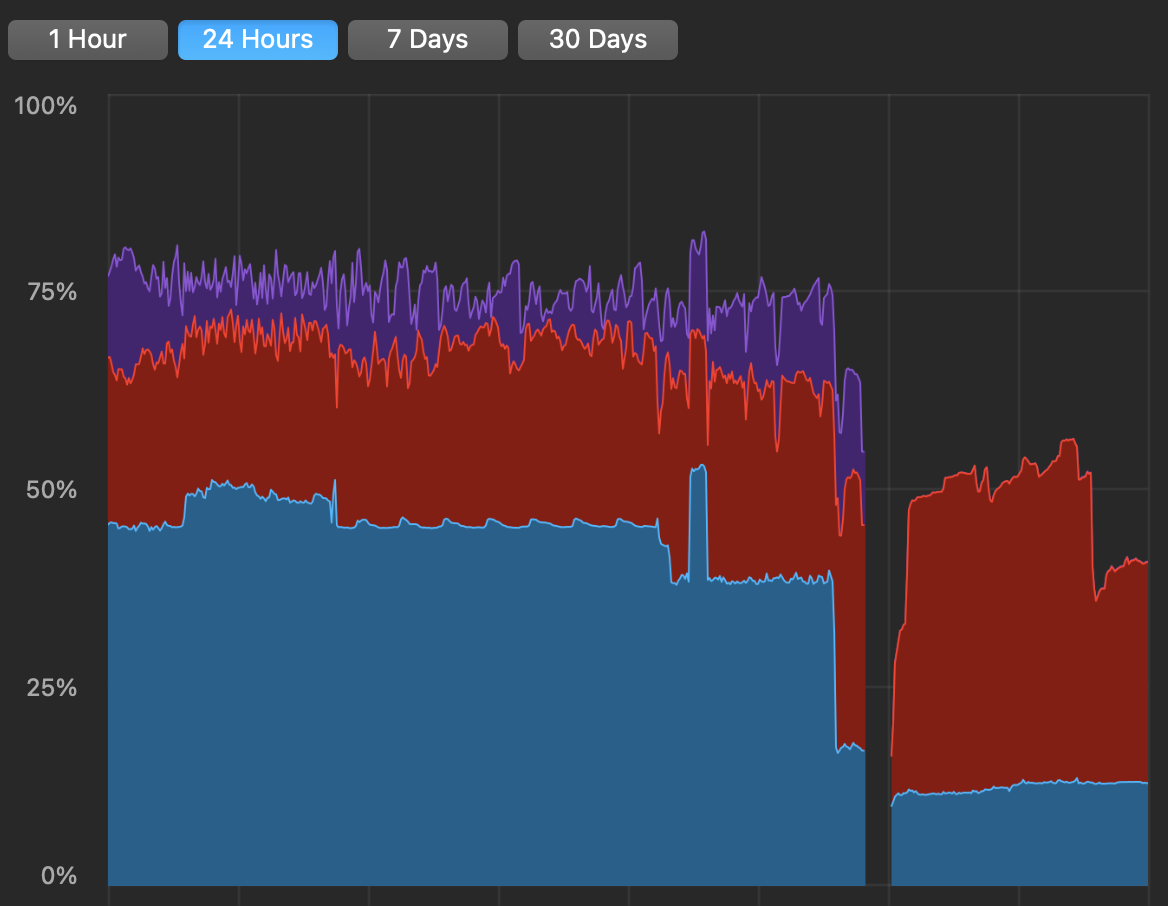
The Purple shaded area is compressed memory, with Red Active and Blue Wired and clearly the vertical scale is a Percentage of maximum therefore the system was peaking at 80% of 16GB (13GB used), but now is peaking at maybe 60% of 64GB (38GB used), with no compression at all. The swap was peaking during 4K video encoding at 15GB which was insane, but now it has yet to pass 0GB.
In summary it’s an upgrade I’ve long wanted to do as I was aware I was pushing this Mac Pro too far with concurrent applications and performance was taking the rather obvious hit as a result. Now I have lots of memory and the Mac Pro is performing better than it ever has. All that’s left is to upgrade the CPU…
Seriously? Well…we’ll see…
Buying A Tesla
I’ve been closely watching Tesla since their original collaboration with Lotus in the 2010 Tesla Roadster. In Australia, Tesla didn’t open a store until December, 2014 and the Model S started at about $100k at the time with only 2 Superchargers, both in the Sydney area and of no use to me in Brisbane.
Mind you, money stopped me anyway and so I drove my 2012 Honda Jazz somewhat grumpily and waited. (Sorry Jazz…you’re a pretty solid car and have served me well…) My company was increasingly supportive of Electric Vehicles and had obtained a Nissan Leaf for each of their major office locations, and Brisbane was one of them. So in June 2016 I booked the company Leaf and took it for a drive home and back to the office again as a test run - could a Leaf be in my future?

Certainly it was much more affordable and it was fun to drive but when the round trip between the Brisbane CBD and my home took me down to only 12km of range remaining, I decided that it was too short on range to meet my needs once the battery would ultimately degrade with long term use.

Again, I grumbled and watched Tesla from afar. The Model S was a hit, and was followed by the Model X with it’s technical problems (those Falcon Wing doors…really?) and finally the Model 3. Tesla had opened their first store in Brisbane in mid-2017 but it wasn’t until the end of 2018 that the Model 3 was available to be viewed - and then it was the Left-Hand Drive model and wasn’t allowed to be driven in Australia at that point - so no test drives were permitted.
Despite that I couldn’t contain myself any longer and took my sons with me to the Tesla dealership and test “sat” in the S, the X and the 3 - even if the steering wheel of the Model 3 was on the other side! It cemented in my mind that whilst the X was the family favourite its price made it perpetually out of my reach, but the 3 was the far nicer vehicle inside. Cleaner, simpler and helpfully it was also the cheapest!
And so my heart was set on the Model 3, but with two other car loans still in play, I had to wait just a little bit longer. A few of my friends had received their Model 3 locally in 2019 and Tesla now had test drives available, but on advice from the only Model S owner I knew I refrained and didn’t test drive a Model 3 out of fear that it would only make me want one even more…
He wasn’t wrong…
Fast-forward to 2021 and now with my eldest child having a drivers licence, we needed a third car and with both existing cars now paid out, I was finally able to seriously look at the Model 3. I test drove a Standard Range Plus with FSD installed on the 1st of September, 2021. I was allowed to drive it for 45 minutes and fell in love with it on the drive. The budget couldn’t stretch to the Performance or Long Range models, FSD was out of the question too, but might be enough to get the White Interior (I loved the look and feel of it) as well as the lovely Red paint. I’d been wanting a Red car for 20 years. (That’s another story)
Important Tangent
My daughter was in her final year of High School and like many of her friends they were starting to organise their Grade 12 formal…dresses, make-up, hair and of course, the “car” that would drop them off. My wife and daughter were very excited about the possibility of dropping her at the formal in a shiny new, Red Tesla Model 3 and after my test drive we saw the website reporting 1-4 weeks expected delivery, and decided that given how well it drove and it would be easily delivered within the 11 weeks I needed to make the formal, that I placed my order the night of the test drive. Two birds with one stone…as they say.
Back to the Tesla Bit
Finance was approved within a day and the Tesla app and website changed from 1-4 weeks expected delivery, to showing “We’re preparing your Invoice.” On the 17th the App changed from its blank entries to listing the 8 instructional videos. There was no doubt I’d entered the infamous Tesla Reservation Black Hole. I’d read about it, but when you’ve been excited about owning an EV, specifically a Tesla and most recently the Model 3, it was approaching 10 years of mounting anticipation. I thought it was supposed to get easier when you got older to deal with this sort of thing, but apparently it really hasn’t. So had begun what I thought would only be a few weeks wait. How wrong I was…

The Tesla representative I was assigned was not the best communicator. He didn’t return several of my calls and I originally had called once each week to see if there was an update, but on week three his tone made it clear that so far as checking on updates for where my car was, in his words…he “wouldn’t be doing that.” Realising that I was becoming “that guy” I decided there was no point in pressing and instead returned to habitually reloading the website and the app in the hopes of a change of status.
3 weeks. Still nothing.
4 weeks. Still nothing.
5 weeks. Still nothing, although my electrician had mounted the wall charger and completed the 3-phase power upgrade, but the charger still wasn’t wired in. Didn’t matter - no car to plug it in to…yet!
6 weeks, still nothing, though my electrician finished the wiring for the HPWC so that was some kind of progress, but still no car to plug it in to.
Time Out for a Second
It’s worth noting that the website claimed a 1-4 week wait when I ordered, and a 1-3 week wait on the 2nd week of September.

It wasn’t a performance model or a long range either. Then I came across a growing list of videos from other Australian recent Model 3 buyers reporting that the website time estimates were essentially complete fiction. It was never up to date…even when the notification came through on their phone saying their delivery was ready, payment had been received and their delivery appointment was set, it didn’t always show up on the website.
Additionally I learned that even once a Tesla hits the shores in Oz, it still takes 2-3 weeks before you’re able to even pick it up hence when the site indicates 1-4 weeks, it means it will be 1-4 weeks before you actually get the chance to book a time to pick it up - not actually pick it up. So realistically even if I got a message saying I can book a pick up time, it will be another 2-3 weeks before I can actually pick it up. (Yay) So at this point it’s looking more likely that I’ll get the car late October, or the first week of November which would be just in time for the formal.
You might forgive me (or not) for my rant as an impatient child to an extent, to which I see that side. Then again I was also feeling the pressure of living up to the promise I thought was safe to make to my daughter based on conversations with the Tesla representative and the Tesla website. I also knew, even then, that there were those that reserved a Model 3 multiple YEARS before their Model 3 was even delivered. Although that was for a vehicle that wasn’t shipping to anyone, anywhere, when they placed a reservation.
I suspect (and likely will never know) that the problem I created for myself inadvertently was choosing an entry level Model 3 with a White Interior and Red Paint. Truth is that if you are REALLY strapped for cash, you’re likely to order the fully entry level, White paint, Black Interior, stock-standard Model 3 Standard Range Plus - for which I believe that the order time might even have genuinely been 1-4 weeks. Even if you ordered a Long Range or Performance model, with standard colours, you’d probably get one sooner as these are higher margin and Tesla have been known for prioritising higher margin vehicles.
Designing The Website
I think about how I would have developed the website and if it was possible to separate the quantity of ordered combinations by exterior and interior colours then I would. However to test my theory I tweaked the colours, both interior and exterior and sure enough the delivery estimates NEVER changed. Knowing that Tesla don’t generally make your car to order in a manner of speaking, they seem to batch them in every combination based in part on the prior quarters order demand, it’s clear that I just didn’t pick a popular combination and that Tesla don’t break down their supply/demand by every combination. Hence their website delivery estimates aren’t based on anything other than the base model and don’t account for options and any delays they might therefore incur.
Back to waiting I guess, though by the 5th week I’d just given up on the website now knowing it was effectively full of sh!t.
Tracking “Ship"ments Literally
Running low on whatever patience I had left, I was interested to find some articles linked on Reddit and a Twitter account called @vedaprime that claimed to track Teslas as they moved around the world, including to Australia. Unfortunately his “service” used the VIN number that was often associated with orders in the past when shipments came from the USA, however from China he indicated the VIN wasn’t as reliably extracted from the website as it had been in the past. I did learn a few interesting things though.
As of the time of publishing this article, Tesla ship all Model 3 Standard Range Plus models from Shanghai to Australia on a limited number of vehicle carrier ships most commonly on the primary route: Shanghai–>Brisbane–>Port Kembla (near Sydney). Despite Tesla having sales and delivery centers in Queensland (in Brisbane too) they do ALL of their inbound Quality Assurance (QA) in Port Kembla.
Once coming off the ship at Port Kembla, each car needs to be inspected and once it passes quarantine, customs and QA inspections, it waits its turn at AutoNexus for a car-transporter (semi-trailer connected to a prime mover aka a big truck) bound for Brisbane. The ships dock in several ports but only unload Teslas in southern NSW for the East Coast and Tasmania, and Brisbane isn’t as large a market as Sydney or Melbourne so gets less transporter trucks as a result.
Matching the VIN then progresses down the list of the first Reservation Number (RN) to match the configuration, then it’s attached to the RN, and assigned to the buyer. The whole process can take 1-2 weeks to QA all of the cars coming in from the docks with shipment sizes varying from a few hundred to well over a thousand - that’s a lot of cars to QA! Once the VIN is matched, then if Mr VedaPrime can find it, he can track the vehicle, but by then it should be imminently on its way to the buyer.
So I began searching for ships that fit the criteria. Using VedaPrime’s last 12 months of public shipping notifications on Twitter, I narrowed down the search to ships that had left Shanghai bound from Brisbane and eventually Port Kembla, and finally came across one that fit - the Morning Crystal. Departed Shanghai on the 26th of September, due to arrive in Brisbane on the 7th of October, then in Port Kembla most likely 9th of October. Assuming a 1-2 week QA delay then a 1 week delivery to Brisbane, the most likely date for a delivery would be the last week of October, about 9 weeks after placing an order but still within my 11 week limit.
Well then…I guess that means I’ll keep waiting then. Of course that assumed that my vehicle was on that ship. If it wasn’t, there were no current alternate candidates for at least another 2 weeks, possibly more.
Back to the story
7 weeks…still nothing. The first ship that I had my hopes pinned on (Morning Crystal) came and went without a word and the site now reported a 2–5 week delivery delay. The next candidate ship was the Passama, on the 19th of October in Port Kembla, but it also came and went without any Teslas aboard. I did however receive a call from Tesla, but from a different salesperson, informing me that my previous salesperson was no longer working for Tesla and he was taking over from him. Okay then. Great.
8 weeks and finally something changed on the website - there was now an estimated delivery date range of between 17th November to 1st December, 2021 and the VIN was now embedded in the Website HTML. A few days later and my final invoice notification arrived by EMail at 7am, though didn’t appear on the website until later that day. As I was financing my car it was advised I would get forms to sign shortly, and I did mid-morning. Submitted them and…back to waiting again.
VedaPrime’s Patreon
At this point I chose to join VedaPrime’s Patron and Discord group as I had a VIN now, and he claimed he could track it, or would do his best to do so. I’d reached the limit of what I could discern easily with my own knowledge and investigation on the public internet and Lord Veda (a nickname given to him by a popular Tesla YouTuber) clearly knew much more than I did about Tesla order tracking.
Now I’d seen suggestions about Tokyo Car and Morning Clara as potential candidate ships that could be carrying my Model 3. Tokyo Car was docked in Noumea, bound for Auckland then to Port Kembla (due 6th November) and Morning Clara was still in Shanghai, due to arrive on the 19th of November. So…back to waiting some more.
9 weeks…and my app and website began showing an estimated delivery schedule of between the 7th and 21st of November. There was mounting evidence that my car was in fact on the Toyko Car ship. With the 7th of November coming and going, I called my new Tesla representative to see if he had more information, and he didn’t. Of course. I’d given up calling Tesla about anything at this point. At this stage I’d called them five times in total following the order. They were generally unwilling or unable to help anyway, so there was no point in bothering them. I was learning far more from the VedaPrime Discord than from Tesla themselves.
10 weeks…and my app narrowed the dates down to between the 11th and 20th of November. Okay. We were cutting this really close. The morning of Friday the 19th of November was my latest possible chance if I was going to make the formal.
Then on the 11th of November, the text I had been waiting for arrived: and I was offered the choice of a Delivery appointment at either 10:00am, 1:00pm or 3:00pm on Monday the 22nd or Tuesday the 23rd of November. My youngest son had a school awards ceremony I would not miss which wrote off Monday almost entirely (not to mention an afternoon of meetings I couldn’t skip) leaving Tuesday morning as my sole option - so I booked 10am Tuesday as my pick up date.

My car had in fact, been on the ship Tokyo Car and was now landed in Australia. Hooray…of a sort because unfortunately…
It was over
So much for having that car for the formal. I reached out to Tesla, one last time, and left a message to which they texted back they would let me know if it could be delivered sooner but it was no use. They wouldn’t.
During the 11th week the finance finally cleared, funds cleared and on Friday that week as I was picking up my kids from school the call came in from the Tesla delivery center - we were good to go for Tuesday. I also received an Email and replied to that Email asking if Tesla could pick me up from the nearest train station but never got a response.
Why did I ask that?
I knew that on Tuesday morning at 10am, I had no convenient way of getting to the delivery center as my eldest daughter was away at schoolies all week, my wife was working, my mother no longer drives, my sister was working as were my friends in various locations, all too far away. So it was either public transport or a Taxi/Uber. Unfortunately for me I chose to live in the middle of nowhere, meaning the cheapest Uber would cost me $120 AUD one-way. The cheapest Taxi would be closer to $190 AUD. The Tesla home delivery option requires you to live over 250km from the nearest dealership so I didn’t qualify for that either. The closest a train got me was still a 45 minute walk and the bus connections to the trains were terrible. So it was going to be a combination of Train + Taxi in the end. Oh well…what can you do?
Pick-up Day…at LONG last
Tesla’s showroom in Brisbane is in the classy end of Fortitude Valley (yes, there is a classy end you Valley-haters…) near other dealerships like Porsche, Ferrari, Lamborghini and many others. Space is at a premium though and as such they will show you the cars at the showroom, you pick up test drives from there and they do have some limited servicing facilities, but their delivery center is far from the CBD of Brisbane.
It’s located in a somewhat run-down steel warehouse with a chipped concrete floor with a corrugated iron roof held up by exposed girders. A quintessential warehouse. The only way you know it’s a Tesla delivery center from the outside is a lone rectangular black sign partly obscured by trees along the roadside. The bigger issue was it was in Hendra and the nearest train station was a decent walk away.
 A Lone Sign lets you know it’s the Delivery Center
That morning it was raining and so I decided to suck it up, take the train as close as I could and then get a Taxi from there - I don’t like using Uber on principle. (That’s another story)

When I got to Northgate the rain had stopped and looking at the rain pattern on the radar I estimated I had about 60 minutes before the next wave of rain hit so I decided to save my Taxi money (about $45 from there) and walked to Hendra instead.

To be honest, it really was quite a pleasant walk in the end. (Maybe I was too excited about the destination to care at that point?)
I arrived 45 minutes before the scheduled time and apologised for being early. Lord Veda had highly recommended getting there early so I think that was good advice.
 In Front of the Delivery Center
I was greeted by a very pleasant ex-Apple employee who now worked for Tesla and said: “You must be John! Yours is the only Red one going out today and it’s lucky because I literally just finished setting up your car.” I’d already spotted it, as I figured out the number plate from the Qld Transport site the previous day by searching the VIN.
 Mine was the Red one in the far back right of this photo
Some photos, set up and giggling to myself later and I was off. Not before she insisted on taking a photo of me with the car and waving me off. As I was leaving it was 9:45am and still no other owners had shown up. I had quite literally…beaten the rush.
 United with my car at last!
I drove to Scarborough and my old favourite spot on Queens Beach where I once took photos of my car 20 years earlier and took some photos in about the same spot…then went home. Later in the day I picked up my kids from swimming and that’s pretty much it.
I finally had my dream EV.

The Minor Details
There are a few things I wasn’t 100% clear on until the delivery day. Firstly, you do get the UMC Gen-2 Mobile Charger with the two tails (10A and 15A) which is a single phase unit, delivering a maximum of 3.5kW. The Model 3 also came with cloth floor mats, and a 128GB USB Thumb Drive in the glovebox for sentry mode and other things. It did NOT come with a Mennekes Type 2 cable for connecting to BYO cable charging points which was disappointing and it didn’t come with a Tyre Repair kit. I was aware that Tesla’s don’t have a spare tyre so had pre-purchased a repair kit when I bought my HWPC.
In 2019 in Australia, all new Teslas came with a HPWC as well, but that was long since un-bundled. The car also comes with a free month of Premium Connectivity after which it’s $9.95 AUD/month, which I’ll be keeping after the free month ends.
My original sales assistant incorrectly informed me it didn’t come with car mats, so I ordered some. Now I needed to return them. Oh well. I’ll also need a Type 2 cable - there are too many of those chargers around to NOT have one of those in the boot, just in case.
Unicorns
Tesla are constantly tweaking their cars - from the motor to the battery to software and even the occasional luggage hook or seal. They don’t wait for model years most of the time and so it becomes an interesting lottery of sorts and they get themselves caught in knots a bit when they advertise something on the website but then they change it after you order it and it’s built to a different standard. In the Tesla fan-lingo they call those the “Unicorns”.
When I ordered mine the website stated: 508klm Range WLTP, 225kph Top Speed, 5.6s 0-100kph time. The current website however now says: 491klm Range WLTP, 225kph Top Speed, 6.1s 0-100kph time and to add more confusion the compliance sticker adds: 556klm Range.
What had happened is Tesla increased the size of the LFP battery pack mid-cycle from 55kWh to 60kWh (usable). At the same time Tesla changed the motor to one that was slightly less powerful, though it’s unclear why…it was likely due to either efficiency or cost reduction reasons. We may never know. The motor change though didn’t happen until late October which approximately coincided with the website specification change. This meant that there were three builds that had the more powerful motor but also had a larger battery.
The VIN ranges where this happened were those within my build range hence my vehicle is one of a few hundred Unicorn SR+ models. Lucky me?
Conclusion: Order to Delivery Day
The final time from Test Drive and Order to pick up was 11 weeks and 6 days, 8 days shy of three months. Others that received their cars a week before me, some had ordered in early October and only waited 6 weeks from order to pick-up. In one of those “there’s no way I could have known at the time” situations, I’d just ordered at the beginning of a build cycle for Q4 2021, I’d ordered a low-demand combination as well, so I had to wait the longest of almost everyone in my production batch of cars. Oh well…I have it now…so these three months can now be a fading memory…
My obsessing over a new car like this is something I’ve never done before. I’ve been trying to figure out why this was so different to my other experiences. Options include: I’m getting less patient and/or more entitled in my old age; The ordering process was more akin to ordering a tech product from Apple’s online store than any car purchase I’d ever experienced; or the information provided by the manufacturer was in fact worse, than having no information at all.
I honestly don’t think I’m getting less patient with age…more entitled though? Maybe. I think the difference is the contrast with a traditional car purchase. Traditionally sales people from Toyota, Mitsubishi, Honda and Subaru, were well versed with delivery times, standard delays and set realistic expectations up front or at least they certainly presented the situation more honestly than Tesla did.
Tesla appeared to be up-front in their estimates via their website, but it was fundamentally misleading and their sales people were generally unhelpful. Perhaps it was because the Tesla inventory system was not optimised to provide accurate information by specific build sub-types, production batches and such, to enable sales staff and customers to set realistic expectations. Either way it was exceedingly frustrating and had Tesla indicated up front I mightn’t have the car until late November, I would have made other arrangements for my daughters formal and let it be.
Conclusion: Delivery Day
The delivery experience was, quite frankly, the worst of any car purchase I’ve ever had in most respects…but it’s a subtle thing.
I’ve spoken with other owners that had a basic 10 minute run-down of pairing their phone and being shown the basics and shoved “out the door” so to speak. For me, I’d arrived early and they were busy getting everything ready for everyone else, so that’s on me, but if not for that it would have been 10 minutes, got it, great, now out you get, on to the next customer.
Also, when you put down a significant amount of money for your dream car and you show up to a dodgy-looking warehouse that’s hard to get to and treated a bit like a number, dealing with four different people from start to finish, it feels unprofessional and you feel like you don’t matter very much - you’re an imposition not a customer.
Tesla have a LOT to learn from existing car purchasing experiences from pretty much every other manufacturer.
 There’s some nice Electric Vehicles in this bunch of warehouses…seriously!
 The front door is down a dodgy laneway and isn’t signed anywhere
I’ve bought Honda, Subaru, Toyota and Mitsubishi between multiple countries and having a common point of contact from start to finish was consistent throughout. They all spent significant time with me or my wife walking us through every feature of the vehicle and were all in nicely presented showrooms when we picked them up. And yes, they even had a tacky red bow on the bonnet, because, why not? It’s not every day you buy a car. So why shouldn’t you make that a special experience for the buyer?
Maybe the problem is the model of existing dealers and the profit they need to make over the car’s actual price, requiring more salespeople, service departments and larger parcels of real-estate to house it all. If you are to believe the Tesla approach of being leaner, minimal up-sells, less salespeople and smaller showrooms, well then I should be getting more car for my dollar. Maybe I am? It’s hard to be sure. Or maybe it’s that Tesla have pushed their own leaner sales-model too far and the best experience lays somewhere in-between.
Tesla are finally making a lot of money after nearly going bankrupt in 2018. Maybe Tesla should reinvest some of that into customer service.
Conclusion: Lord Veda’s Patreon
I witnessed VedaPrimes Patreon start at $170 AUD/month and then rocket to $1,700 AUD/month over the two months I was a Patron. Unlike TEN though, once people have their cars they tend to drop off, so it varies significantly from month to month. In the end he was unable to find my VIN at any stage in the process. My car was transported on a smaller carrier and slipped past his radar. Either way though the value for me wasn’t the VIN tracking - it was the Discord.
In the Discord I met a lot of people that were hopefuls like me. We shared our frustrations, our knowledge of charging, 3rd party apps, tips and tricks and of course, talked about Charlie the Unicorn in relation to naming our new cars…when they actually arrived. It was a blast actually and without people sharing the hundreds of tidbits of information, from different Tesla salespeople, known VINs and such, I suspect Veda wouldn’t be able to paint as meaningful a picture for the broader group. In essence, the groups collective knowledge is a huge part of the VedaPrime services’ value.
That said I now have to bow out of the group at this point and am grateful for the friendships and discussions we had during our long wait for our vehicles to arrive.
Final Thoughts
My advice for anyone buying a Tesla:
- Don’t trust the website about delivery times
- Don’t believe a word the salespeople tell you about when it’s arriving until you’ve had a booking text message
- Teach yourself how to use the car through the videos because Tesla don’t want to spend their time teaching you on delivery day.
Despite these things, there’s one thing Tesla have going for them that might make you forgive all of that.
They make some of the best cars in the world.
And I love mine already.
Afterword
This post was written as I went and has taken three months to finish. I know it’s a bit long, but it captures all the threads I pulled, all the investigations I did as well as the final result. If nothing else it’s a point of reference for anyone interested in what ordering a Model 3 in Australia was like in 2021.
My daughter went to the formal in a Mitsubishi Eclipse Cross Aspire PHEV. It was also Red. She was happy with that and returned safely from Schoolies having had a great time.
I did NOT call my Tesla “Charlie”. Sorry Discord gang. I just couldn’t…
Upgrading the Mac Pro SSD
I’ve been enjoying my 2013 Mac Pro immensly and wrote about it here five months ago, with the thought that someday:
"…I can upgrade the SSD with a Sintech adaptor and a 2TB NVMe stick for $340 AUD…"
Last week I did exactly that. Using the amazing SuperDuper! I cloned my existing Apple SSD (SM0256F) 256GB SSD to a spare 500GB USB 3.0 external SSD I had left over from my recent Raspiblitz SSD upgrade. With that done I acquired a Crucial P1 M.2 2280 NVMe SSD for a good price from UMart for $269 with $28 for the Sintech Adaptor for a total upgrade cost of $297 AUD.
Shutting down and powering off, unlocking the cover and lifting it off reveals the SSD waiting to be upgraded:
Then using a Torx T8 bit, remove the holding screw at the top of the SSD and pulling the SSD ever to slightly towards you then wriggle it side to side, holding it at the top and the SSD should come away. Be warned: the Heatsink makes it heavier than you think, so don’t drop it! The Mac Pro now appears very bare down there:
Next we take the Sintech adaptor and gently slide that into the Apple Custom SSD socket, converting the socket to a standard M.2 NVMe slot. Make sure you push it down until it’s fully inserted - the hole should be clearly visible in the top notch. It should fit perfectly flush with that holding screw.
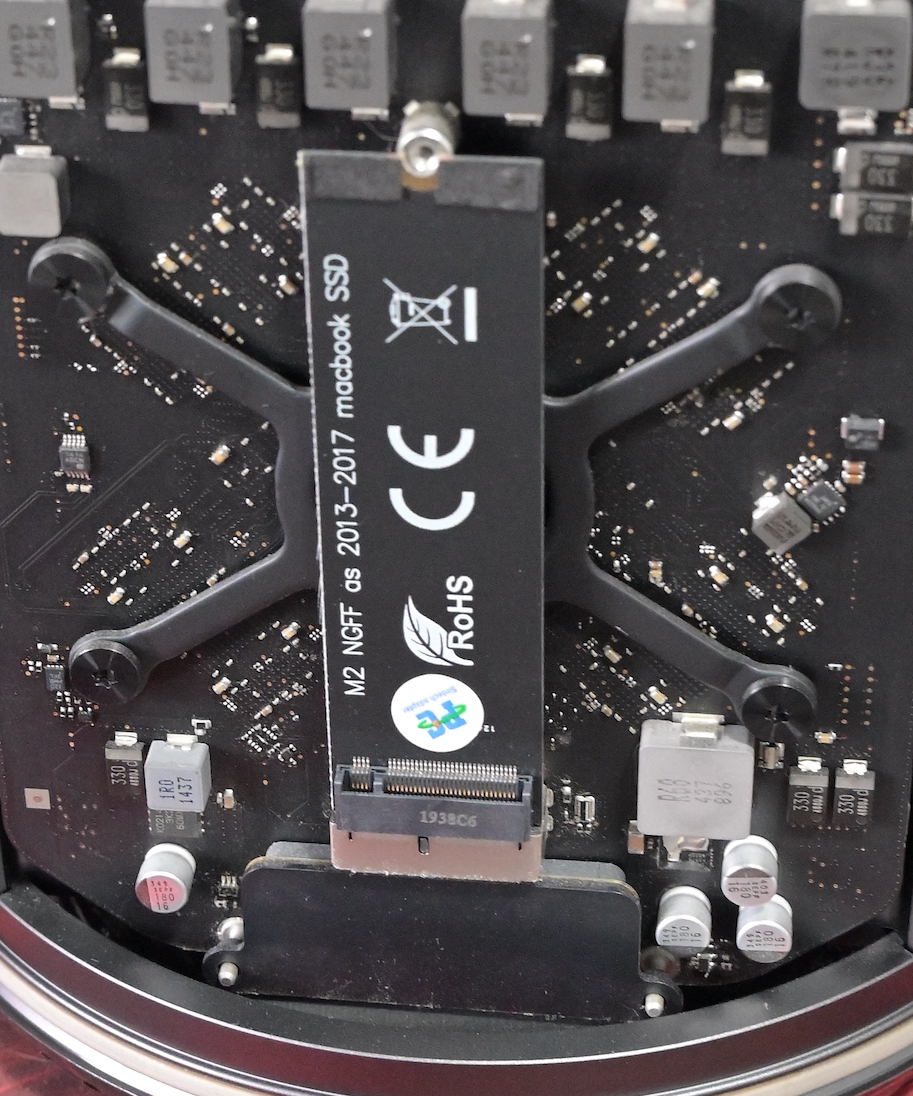
The M.2 NVMe then slots into the Sintech adaptor but it sticks out at an odd angle you can see below. This is normal:
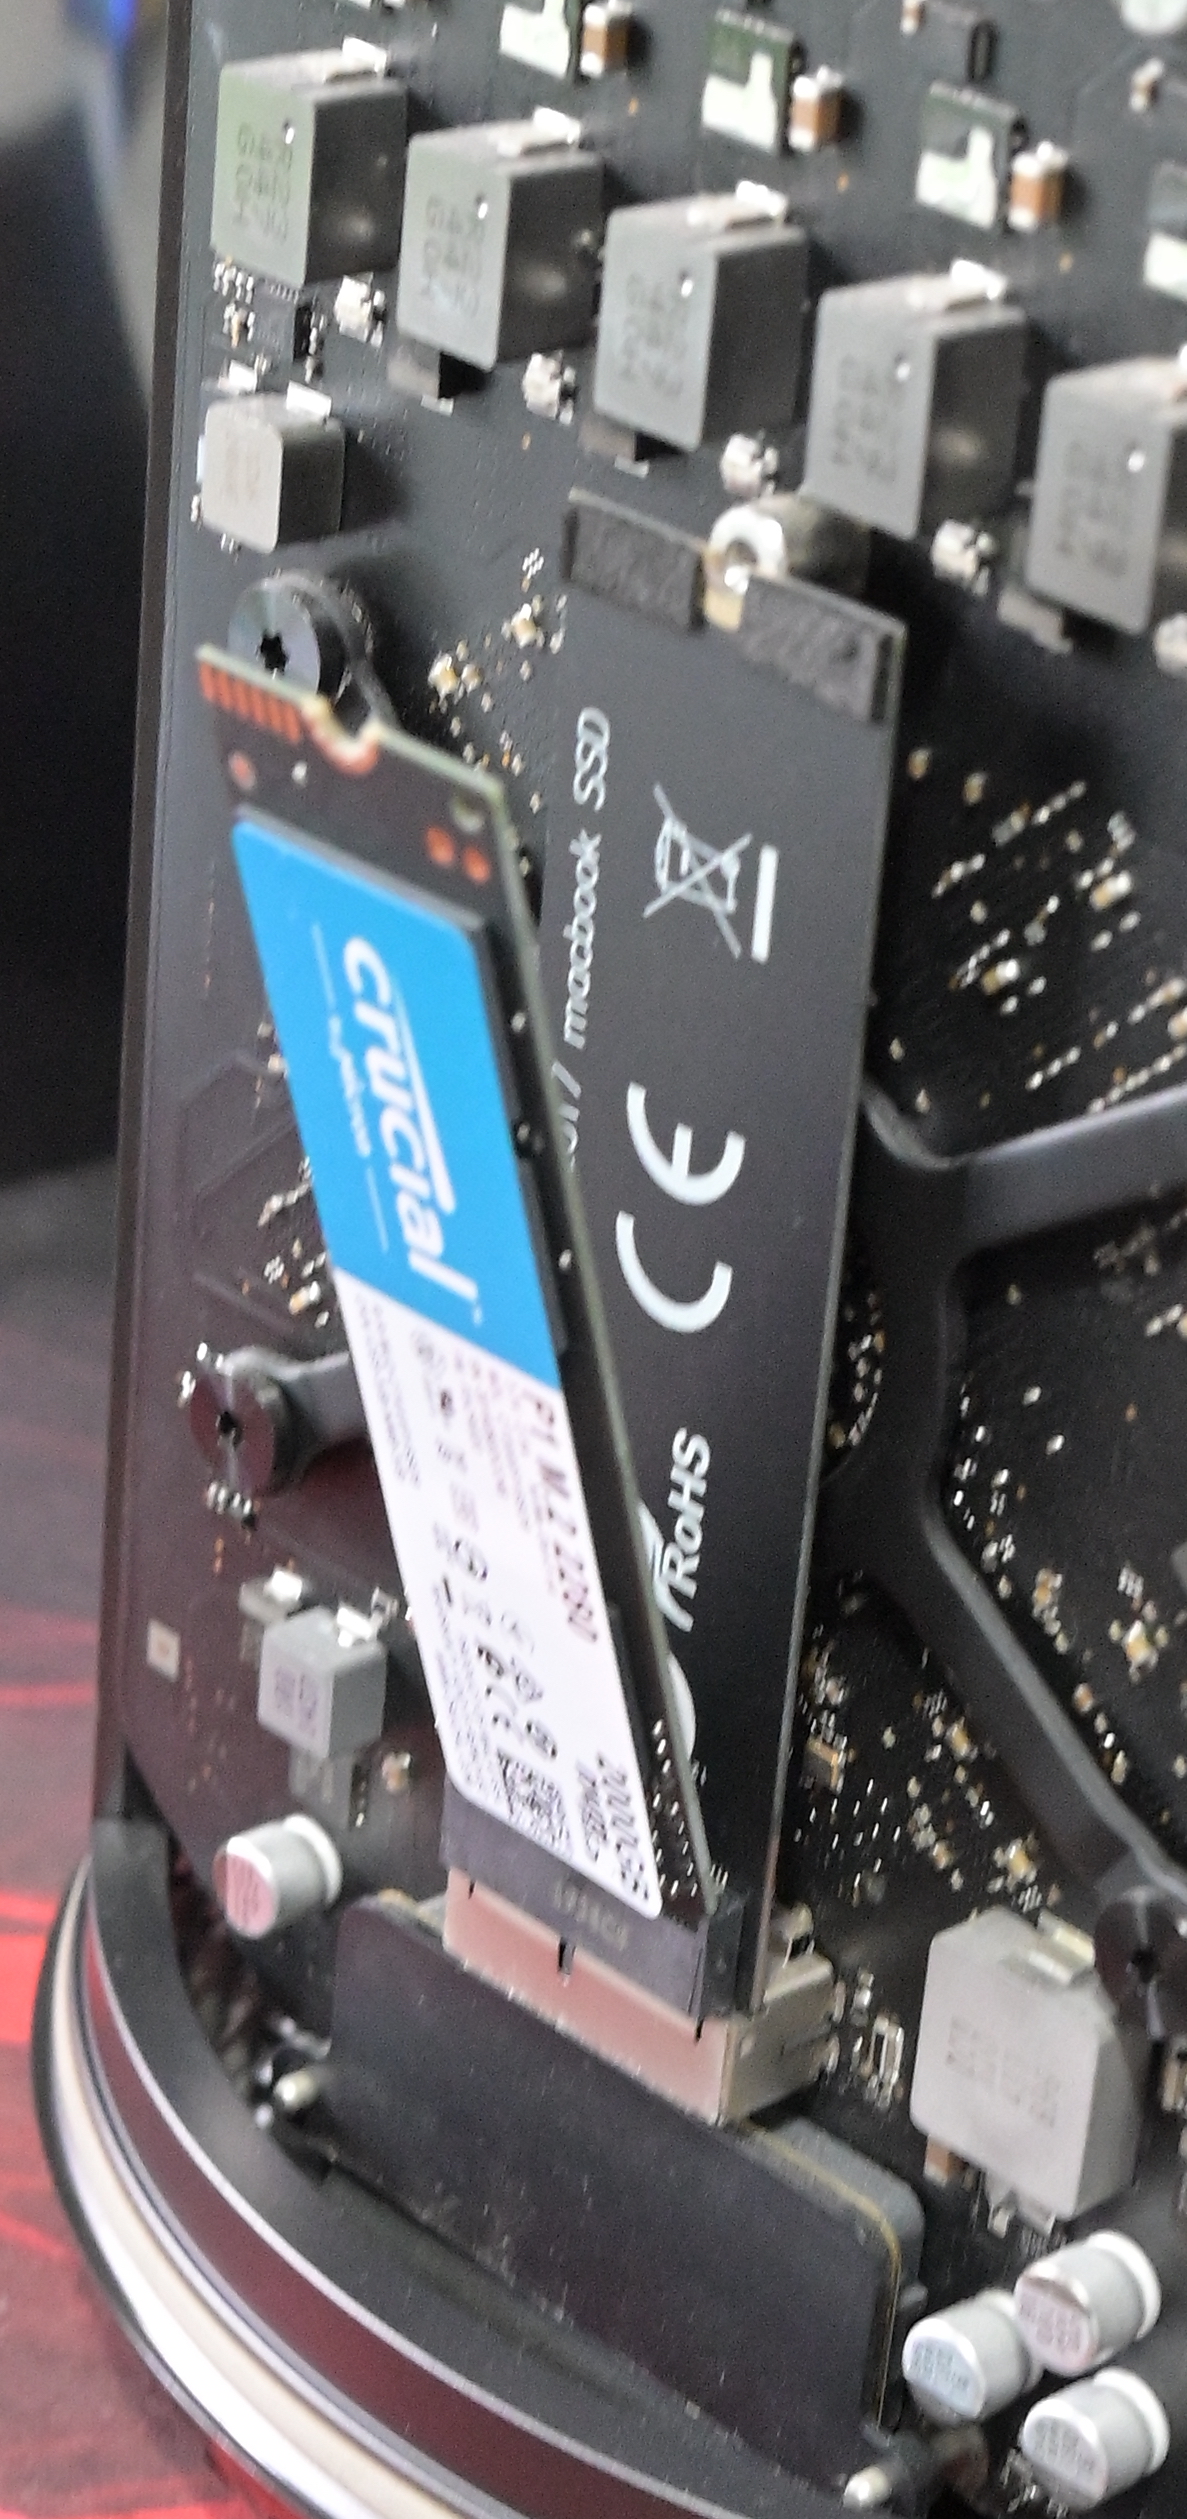
Finally we re-secure the 2TB SSD and Sintech adaptor with the Torx screw and we’re fitted ready to replace the lid.

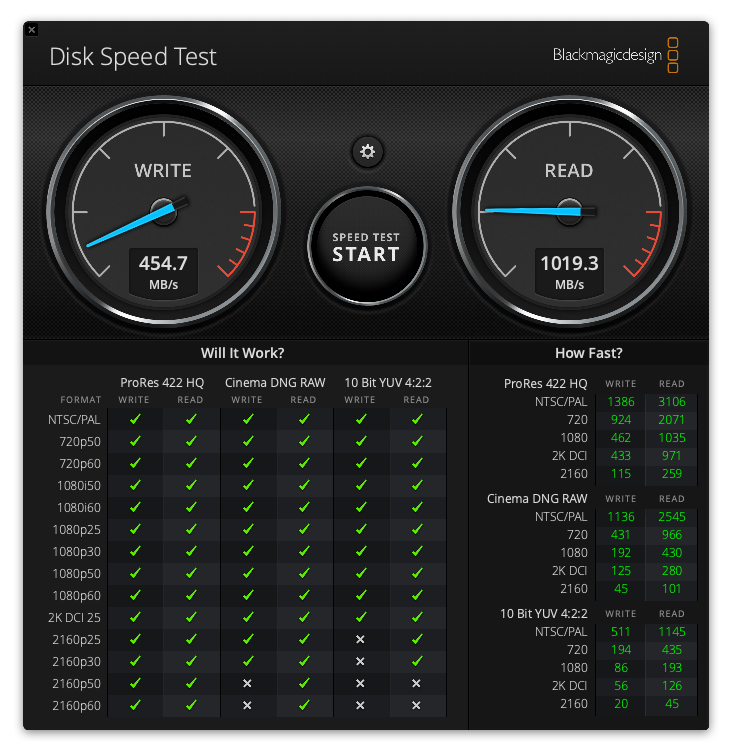
Once we’ve booted back up again I booted to my SuperDuper clone (holding the Option key on boot), then did a fresh install of Monterey. With some basic apps loaded it was time to test, and the results are striking to say the least - beyond the fact I now have 2TB of SSD but the speeds:
| Drive Size | Read Speed | Write Speed |
|---|---|---|
| 256GB | 1,019 | 454 |
| 2TB | 1,317 | 1,186 |
| Diff | +1.3x | +2.6x |
Original SSD
New SSD
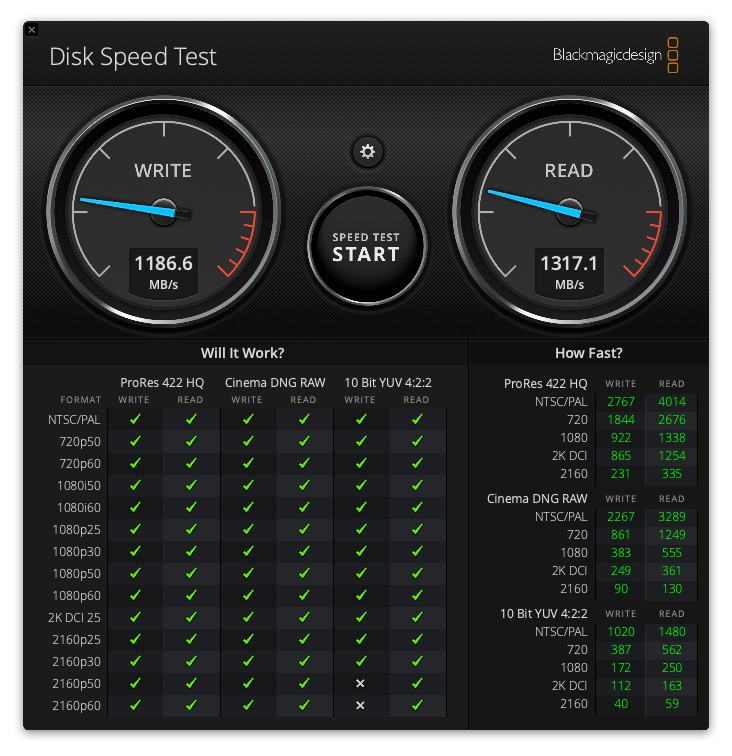
You do notice the improvement in performance in day to day tasks although I think when I retested this compared to five months ago, my 5GB file test was up against about 20GB of spare space on the 256GB SSD at that time, which impacted the write testing as it worked around available blocks on the drive.
A final note about the SSD regarding the heatsink. The Apple SSD heatsink is heavily bonded to the drive and is extremely difficult to remove. There’s no question that the SSD would benefit from fitting a heatsink to it, however the amount of heat dissipation in the NVMe drive relative to the GPUs and CPU is small in comparison. In my testing I couldn’t see a significant temperature change under heavy load, with it rising less than 10 degrees Celcius from Idle to maximum.
In summary it’s an upgrade I’ve long wanted to do as I was getting sick of swapping out larger files to the NAS and a USB drive. Now I have lots of high speed access storage space for editing photos and videos. Now…how’s my memory pressure going…